Overview
Velixo’s Writeback functionality enables you to send data from Excel back into your ERP. Writeback works with any ERP data modifiable via API that you have permissions to access. The functionality is based on custom Velixo NX functions.
Typical use cases for Writeback include:
-
Uploading GL journal entries, such as allocations or accruals.
-
Creating or revising budgets directly from Excel.
-
Updating project forecasts or estimates.
-
Performing bulk updates.
Below you will find information about Writeback functions, the feature’s requirements, and where to find detailed instructions.
The most common user scenarios involving Writeback are:
-
Constructing a new, bespoke writeback sheet (for example, to be used as a template) using the functions listed below.
-
Using the highly-modifiable pre-built Writeback templates, accessible from the Velixo NX menu → New Sheet button, or Writeback templates available in the Velixo Template Gallery.
Earlier Velixo versions included Writeback templates that did not contain formulas. While we replaced such templates with formula-based ones for easier customization, both types of templates are continuously supported by Velixo NX.
Writeback functions
-
WRITEBACKREFRESHDATA – used to force cache refresh.
-
WRITEBACKCOMMIT – Used to divide Writeback into batches (see details below).
Prerequisites and setup
To use Writeback with Acumatica:
-
Acumatica 2024 R1 or newer requires the Velixo Customization Package to be published for each tenant to enable Velixo user roles:
-
Velixo Core – required for Universal Writeback and Generic Inquiries.
-
Velixo GL – required for financial writebacks.
-
Velixo PM – required for project writebacks.
-
-
To perform writeback for particular screens, appropriate roles need to be assigned to the user. For a detailed overview of permissions for each role, refer to the Velixo Customization Package article.
-
Ensure that target Import Scenarios exist and are active in Acumatica.
-
When a user has access to a given screen in Acumatica, they can perform Writeback for this screen.
Performing writeback
Using pre-built templates
-
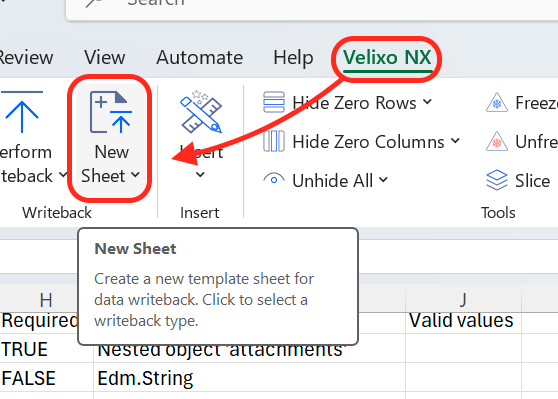
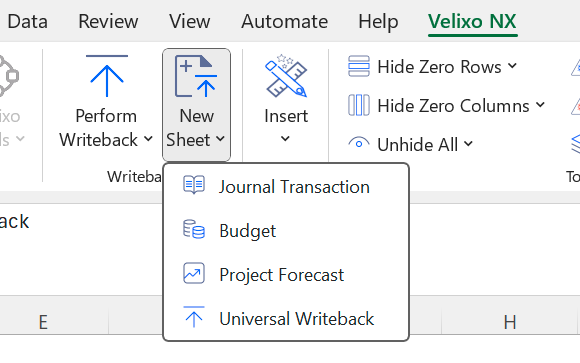
Click New Sheet in the Writeback section of the Velixo NX Excel menu and select the desired writeback template type.
OR
Open a Writeback template downloaded from the Velixo Template Gallery.
-
Configure the Settings lines in the template and fill in the lines to be updated in the ERP. For details, refer to the following articles: Budget Writeback, Journal Writeback, Project Forecast Writeback, Universal Writeback.
-
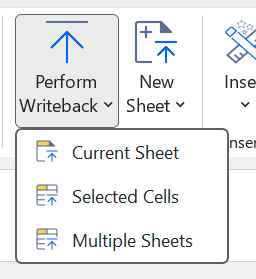
With your data prepared, click Perform Writeback and select the desired writeback mode:
-
Current Sheet – uploads all lines in the currently active worksheet, including hidden rows.
-
Selected Cells – only uploads data from cells that are selected, hidden rows excluded.
-
Multiple Sheets – you can tick the worksheets you want to write back in the side panel; they are then processed one by one in a single operation, hidden rows are included.
-
-
One of three statuses will be returned during Writeback in the Status column of the template sheet (in place of your Writeback formula):
-
Pending – upload in progress,
-
Line uploaded – upload successful,
-
Error – an error occurred during the processing of the formula.
-
Data upload is always explicit: no data is transmitted until you click Perform Writeback in the Velixo NX Excel menu.
Creating or customizing Writeback sheets
-
Construct your formulas according to the individual help articles listed in the Writeback functions above, or modify formulas in pre-built templates to match your needs.
-
Continue from point 3. in Using pre-built templates above.
Considerations for processing order and creating Writeback batches
Header and lines writeback (parent-children records)
For all Writeback worksheets that contain both header and line data (for instance, journal Writeback), make sure all of the header and line data is processed within one selection, with parents preceding the children.
Writeback with multiple selections
When using the Selected Cells Writeback method with several areas of a worksheet selected, the processing order depends on two factors:
-
the cell address of the top-left corner of the selection,
-
and the chosen Writeback processing order in the Velixo NX Options menu.

Writing back lines that depend on previous lines
In scenarios where you are writing to an object whose values are dependent on the input of a preceding line, you ensure the correct processing order using one of two methods:
-
Perform each Writeback as a separate cell selection.
-
Create a row or column (depending on the processing order) containing the WRITEBACKCOMMIT function in between the co-dependent Writeback lines to make sure they are processed sequentially.
