
Overview
If you want to write a GL batch to your ERP, you can use the WRITEBACKJOURNAL function. You need to write a separate writeback function for each journal entry in the GL batch. When you select the scope of the Perform Writeback action on the ribbon, all writeback functions in this scope (Current Sheet or Selected Cells) will be grouped in GL batches and written to the ERP. For how rows are grouped into batches, see Batch grouping below.
Related articles
-
Getting started with Writeback - A general article on setting up and using writeback functions.
Syntax
=WRITEBACKJOURNAL(
    ConnectionName,
    TransactionDate,
    PostPeriod,
    Description,
    Branch,
    Ledger,
    Currency,
    AutoReversing,
    LastBatchNbr,
    OpenAfterWriteback,
    AutomaticallyRelease,
    CreateTaxTransactions,
    SkipTaxAmountValidation,
    Account,
    Subaccount,
    Project,
    Task,
    CostCode,
    Quantity,
    ReferenceNumber,
    UoM,
    Debit,
    Credit,
    TaxID,
    TaxCategory,
    TransactionDescription,
    NonBillable,
    LineCustomFields,
    LineBranch,
    HeaderCustomFields
)
Arguments
The arguments of the WRITEBACKJOURNAL function can be divided into two groups:
-
The arguments of the GL batch header
-
The arguments of the journal entry (GL batch line).
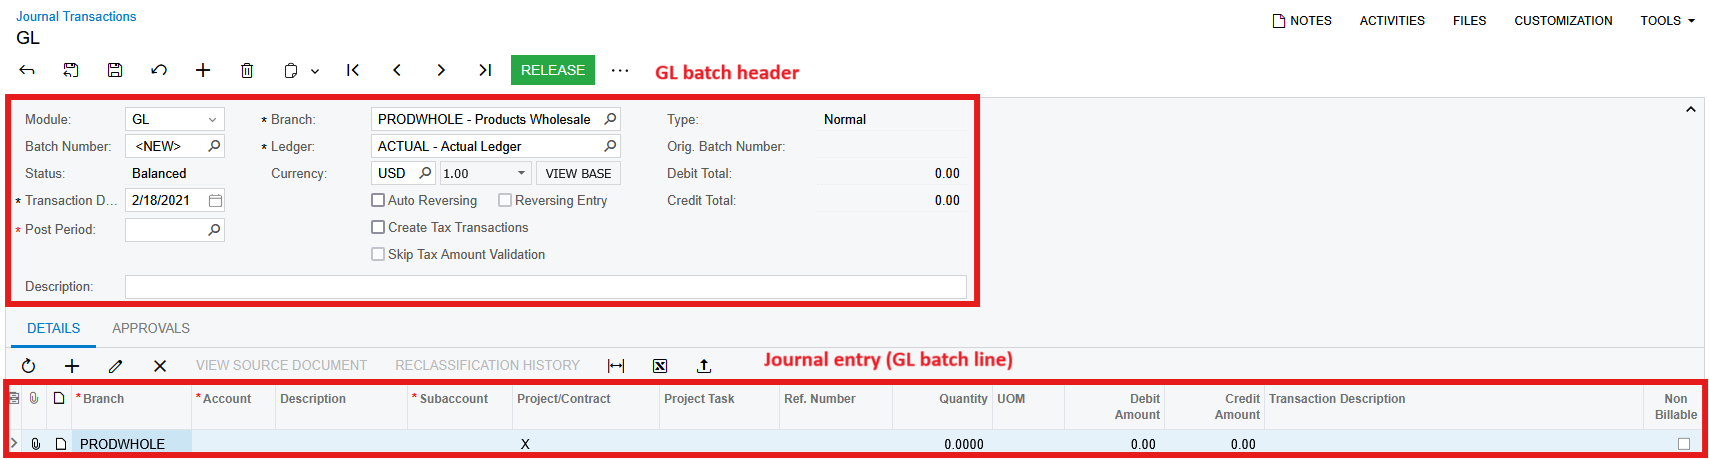
The arguments of the GL batch header should be the same for all journal entries you will add to the batch.
Header-level arguments
|
Argument |
Required/Optional |
Description |
|---|---|---|
|
|
Required |
The name of the connection, as specified in the Connection Manager. This function does not support the multiple connection functionality. |
|
|
Required |
The date when the GL batch was created.
|
|
|
Required |
The financial period to which the journal entries should be posted. All journal entries from a GL batch are posted to the same financial period. |
|
|
Required |
A description of the GL batch. |
|
|
Required |
The branch to which this GL batch is related. It may differ from the branches in the journal entries. |
|
|
Required |
The identifier of the ledger to which the journal entries are posted. |
|
|
Required |
The currency used for all the journal entries in the selected GL batch. |
|
|
Required |
If selected, the general ledger automatically creates a batch that reverses the original debit and credit transactions in the next financial period. A reversed batch will be created when the original batch is released or posted, depending on the Generate Reversing Entries option selected on the General Ledger Preferences (GL102000) form. |
|
|
Optional |
The sequential batch number. If the batch with the |
|
|
Required |
When the entire batch is processed, open it in Acumatica. |
|
|
Required |
Automatically release the new GL batch. |
|
|
Required |
If |
|
|
Required |
If |
For the HeaderCustomFields argument, see the Header custom fields subsection below.
Line-level arguments
|
Argument |
Required/Optional |
Description |
|---|---|---|
|
|
Required |
The account whose balance is updated by the journal entry. |
|
|
Required |
The subaccount used with the account to detail the journal entry. |
|
|
Optional |
The project or contract with which this journal entry is associated. |
|
|
Optional |
The particular task of the project with which this batch is associated. |
|
|
Optional |
The cost code with which this batch is associated to track project costs and revenue. |
|
|
Optional |
The quantity of items associated with the transaction, if relevant. |
|
|
Optional |
The reference number of the external or internal document associated with the journal transaction. The documents’ reference numbers must be specified for tax-related transactions. These numbers are required because tax and taxable amounts are reflected in the tax reports only if the transactions are linked to the corresponding documents. |
|
|
Optional |
The unit of measure for items associated with the transaction, if relevant. |
|
|
Optional |
The debit amount of the journal entry. You should specify either |
|
|
Optional |
The credit amount of the journal entry. You should specify either |
|
|
Optional |
Transactions |
|
|
Optional |
The tax category based on which the taxable amount is calculated. It can be specified only if |
|
|
Optional |
A description of the transaction or any comments relevant to the transaction. |
|
|
Optional |
If |
|
|
Optional |
A two-column Excel range where the first column contains line-level custom field names and the second column contains the respective values. The values are written to the journal entry (GL batch line). See Custom fields below. |
|
|
Optional |
The branch associated with the specific line. If not specified, the batch |
Header custom fields
|
|
Optional |
A two-column Excel range where the first column contains header-level custom field names and the second column contains the respective values. The values are written to the GL batch header. Rows that are identical in every other header argument but differ in their header custom fields are written back as separate GL batches. See Custom fields below. While this is a header-line argument, it has been added at the end of the list for backward compatibility with existing formulas. |
Output
The function returns its status, which can be one of the following:
-
Pending - the formula is pending to be processed.
-
Line Uploaded - the formula was processed successfully.
-
Error - an error occurred during the processing of the formula.
Custom fields
WRITEBACKJOURNAL writes custom fields at two levels, each with its own argument:
-
LineCustomFields- custom fields defined on the journal entry (GL batch line). -
HeaderCustomFields- custom fields defined on the GL batch header.
Both arguments accept a two-column Excel range: custom field names in the first column and the respective values in the second column.
Building the two-column range
To pass static values, use an inline array:
={"UsrTestField","Alpha";"UsrTestDecimal",12}
To reference cells, or to combine several name-value pairs, use the VX.SETTINGS function. It accepts name-value pairs and builds the two-column range:
=VX.SETTINGS("UsrTestCustomField", $N$4)
=VX.SETTINGS($M$4, $N$4, $M$5, $N$5)
You can use VX.SETTINGS directly inside the WRITEBACKJOURNAL formula or in a helper cell that the formula references.
Header-level custom fields must be passed via HeaderCustomFields. Passing a header-level field name via LineCustomFields fails with the error An internal server error occurred: The column '...' is not found in the data set. The GL batch is still created, without the custom field values. Check the Journal Transactions (GL301000) form for the partially written batch before retrying the writeback, to avoid creating duplicate batches.
Date-type custom fields
You can pass the value of a Date-type custom field as an Excel date value or as text in ISO format with a leading apostrophe, for example '2026-08-20. This applies to both LineCustomFields and HeaderCustomFields.
If a value can't be read as a date, Velixo sends it to Acumatica unchanged, and the writeback fails with the error returned by Acumatica.
Batch grouping
When you run Perform Writeback, Velixo groups WRITEBACKJOURNAL rows into GL batches by their header argument values: ConnectionName, TransactionDate, PostPeriod, Description, Branch, Ledger, LastBatchNbr, and HeaderCustomFields. Rows that match on all of these values are written back as one GL batch. Rows that differ in any of them, including the header custom field names or values, are written back as separate GL batches.
The order of the name-value pairs inside the HeaderCustomFields range does not matter: rows with identical pairs listed in a different order still belong to the same batch.
Rows that omit HeaderCustomFields are grouped separately from rows that pass it, even when all other header arguments match.
For a Date-type header custom field, rows that pass the same date belong to the same GL batch, whether the date is entered as an Excel date value or as ISO text.
Examples
Writing back a table of journal entries
If you insert the pre-built journal writeback sheet (Velixo NX → New Sheet → Journal Transaction), the workbook will look as follows:
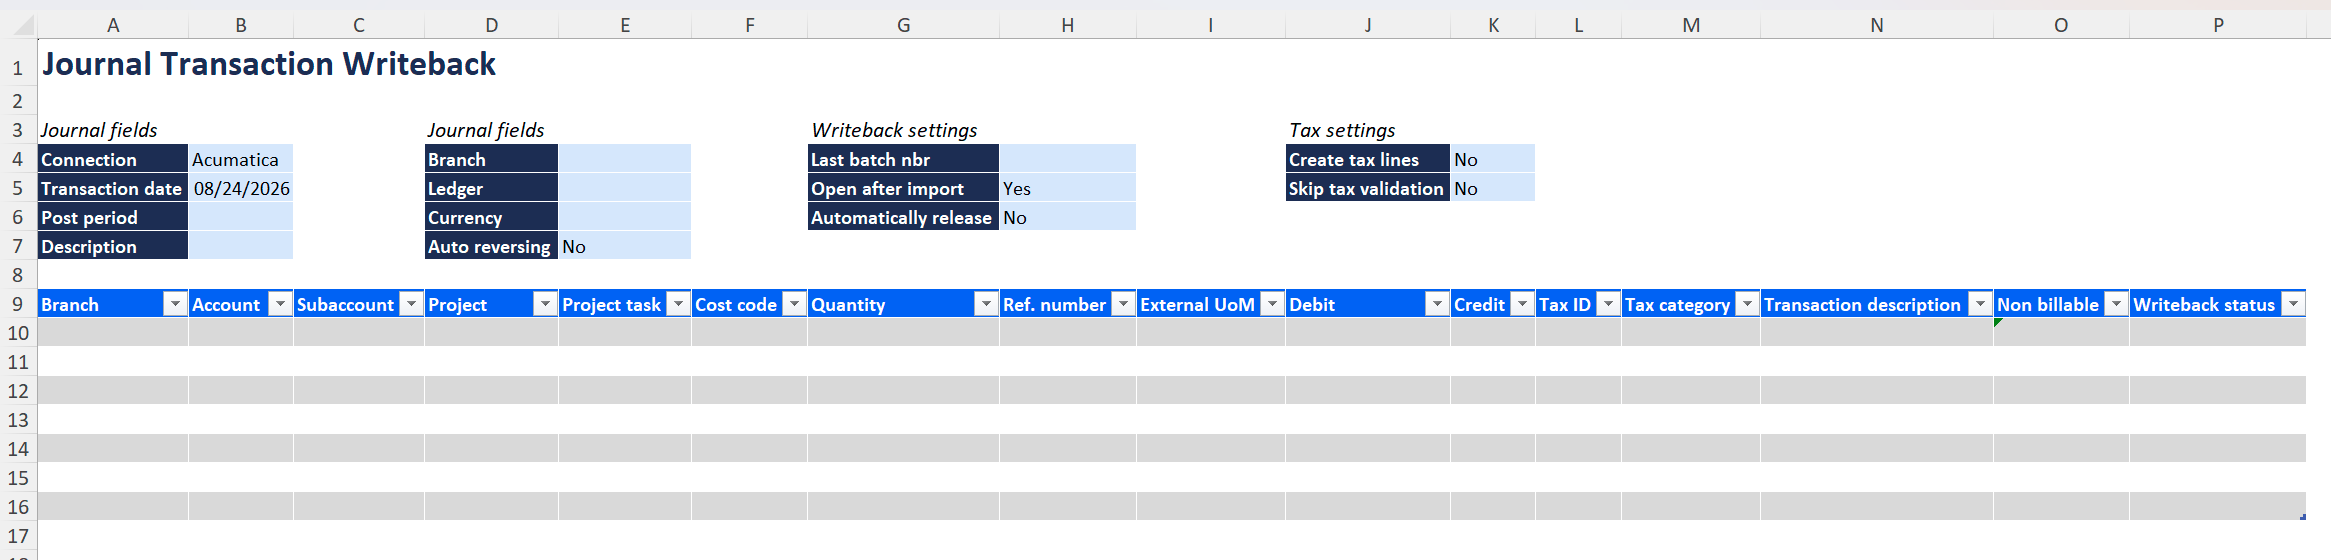
The Writeback status column of the pre-built sheet already contains the WRITEBACKJOURNAL formula:
=IF(B10<>"", WRITEBACKJOURNAL(
    $B$4, $B$5, $B$6, $B$7,
    $E$4, $E$5, $E$6, $E$7,
    $H$4, $H$5, $H$6,
    $K$4, $K$5,
    B10, C10, D10, E10, F10, G10, H10, I10, J10, K10, L10, M10, N10, O10,
    ,
    A10
), "")
The IF wrapper skips rows where the Account column is empty. The line arguments reference the cells of the table row, LineCustomFields is left empty, and the row's branch is passed as the LineBranch argument.
Now you can fill in your data and Perform Writeback to pass the data to the ERP.
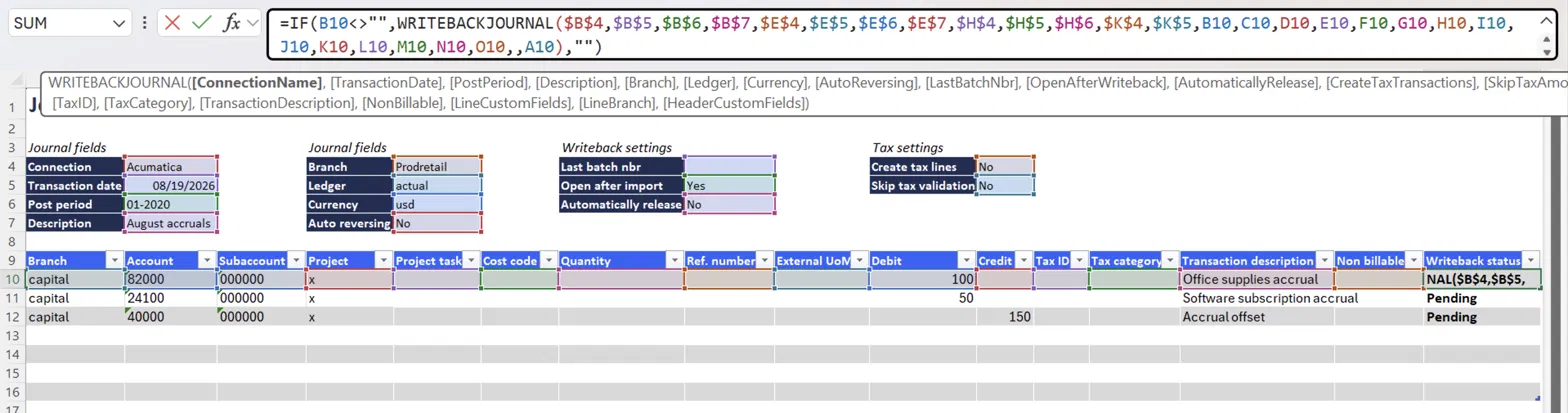
Writing line-level and header-level custom fields together
In this example, the pre-built sheet is extended with a UsrTestField column (column Q) holding line-level custom field values, and cells M4 and N4 contain a header-level custom field name and value.
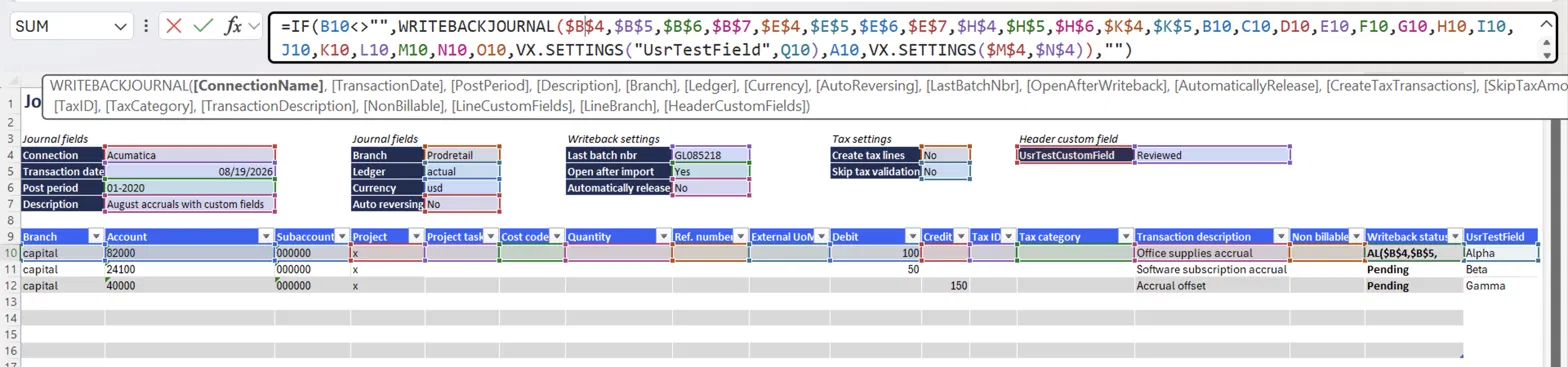
=IF(B10<>"", WRITEBACKJOURNAL(
    $B$4, $B$5, $B$6, $B$7,
    $E$4, $E$5, $E$6, $E$7,
    $H$4, $H$5, $H$6,
    $K$4, $K$5,
    B10, C10, D10, E10, F10, G10, H10, I10, J10, K10, L10, M10, N10, O10,
    VX.SETTINGS("UsrTestField", Q10),
    A10,
    VX.SETTINGS($M$4, $N$4)
), "")
Description: The formula writes the value of each row's UsrTestField column to the corresponding journal entry, and the header custom field name and value from cells M4 and N4 to the GL batch header. Header-level values appear only on the batch header, and line-level values appear only on the lines.
Rows with different header custom fields produce separate batches
If the rows in scope are identical in every other header argument but reference different HeaderCustomFields values, Perform Writeback creates a separate GL batch for each distinct set of header custom fields. In this example, rows 10 and 11 reference the value in cells M4 and N4, while rows 12 and 13 reference the value in cells M5 and N5:
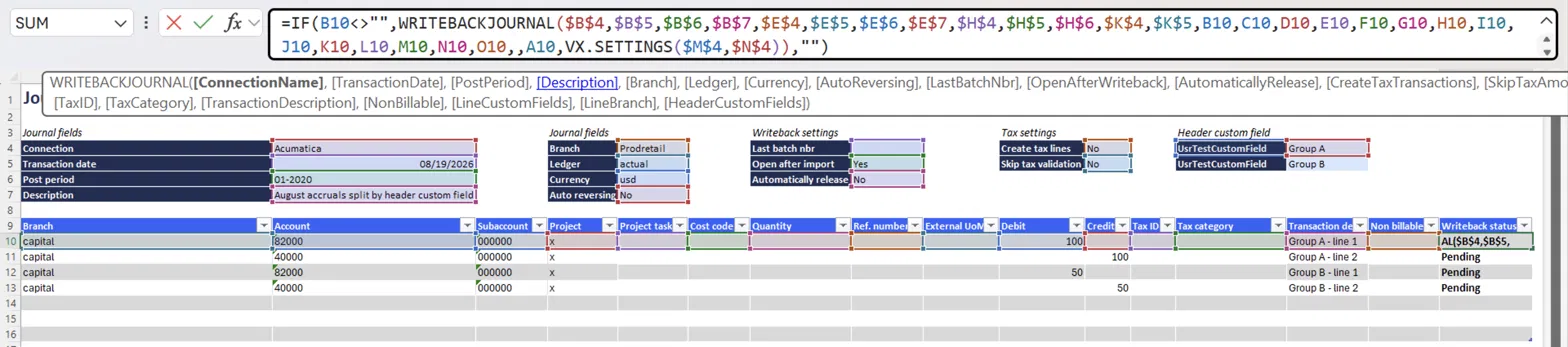
=IF(B10<>"", WRITEBACKJOURNAL(
    $B$4, $B$5, $B$6, $B$7,
    $E$4, $E$5, $E$6, $E$7,
    $H$4, $H$5, $H$6,
    $K$4, $K$5,
    B10, C10, D10, E10, F10, G10, H10, I10, J10, K10, L10, M10, N10, O10,
    ,
    A10,
    VX.SETTINGS($M$4, $N$4)
), "")
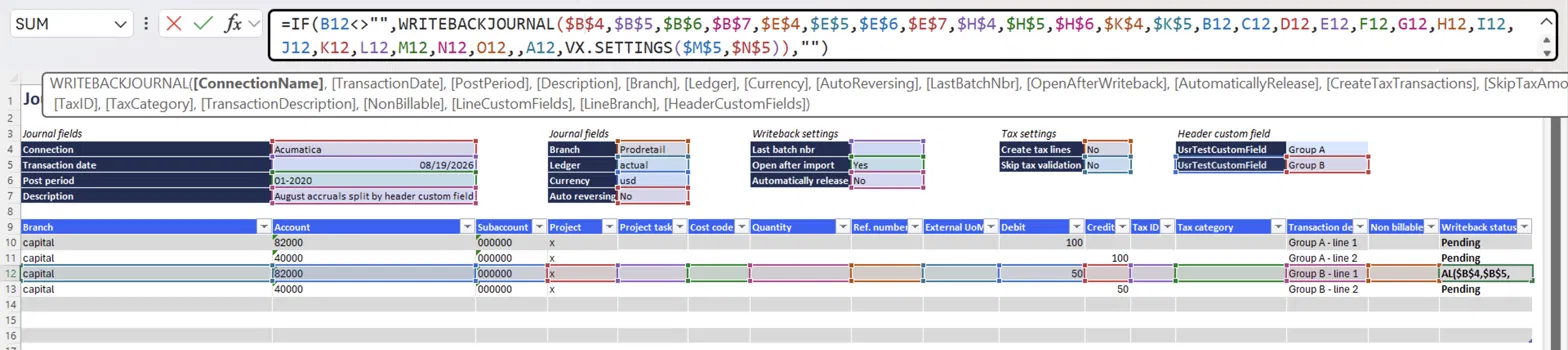
=IF(B12<>"", WRITEBACKJOURNAL(
    $B$4, $B$5, $B$6, $B$7,
    $E$4, $E$5, $E$6, $E$7,
    $H$4, $H$5, $H$6,
    $K$4, $K$5,
    B12, C12, D12, E12, F12, G12, H12, I12, J12, K12, L12, M12, N12, O12,
    ,
    A12,
    VX.SETTINGS($M$5, $N$5)
), "")
One writeback run creates two GL batches, each with its own header custom field value.