Velixo NX is our modern, cross-platform product that supports multiple ERP systems and is constantly updated with new features.
If you’re looking for our legacy, Windows-only offering, Velixo Classic, click here.
You can also learn more about the differences between Velixo NX and Velixo Classic.
Installation
Installing Velixo NX is a self-service process that typically takes just a few minutes.
Self-installation by end users
If your organization allows individual acquisition of Office add-ins, which is the recommended way, you can use one of the three methods outlined below:
-
The quick installation link
-
Installing the add-in from the Microsoft Store
-
Installing the add-in by opening a file that uses Velixo NX formulas
If your organization’s security policies do not permit individual users to install Office add-ins independently, Velixo NX must be centrally deployed by your administrator.
Quick installation link
Click the “Install Velixo NX” link below, allow your browser to open the link in Microsoft Excel, and follow the installation guide that opens.
Alternatively, follow the Microsoft Store Add-in installation guide below.
Installing the add-in from the Microsoft Store
-
Open Excel and create a new blank worksheet
-
As with any add-in based on Excel's new extensibility features, installing Velixo NX typically requires each user to have access to the Microsoft Store*
-
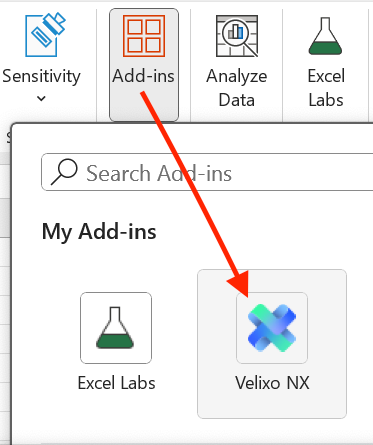
Depending on your edition of Excel, click one of the following Add-in buttons:
|
Excel edition |
Add-ins button |
|---|---|
|
Excel for Windows
|
Navigate to the Home tab, then click Add-ins 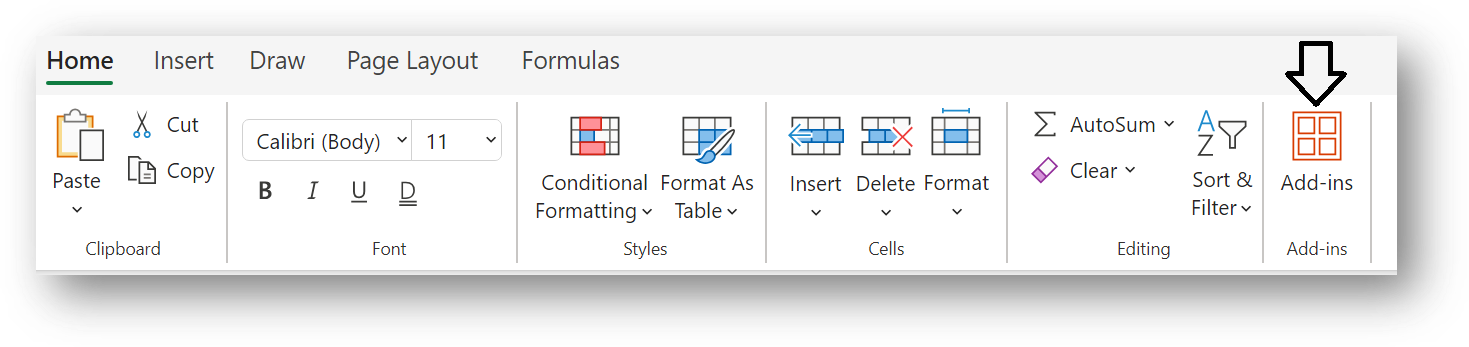
|
|
Excel for Mac |
Navigate to the Home tab, then click Add-ins 
or in earlier versions of Excel 365 for Mac, navigate to the Insert tab, then click Store 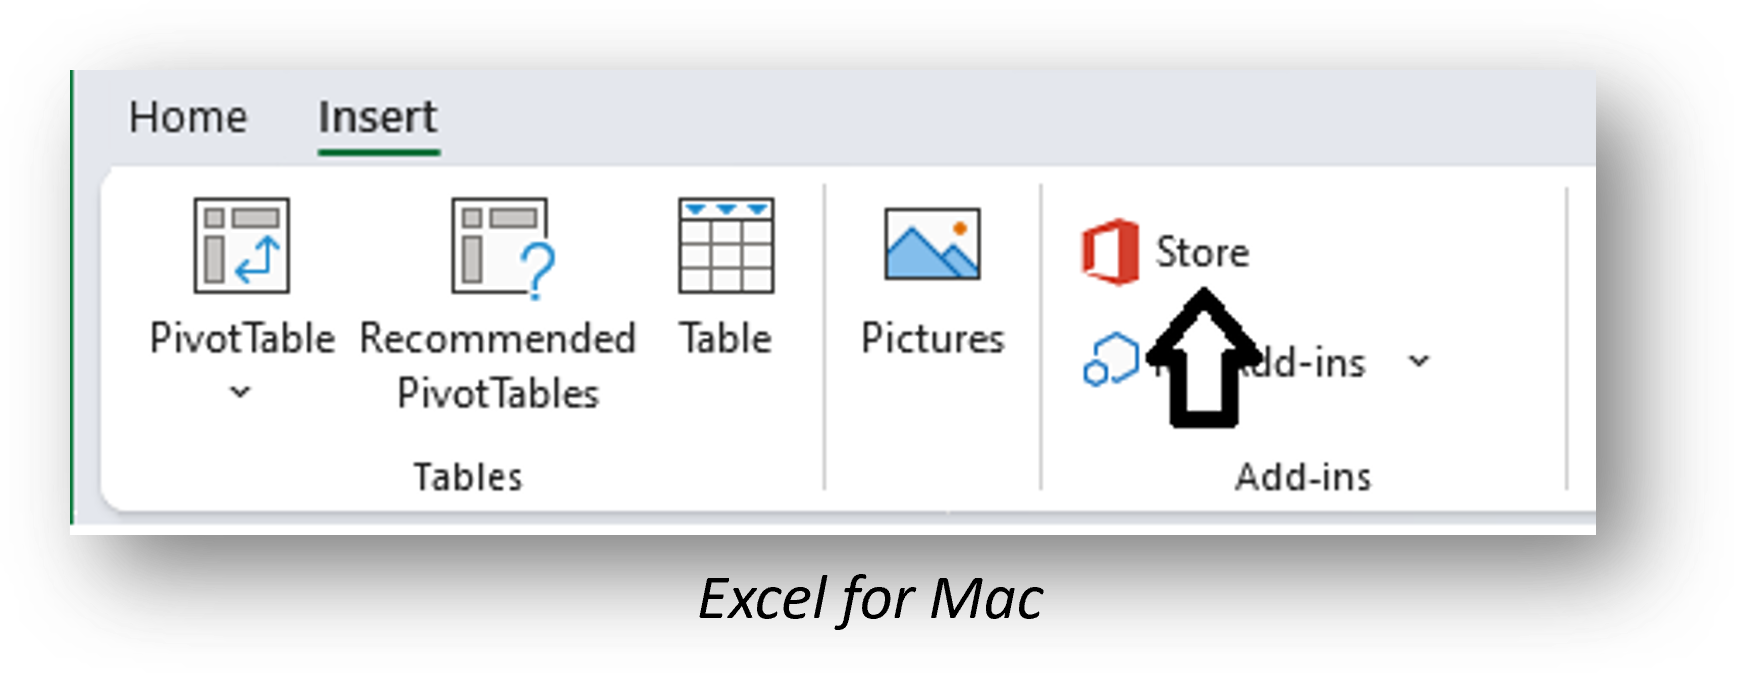
|
-
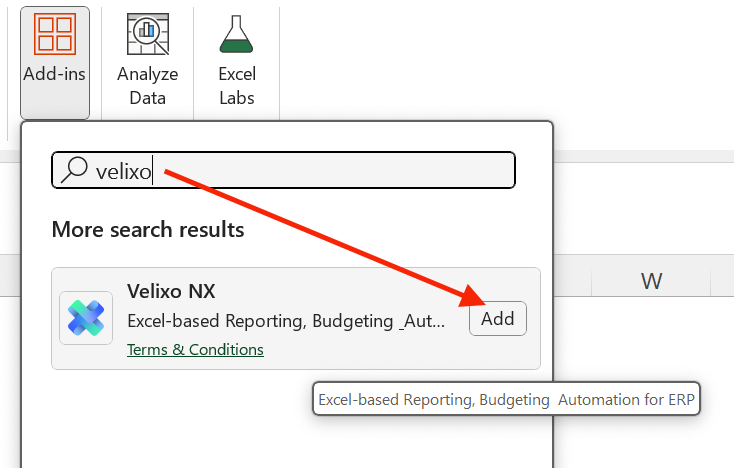
In the Add-ins window, search for Velixo:
-
Click Add.
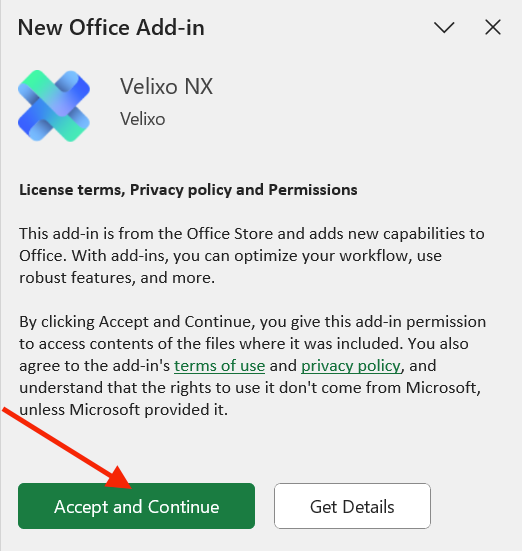
Installing the add-in by opening a file containing Velixo NX formulas:
If you open a file that uses Velixo NX formulas while not having the add-in installed in your account, you may see a prompt like the one below. In this scenario, to install Velixo NX, you only need to review the mentioned agreements carefully, and, if you consent, click Accept and Continue:
Centralized deployment
If your organization uses the Centralized Deployment route and individual users do not have access to the Microsoft Store, you will need to contact your IT administrator to deploy Velixo NX for you.
If you’re an administrator looking for information about managing the Velixo add-in using Centralized Deployment, refer to our dedicated article.
Once the administrator performs the deployment, changes can take a few minutes to take effect. You will also need to close all Excel windows and the Excel application itself.
After restarting Microsoft Excel, the Velixo icon should be visible in the Excel Home tab:

If the Velixo button is absent immediately after deployment, open the Add-ins menu, go to More add-ins…
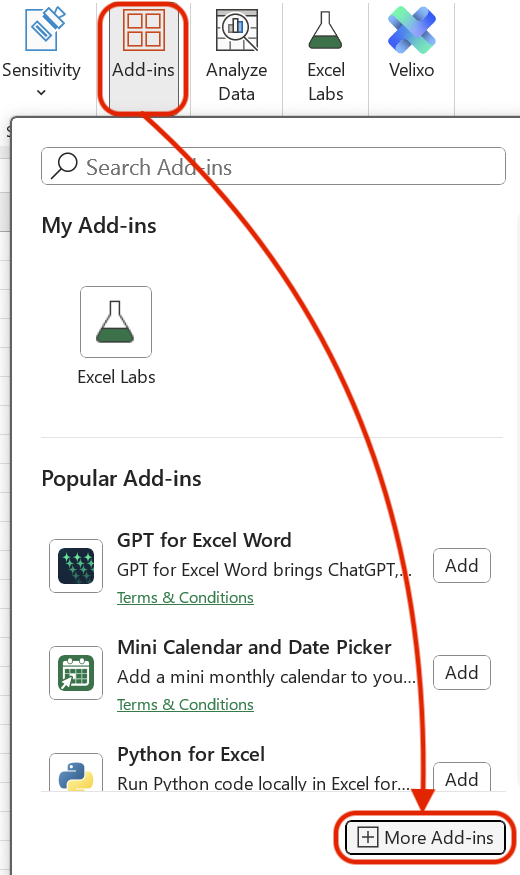
Select the Admin Managed tab, and click Refresh.
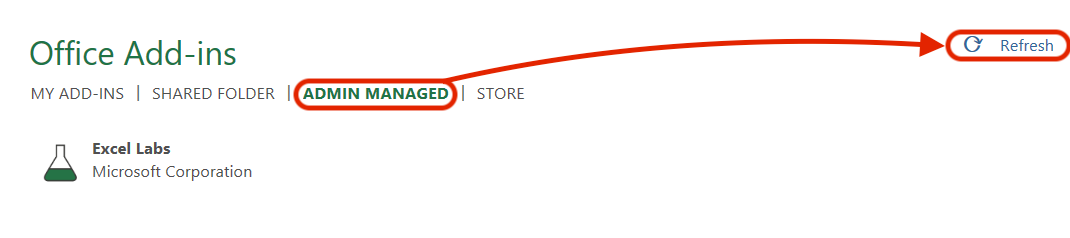
Eventually, you should see the Velixo NX icon appear in the Admin managed section, as well as in your Home tab.
Post-installation steps
Opening the Velixo NX side panel
After installing the add-in using one of the above methods, you may see Velixo’s side panel appear immediately on the right:
In this case, proceed to the Signing in section below.
If this didn’t happen automatically, navigate to the Home tab and click the Velixo button on the right:
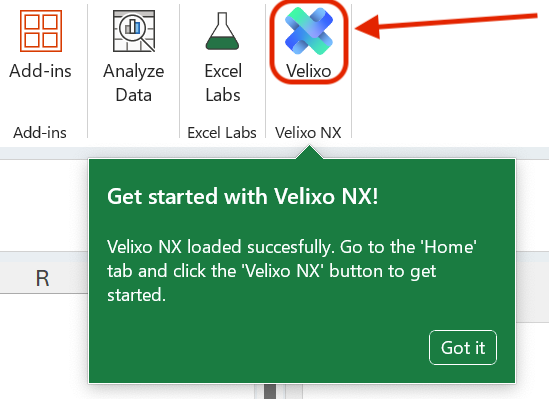
Clicking this button will cause:
-
The Velixo NX side panel to open.
-
A new tab on your Microsoft Excel ribbon, called Velixo NX, to appear.
If the side panel appears, but the Velixo NX ribbon tab doesn’t, please reload the add-in by clicking the Add-ins button, and then Velixo NX in the My add-ins section.
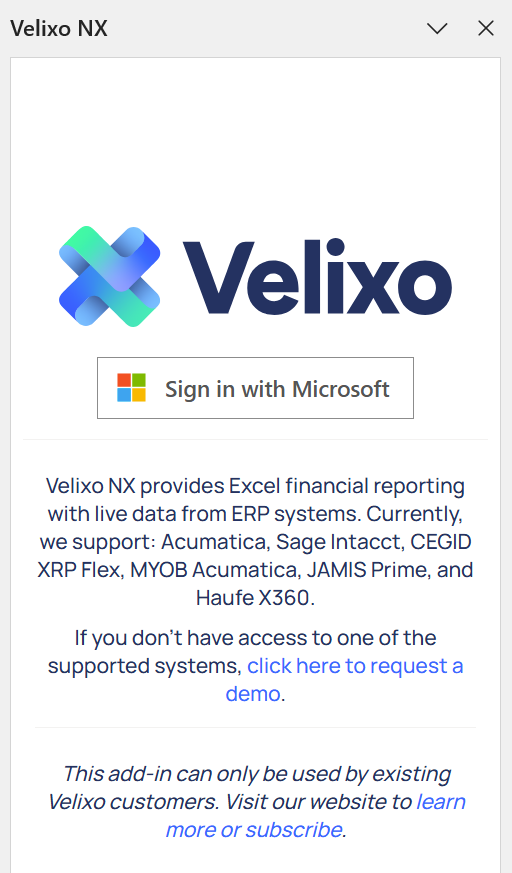
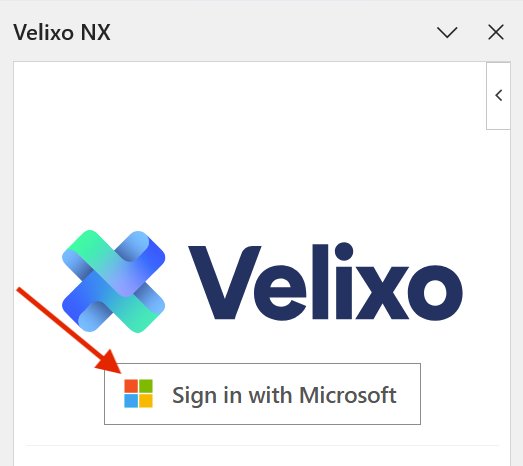
Signing in
Once you have opened the Velixo NX side panel, you need to sign in with your Microsoft account:
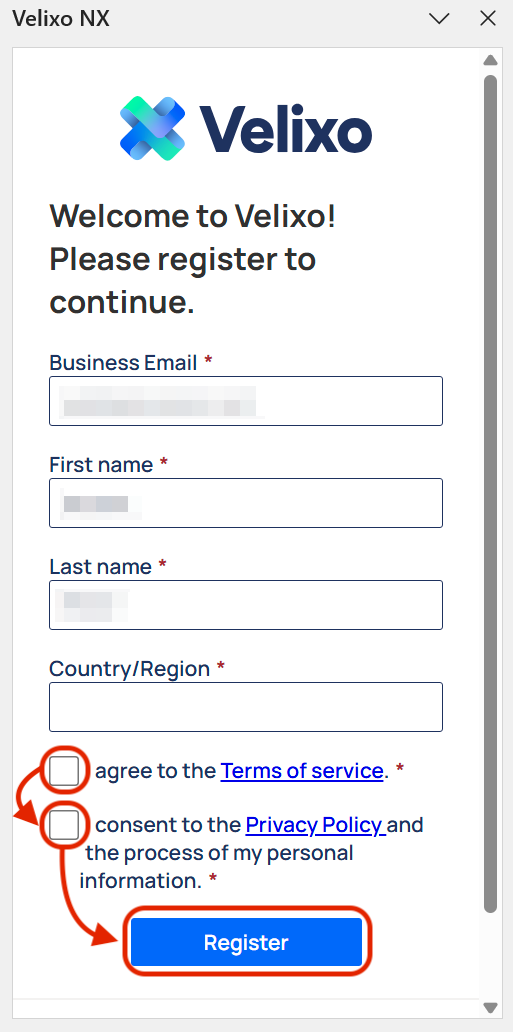
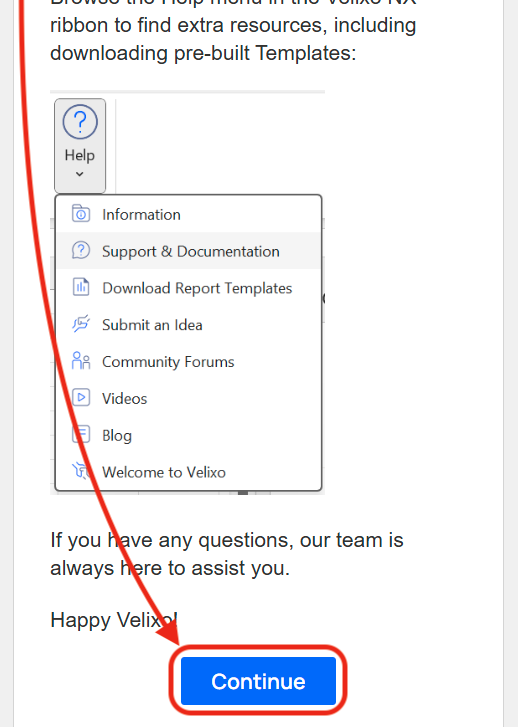
Registration (first-time users only)
As a first-time user, you may also see the registration form after signing in. You will need to fill out the form, carefully review and, if you agree, accept the Terms of Use and Privacy Policy. Then, click Register.
Wait a little until the thank-you screen appears, scroll down, and click Continue.
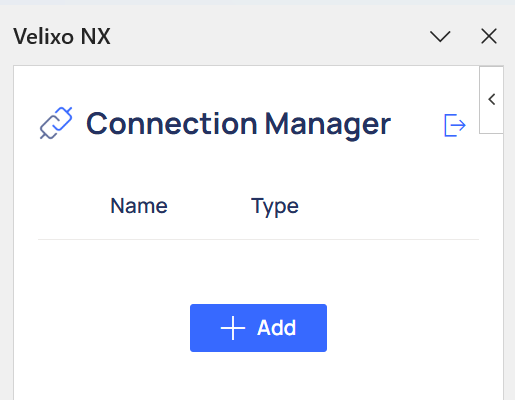
After completing the above steps, you should be greeted by the Connection Manager in the Velixo NX's side panel. You’re all set to start using Velixo!
Connect to your ERP
See our Connection guide.
Install the Velixo Business Central extension
The Velixo Business Central extension is required as it enables Velixo to:
-
Retrieve account information with the required details
-
Access dimension sets
-
Obtain running balances by dimension set IDs, both monthly and daily
Refer to our installation guide for details.
Distribution using Velixo Tools (Windows Only)
Some features of Velixo NX, most notably Report Distribution, are only available if you install Velixo Tools. This product is a special "background agent" add-in for Microsoft Excel that does not have any user interface of its own; it only shows up in the "Add or Remove Programs" menu, and in the add-ins menu in Microsoft Excel.
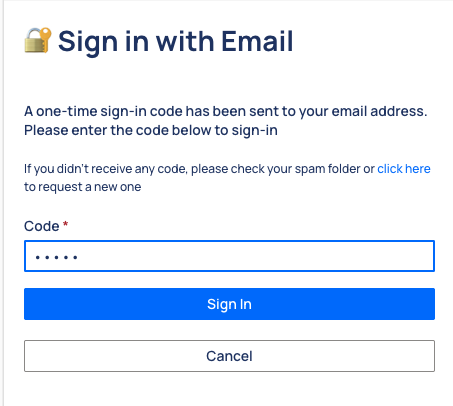
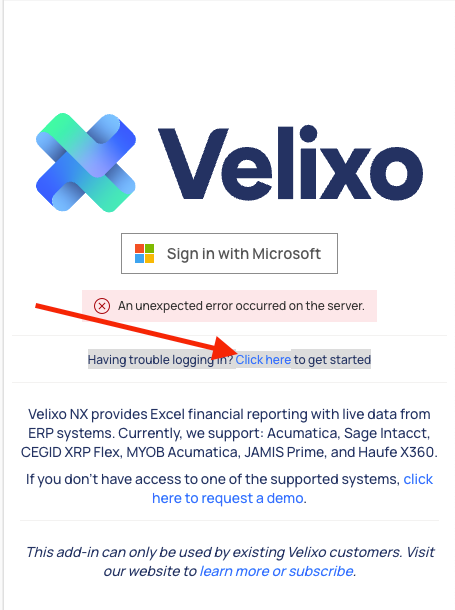
Troubleshooting “Sign in with Microsoft”
If you are experiencing any issue connecting to your Microsoft Account, Velixo NX provides an alternative method for activating the add-in. After your first sign-in attempt fails, click the link that will appear below the Sign in with Microsoft button:
Enter your email address and click the Request code button:
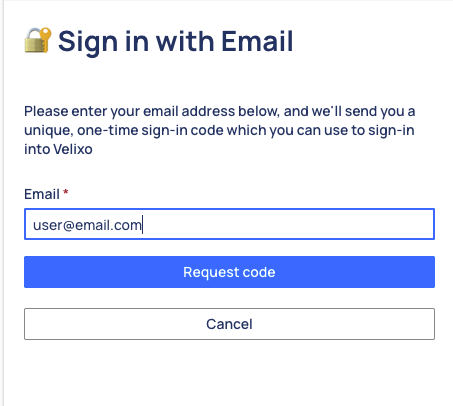
Enter the one-time sign-in code that has been sent to your email address and click Sign In: