Quickly connect Excel to your ERP with Velixo NX, then use simple formulas and filters to build dynamic financial reports.
Pre-requisites:
Overview
The first step after you open Excel is to connect your spreadsheet to your ERP. The add-in adds a new ribbon tab to Excel, titled Velixo NX:

Add a connection
If your workbook does not have a connection yet, follow our Connecting Velixo NX to MS Dynamics 365 Business Central guide.
Your first formula
Let's begin with something very simple — retrieving the name of an account. In the A1 cell, we will put an account code, in this case 6110.
In the B1 cell, we will use the BC.ACCOUNTNAME function. As you start typing, notice that the add-in provides you with information about the function and its parameters:
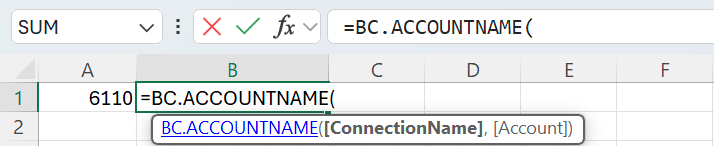
The first parameter for the BC.ACCOUNTNAME function is the name of the connection as it was defined in the Connection Manager - "BC”.
The second parameter that is required by this function is the account code. In our example, the account code is in cell A1. Click on the cell and Excel will automatically add a reference to that cell in the formula.
The complete formula should look like this:
=BC.ACCOUNTNAME("BC",A1)
Press the Enter key.
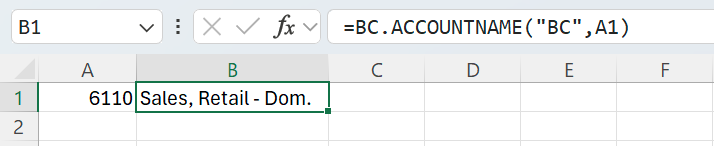
Next, try to change the account code in the A1 cell, and then press Enter to see an immediate update to the value of the account name cell.

|
Complete list of functions: There are many more Business Central functions included in Velixo, and we invite you to explore them all when you complete this tutorial. |
Get the balance of an account
Let’s continue to build our worksheet and do something more useful. We’re going to get the closing balance of the Cash account (account code 2910), using the BC.CLOSINGBALANCE function.
The BC.CLOSINGBALANCE function expects a few different parameters:

-
Connection - The name of the connection. In this example, it's “BC”.
-
Account -The code of a particular GL account. You can specify either an account category/subcategory name or a single account, but not both at the same time. The value here could be written as
“2910”directly in the formula. However, the account number is already in cell A1, so let's use that as a cell reference. -
AccountCategory - The code of a GL account category. Since we’re using a particular account code, this field will remain empty.
-
AccountSubcategory - The code of a GL account subcategory. Since we’re using a particular account code, this field will remain empty.
-
AsOf - The balance will be calculated as of this date.
-
Dimensions - In this example, we will not be using Business Central dimensions – this field will remain empty.
-
Press Enter to complete the formula. The closing balance will calculate automatically.

Ranges and wildcards - Combine multiple accounts and locations
The previous example covered getting the balance of a single account. To get the total for multiple accounts, use ranges and wildcards.
Here are some examples of what’s possible:
-
Range —
“1010:1210”will return all the accounts between 1010 and 2010 -
Wildcard —
“10?0”will return any account that starts with a 10 and ends with 0 (examples would be 1010 or 1070). -
Excluding or subtracting specific accounts from a range —
"1000:1100;-1020"would subtract the balance of account 10020 from the total. -
Single accounts, ranges and wildcards can be combined by using the
;character — for instance,“1?000;61100”.
For account groups to be searchable using Velixo filtering techniques, their names must not contain special characters, e.g., @, ! or :.