SI-NFP-RPT1 Net Asset Rollforward
Applies to:
Product version: Velixo NX
ERP: Sage Intacct
Functional area: Financials
Industry: Not-For-Profit
Plan: Free, Essentials, Professional, Advanced
Template type: Production Report template
Description
The SI-NFP-RPT1 Net Asset Rollforward is an advanced nonprofit reporting and accounting automation template. This tool presents a nonprofit's donor-restricted net assets subject to temporary restriction, and is intended specifically for reporting on and releasing purpose-restricted net assets which are released based upon the organization's expenditures against those donor-restricted amounts. Seamlessly integrating with your financial data, it provides a streamlined overview and user-friendly interface, reducing some relatively complex Excel operations to simple point-and-click selections on the part of the end user. Free from any preconceived assumptions about how you use your dimensions, this template puts the choice in your hands to choose which dimensions your organization uses for pertinent reporting points. With such flexibility, this is a useful tool for any nonprofit organizations with temporarily restricted contributions where revenue is released from restriction based on expenditures.
The current version of the template is: v1.2.
Coverage
This workbook includes the following sheets:
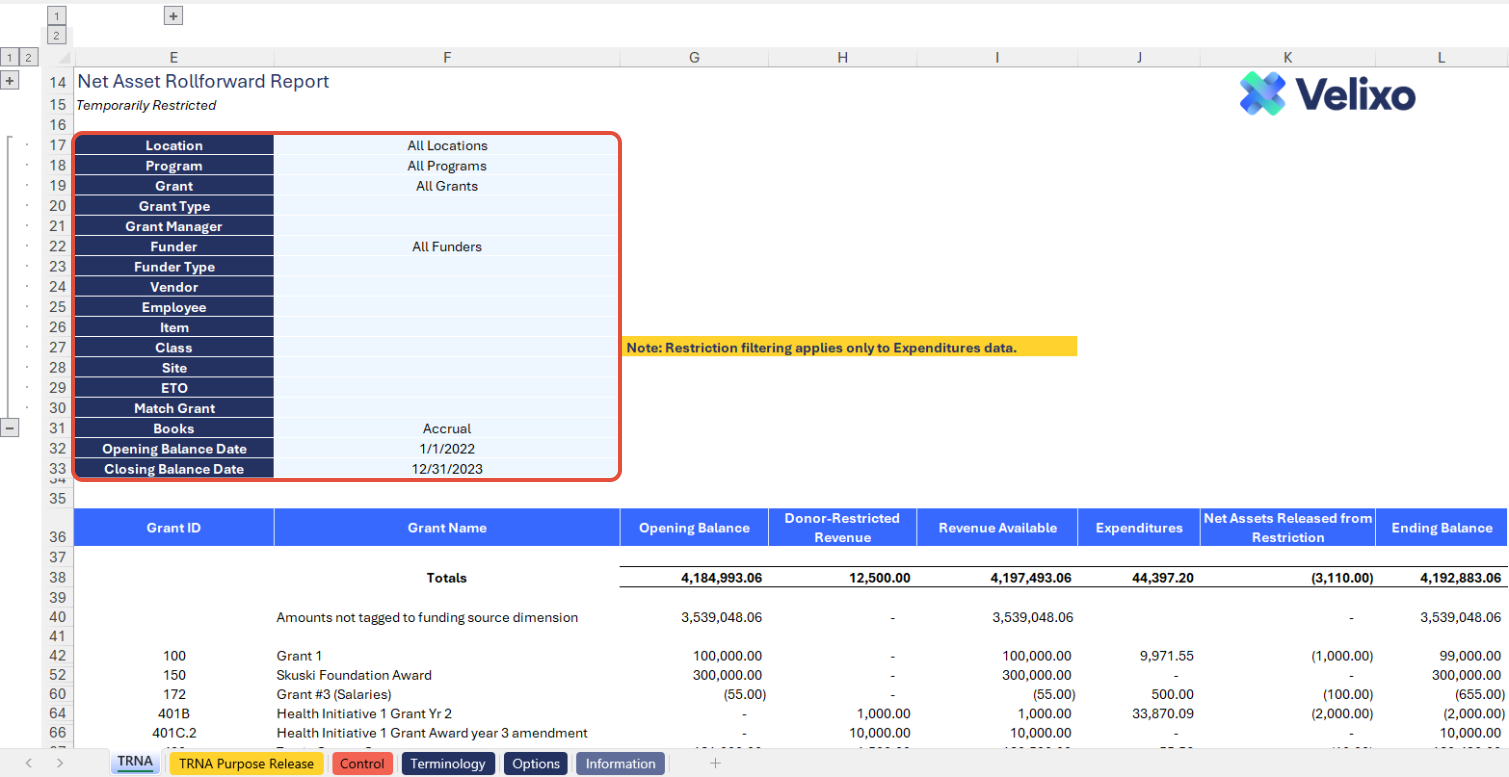
TRNA: The TRNA tab represents your organization's Net Asset Rollforward report, detailing your temporarily restricted amounts by funding source and showing the Opening Balance, Ending Balance, and summarized activity (revenue in, expenditures, revenue released) during the period.
Control: a control report that can be used to confirm that the data is accurate and balances.
TRNAPurposeRelease: a sheet that allows the user to review expenditure amounts against restricted revenue at varying levels of detail. The tab has built-in GL journal writeback for the user to send a restriction release journal entry to Sage Intacct.
Options: the template's settings sheet that is used for data validation lists and various lookups and configurations.
Terminology: a sheet that allows the user to override terminology (naming) used for their Sage Intacct dimensions within the template.
Information: the information sheet of the report, used for storing useful details about the report such as: code, version, article link to keep track of the origin of the report.
Typical audience
The typical audience of this report are nonprofit finance professionals: Accountants, CFOs, Controllers, and their audit firm(s)/committees.
Features
The following Velixo features are used by this report. To use this report, please ensure that your Velixo license includes all of them (or contact Support or Sales if not):
Financial functions
Query functions
Dimension functions
GL Journal Writeback
Preview

Download
To download this and other templates, go to the Velixo Portal template gallery.
Documentation
Navigating and utilizing the SI-NFP-RPT1 Net Asset Rollforward report is a very straightforward process, designed for simplicity, maximum flexibility, and efficiency. There are complex Excel operations in this template, but its design is meant to ensure that any user can work with this tool, regardless of technical proficiency level. The template comes pre-configured with connections to all necessary Sage Intacct objects/records so you can seamlessly map in your chosen account and dimension values where needed, streamlining the reporting process with minimal user effort.
Filters
Located in the upper left of the sheet, the filters include the following (note: each dimension filter can be renamed using the Terminology tab). For ease of use, Velixo shows you both the Dimension ID and Name for included standard dimensions. If you leverage user defined dimensions ("UDDs"), Velixo shows the name only, consistent with UDDs' behavior in Sage Intacct. The Display name for each filtering selection is configurable in the Options sheet.
Location: lists all Entities and Locations present in your Sage Intacct instance, including any custom groups you defined in the Options sheet.
Department: Lists all Departments present in your Sage Intacct instance, including any custom groups you defined in the Options sheet.
Project: Lists all Projects present in your Sage Intacct instance, including any custom groups you defined in the Options sheet. The list of Projects available in the filter adjusts based on the Project Type and Project Manager selections.
Project Type: A secondary Project filter, listing all Project Types available in your Sage Intacct instance, including any custom groups you defined in the Options sheet.
Project Manager: A secondary Project filter, listing all Project Managers (Employees) available in your Sage Intacct instance, including any custom groups you defined in the Options sheet.
Customer: Lists all Customers present in your Sage Intacct instance, including any custom groups you defined in the Options sheet. The list of Customers available in the filter adjusts based on the Customer Type selection.
Customer Type: A secondary Customer filter, listing all Customer Types available in your Sage Intacct instance, including any custom groups you defined in the Options sheet.
Vendor: Lists all Vendors present in your Sage Intacct instance, including any custom groups you defined in the Options sheet.
Employee: Lists all Employees present in your Sage Intacct instance, including any custom groups you defined in the Options sheet.
Item: Lists all Items present in your Sage Intacct instance, including any custom groups you defined in the Options sheet.
Class: Lists all Classes present in your Sage Intacct instance, including any custom groups you defined in the Options sheet.
User defined dimensions: For each user defined dimension, the filter will list each UDD name present in your Sage Intacct instance, including any custom groups you defined in the Options sheet. In the above "Preview" screenshot, Site, ETO, and Match Grant are user defined dimensions.
Books: Lists every type of books defined in your Sage Intacct instance, subject to the selections you made on the Options sheet. The report defaults to the Accrual book, but the user can add multiple books by creating custom book groups in the Options sheet, then choosing the group from the Books filter.
Opening Balance Date: a date field, representing the start date you want to use for your temporarily restricted Net Assets balance. Please enter a date.
Closing Balance Date: a date field, representing the end date you want to use for your temporarily restricted Net Assets balance. Please enter a date.
These filters are seamlessly linked to the data on the Options tab.
Structure
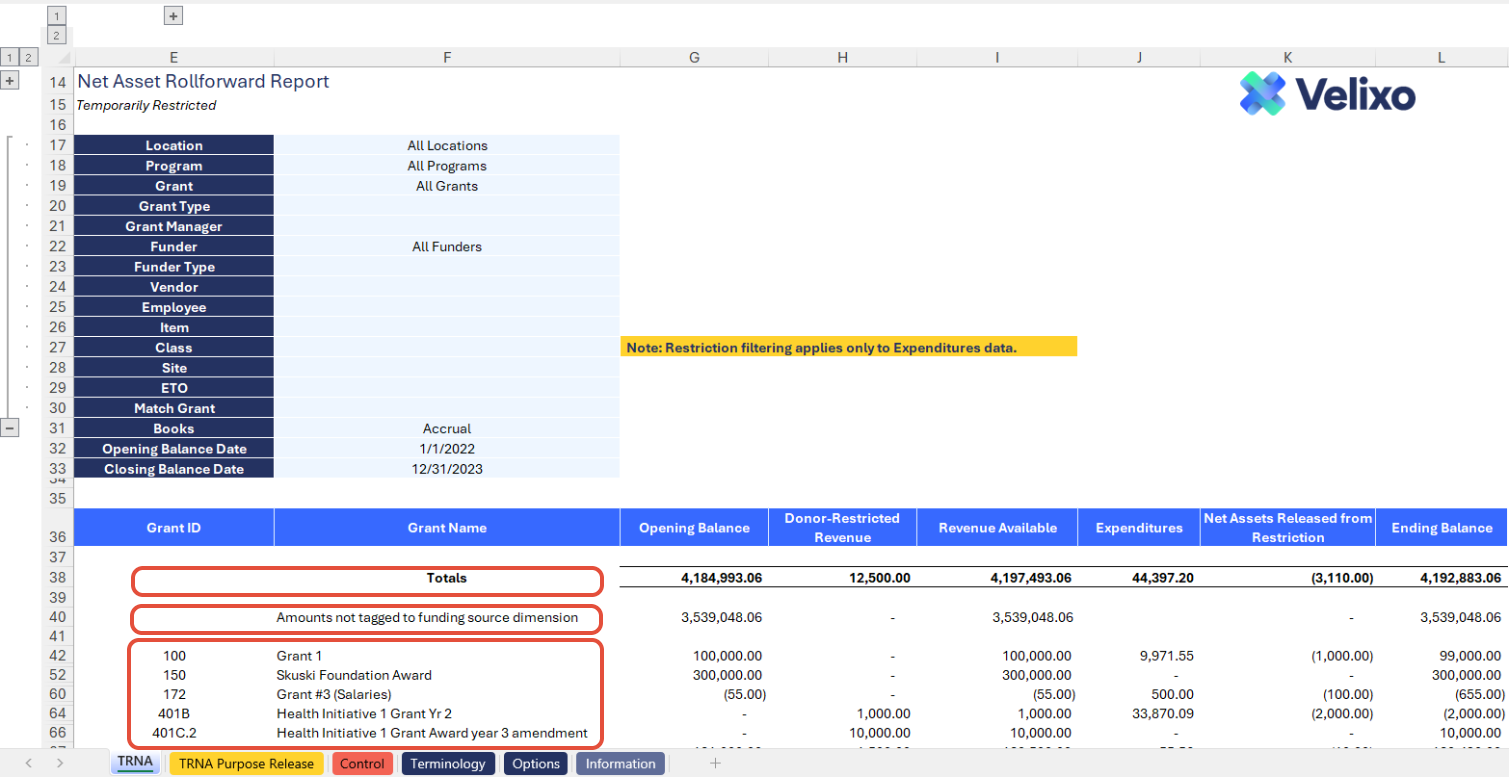
Sections: Velixo has thoughtfully structured the Net Asset Rollforward using a common layout that should be generic, by default. The following sections are used by default:
Totals
Amounts not tagged to funding source dimension
Details expanded by funding source dimension
Metrics: The report includes the following metrics (columns):
Col G (Opening Balance): the balance in temporarily restricted Net Assets (as defined by user selections on the Options tab) as of the Opening Balance Date indicated in the report filter selections.
Col H (Donor-Restricted Revenue): the turnover between the Opening Balance Date and Closing Balance Date (inclusive) for revenue accounts (as defined by user selections on the Options tab) where amounts are temporarily restricted.
Col I (Revenue Available): addition of Opening Balance + Donor-Restricted Revenue to show a "subtotal" of donor-restricted net asset balance available before any revenue was released from restriction.
Col J (Expenditures): the turnover between the Opening Balance Date and Closing Balance Date (inclusive) for expenditure accounts (as defined by user selections on the Options tab).
Col K (Net Assets Released from Restriction): the turnover between the Opening Balance Date and Closing Balance Date (inclusive) for the Net Assets Released from Restriction GL account (as defined by user selections on the Options tab).
Col L (Ending Balance): the balance in temporarily restricted Net Assets (as defined by user selections on the Options tab) as of the Closing Balance Date indicated in the report filter selections.

Time Period
The report uses a single time period, which is defined by the user's input of Opening Balance Date and Closing Balance Date in the report filters.
Current Period:
Provides the Opening Balance as of the Opening Balance Date, Ending Balance as of the Closing Balance Date, and turnover between the two dates.
For example, if a user selects Opening Balance Date 1/1/2022 and Closing Balance Date 12/31/2022, they will receive the following:
Opening Balance as of 1/1/2022
Donor-Restricted Revenue: turnover for 1/1/2022 - 12/31/2022
Revenue Available: Opening Balance as of 1/1/2022 plus Donor-Restricted Revenue for 1/1/2022 - 12/31/2022
Expenditures: turnover for 1/1/2022 - 12/31/2022
Net Assets Released from Restriction: turnover for 1/1/2022 - 12/31/2022
Ending Balance as of 12/31/2022
This automatically supports the flexibility for any variation of date range requirements a user might have (fiscal years, periods shorter or longer than 12 months, etc.) as you are free to define any date range so long as your From Date is not after your To Date!

Auto Hide Zero Rows in Selected Range has been configured on the Opening Balance, Donor-Restricted Revenue, Revenue Available, and Net Assets Released from Restriction columns. That means that dimension values which have a zero for all four of those columns will be automatically hidden, and the report will continue to function as expected.
TRNA Purpose Release Template Structure
Sections: The TRNA Purpose Release tool is built in collapsible sections so users can address what's needed and minimize the section for easier usability.
Left side of tool: Release from Restriction Journal Writeback
Review of Options and filters: this section recaps the relevant Options and filters selected. No action is needed on the user's part; it is purely for context/ease of reference and audit-ability.
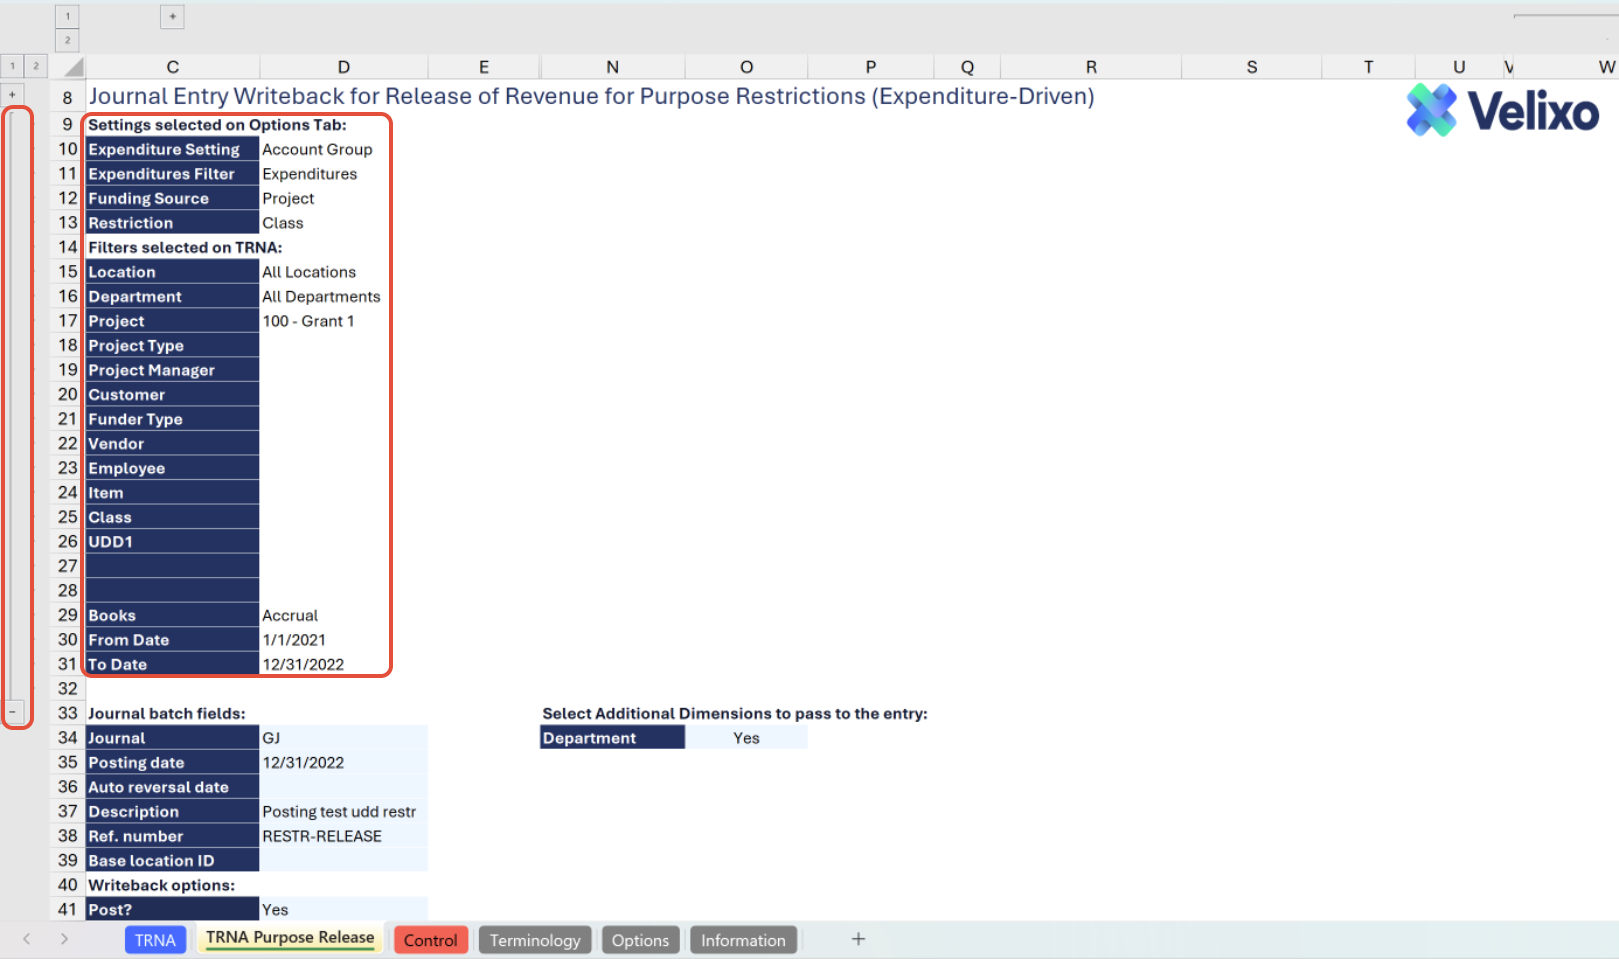
Select Additional Dimensions to pass to the entry: a choice for which dimensions should be used in the release from restriction entry. Only dimensions used on the TRNA tab are available for selection. Next to each available dimension, a dropdown selection with a "Yes" or "No" choice is available. Choosing "Yes" means the dimension will be included on all lines of your release from restriction entry. Choosing "No" means the dimension will not be used on any lines of your release from restriction entry.

Journal entry header: the header fields for the release from restriction journal entry journal entry, along with Velixo writeback options
The following fields are available in the Journal batch fields section:
Journal: the ID of the journal you want to use for writeback
Posting date: the GL posting date to use for the journal entry
Auto reversal date: the date (if any) on which the journal entry should reverse
Description: the header-level description for the journal entry
Ref. number: the reference number for the journal entry
Base location ID: the "source entity ID" (used if this journal entry should trigger automatic inter-entity transactions in Sage Intacct)
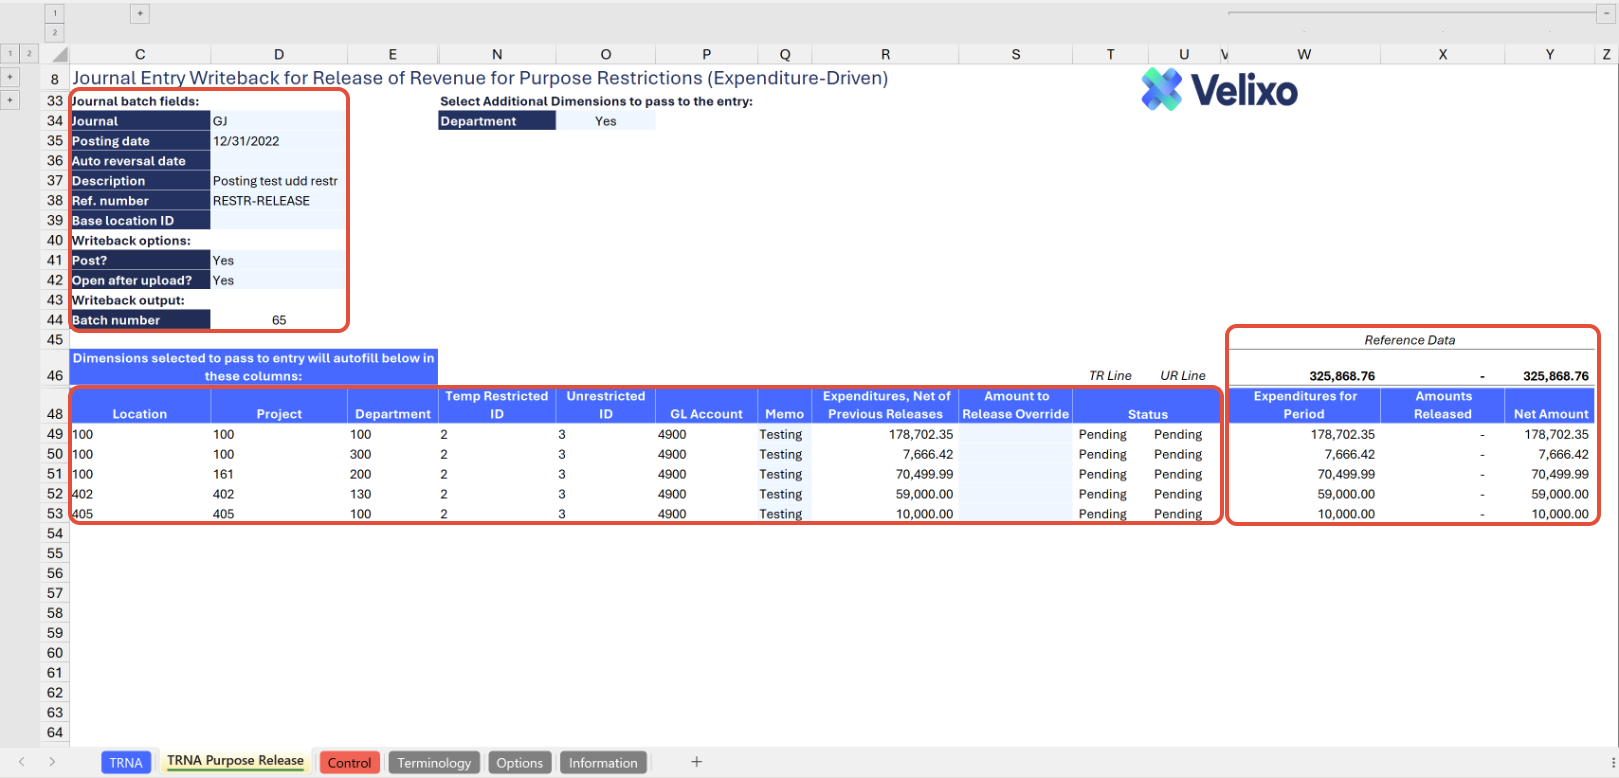
The following fields are available in the Writeback options section:
Connection: the name of your Velixo connection. Should match the name used during Velixo application login.
Post?: indicates if the entry should post when sent to Sage Intacct. If set to No, the entry will appear in Sage Intacct with Draft status.
Open after upload?: indicates if a Sage Intacct browser window should open, taking you to the entry, after Velixo uploads to Sage Intacct.
The following fields are available in the Writeback output section:
Batch number: after Velixo performs a successful writeback, this cell will display the GL batch number of the journal entry sent to Sage Intacct
Journal entry lines:the journal entry line details for the release from restriction entry, along with reference data for easy drilldown/exploration. It contains the following fields:
Location: the Location ID to be used for the journal line, automatically obtained from your expenditure GL activity
Funding Source Dimension (Project in the below screenshot, but yours may vary): the Funding Source dimension ID to be used for the journal line, automatically obtained from your expenditure GL activity
Other Dimensions: any other dimensions you set for inclusion in the above section (Select Additional Dimensions to pass to the entry) will appear here with their IDs, automatically obtained from your expenditure GL activity
Temp Restricted ID: the dimension ID for your temporarily restricted value, automatically populated based on selection on the Options tab
Unrestricted ID: the dimension ID for your unrestricted value, automatically populated based on selection on the Options tab
GL Account: the GL account your organization uses for releasing net assets from restrictions, automatically populated based on selection on the Options tab
Memo: user input - the line-level memo for the entry line
Expenditures, Net of Previous Releases: if other than zero, this represents the line-level amount that will be released from restriction by default if no override is indicated. Automatically obtained from your expenditure GL activity
Amount to Release Override: user input - the line-level amount you want to release from restriction, if different from the Expenditures, Net of Previous Releases
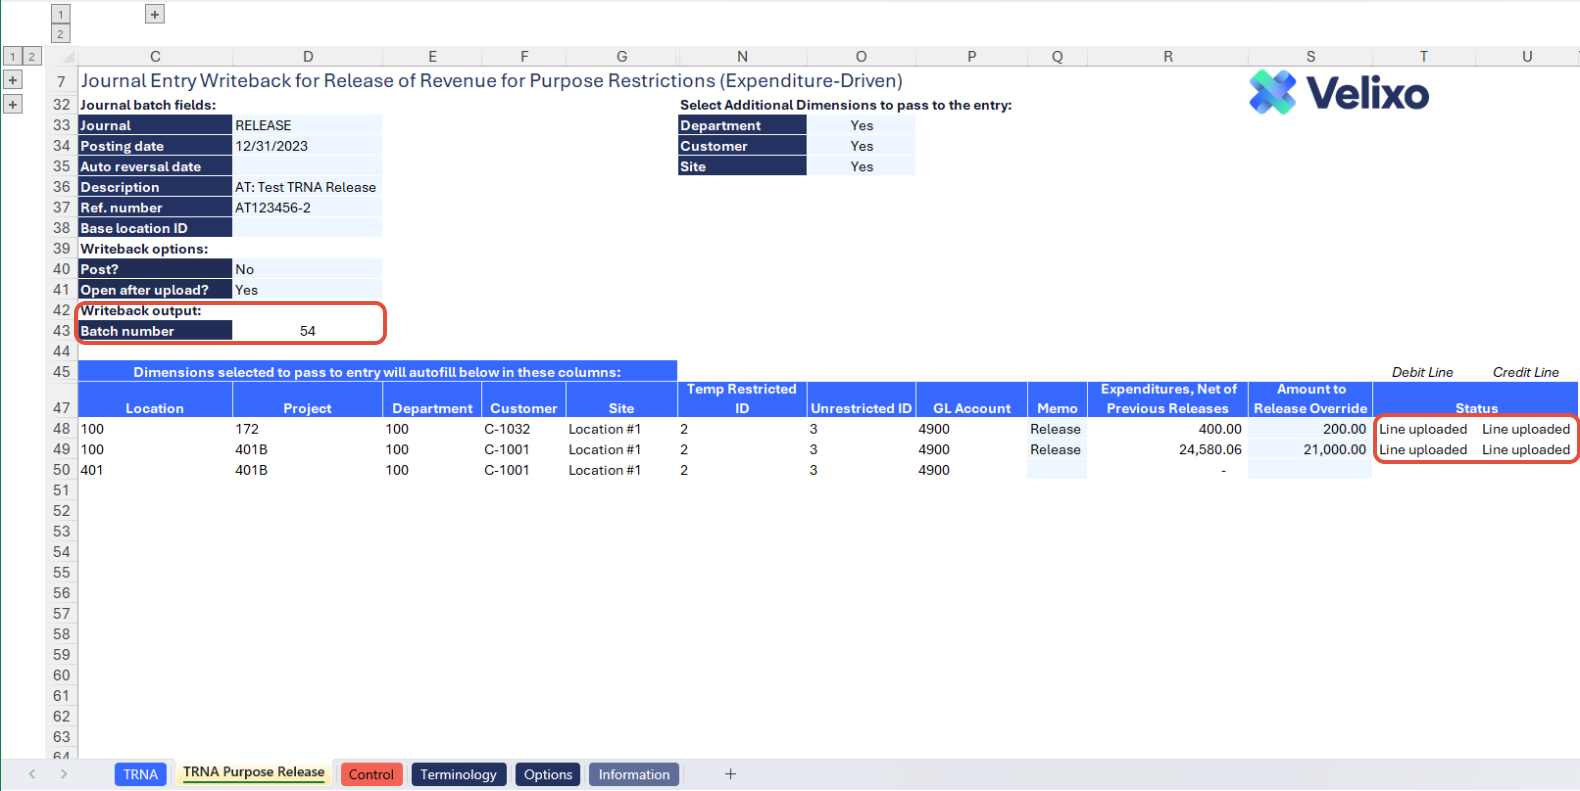
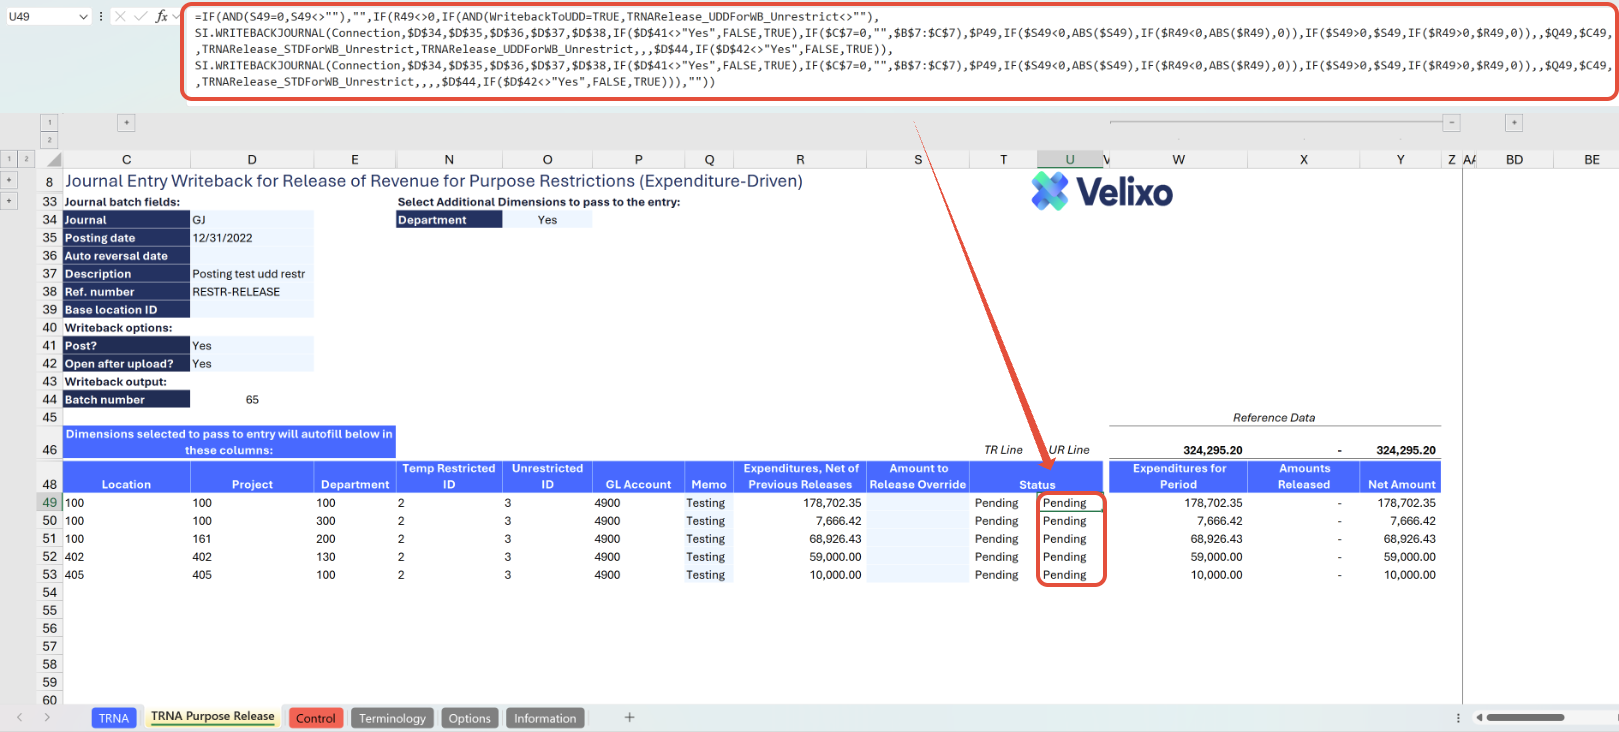
TR Line Status/UR Line Status: this will be the reference status of users when uploading GL journal entries to Sage Intacct (TR = your restricted side of the entry and UR = your unrestricted side of the entry):
Pending: the Writeback process has not started yet, and the figures are not yet uploaded to the ERP.
Line Uploaded: the journal entry was successfully uploaded to the ERP.
Failed: the writeback process failed and further template modification might be required.
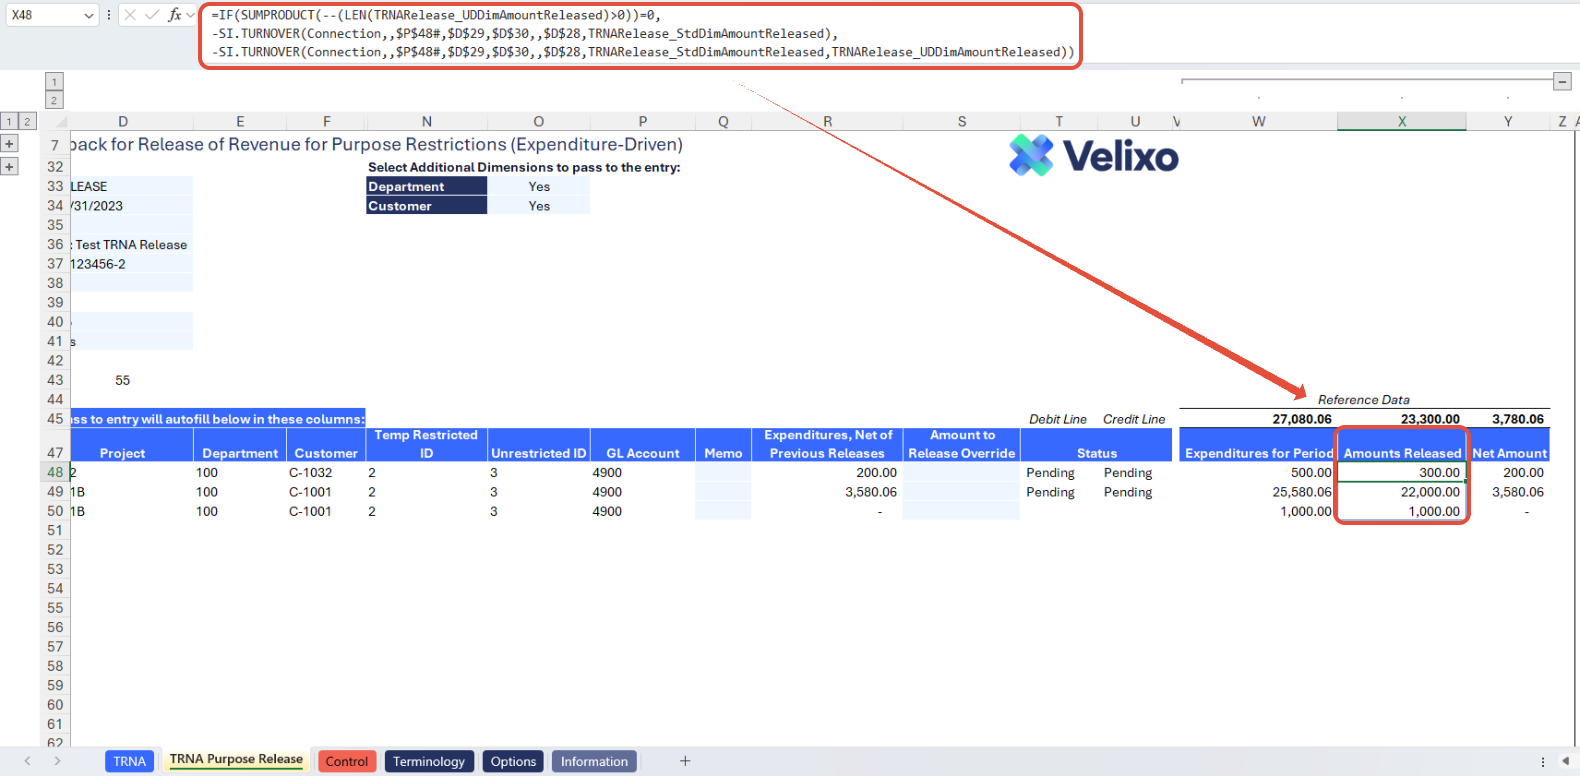
Reference Data: a collapsible column group that details the components that make up the "Expenditures Net of Previous Releases" figure - users can drill down for further details:
Expenditures for Period: the turnover amount for expenditure GL accounts (as chosen on the Options tab) for the combination of dimensions on the worksheet row level
Amounts Released: the turnover amount for the revenue released from restriction GL account (as chosen on the Options tab) for the combination of dimensions on the worksheet row level
Net Amount: the difference between Expenditures for Period and Amounts Released (in other words, the net)
Velixo Auto-Hide Zero Columns has been configured on columns D-M of the TRNAPurposeRelease tab. This ensures that columns will only display if the user has selected dimensions that would populate them in the "Select Additional Dimensions to Pass to the Entry" dropdowns. Otherwise, the columns remain hidden to reduce unnecessary empty space on the report.
Right side of tool: Expenditure GL Detail
GL detail columns: a dynamic detail report that displays information from the General Ledger. This column group is fully collapsible, and the columns included change depending on which dimensions are used on the TRNA tab. The possible columns that may display in the GL detail, depending on user dimension selections, are as follows (note: the below documentation uses standard dimension naming. Dimension naming will be replaced with your provided names on the Terminology tab, if different):
Posting Date: the GL posting date of the transaction
Location: the Location dimension ID on the transaction
Location Name: the Location Name for the ID on the transaction
Department: the Department dimension ID on the transaction
Department Name: the Department Name for the ID on the transaction
Project: the Project dimension ID on the transaction
Project Name: the Project Name for the ID on the transaction
Customer: the Customer dimension ID on the transaction
Customer Name: the Customer Name for the ID on the transaction
Vendor: the Vendor dimension ID on the transaction
Vendor Name: the Vendor Name for the ID on the transaction
Employee: the Employee dimension ID on the transaction
Employee Name: the Employee Name for the ID on the transaction
Item: the Item dimension ID on the transaction
Item Name: the Item Name for the ID on the transaction
Class: the Class dimension ID on the transaction
Class Name: the Class Name for the ID on the transaction
User Defined Dimensions: the User-Defined Dimension name on the transaction (varies per organization)
Book: the reporting book the transaction was posted to
State: the state of the transaction
GL Account: the GL account number for the transaction
GL Account Name: the name of the GL account on the transaction
Batch Title: the title of the batch which the transaction was posted in
Header Description: the header-level description from the transaction
Line Description: the line-level description from the transaction
Line Document Number: the line-level document number from the transaction
Amount: the transaction amount

Velixo Auto-Hide Zero Columns has been configured on columns AB-BB of the TRNAPurposeRelease tab. This ensures that columns will only display in the GL detail if there is data in them (i.e., those dimensions were used on the TRNA tab). Otherwise, the columns remain hidden to reduce unnecessary empty space on the report. If you expand the Expenditure GL Detail and find unnecessary empty columns, simply click Hide Zero Columns > Reapply Auto-Hide Logic in the Velixo NX ribbon.
User Guide
Using the report
Now that we've covered the report overview, let's dive into a step-by-step guide on effectively utilizing the report.
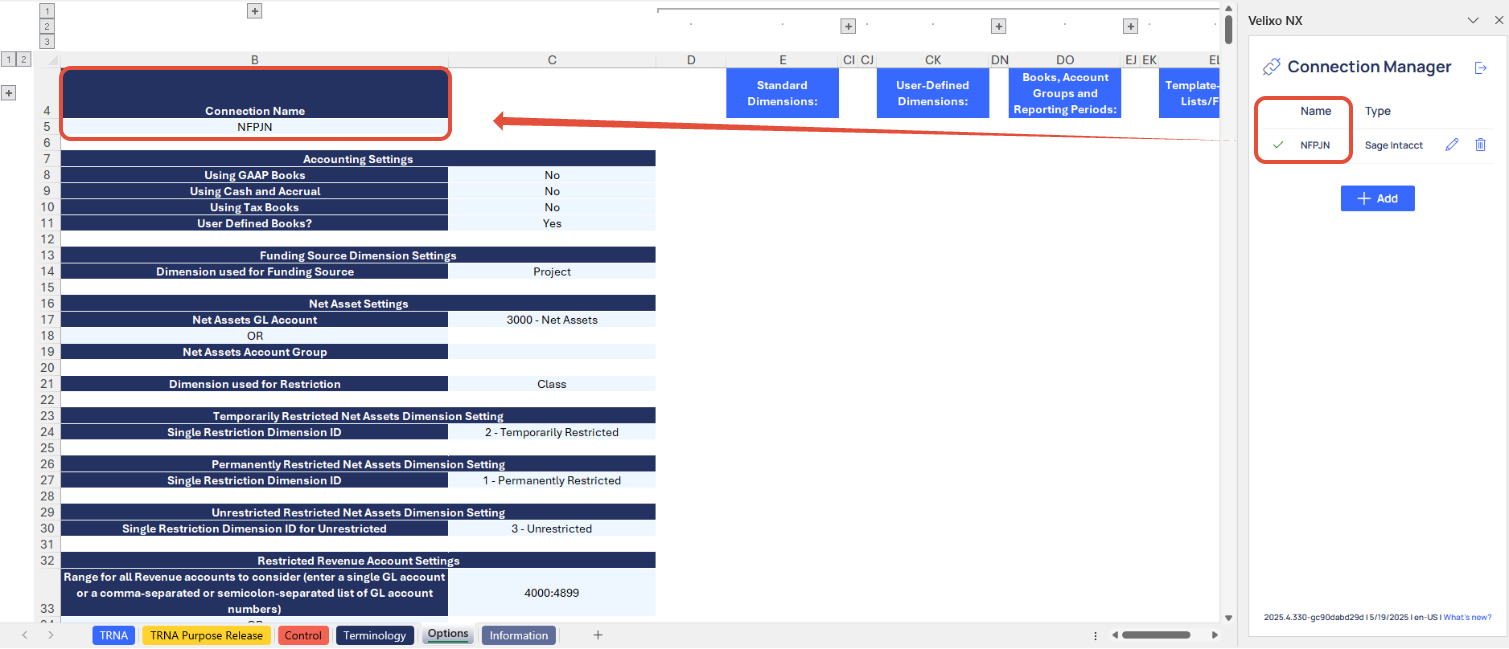
Set the Connection Name on the Options Sheet: crucial for all processes, set the Connection Name on the Options sheet by updating cell B5. Ensure it matches the name used during Velixo application login.
Update the Terminology Sheet: The Terminology tab lists your organization's Sage Intacct dimensions along with the dimension's native name and its name in your Sage Intacct instance. You can use this tab to further customize the names you would like to use for some or all of your Sage Intacct dimensions throughout the template. To do so, simply input your desired name in the light blue cells for Singular Term and Plural Term for the dimension. The changes will immediately and automatically persist throughout the template.
If your organization leverages user-defined dimensions (UDDs), you must also input the exact integration name for each UDD to ensure seamless use of the dimension throughout the template. Note that the integration name and the Object (record) name are not always the same; check with your Sage Intacct implementer if you are unsure. A user with the appropriate permissions can find the UDD's integration name in Sage Intacct by going to Platform Services > All > Objects and locating the UDD in the Objects list.


Example of finding the Integration name for a user-defined dimension (UDD)
We recommend updating the Terminology tab before setting any report filters.
Update the Options Sheet: As the foundation for filters on the TRNA tab, keep the Options sheet up to date. It should always and automatically capture the latest dimensions and structures from your Sage Intacct instance; however, you can also customize it. Initial completion of the Options tab is crucial to using this template, as the settings contained on this tab drive the rest of the template's features and ensure the flexibility for organizations to map the critical accounting/reporting requirements to their specific chosen dimensions and GL account values.
Most of the below settings are "set it and forget it" in nature, meaning that once they are set initially, there is little reason for ongoing maintenance.
If your organization uses special reporting books, you can choose to enable or disable the use of those books in your template. This applies to the following book types available in Sage Intacct, with Yes/No selections to enable or disable their use in cells C8 through C11:
GAAP
Cash (when using Cash and Accrual accounting)
Tax
User Defined Books
Choose which dimension your organization uses to track your donor-restricted Funding Source. Cell C14 presents a drop down list containing your Sage Intacct dimensions.
Choose EITHER: (1) which GL account your organization uses to track Net Assets OR (2) which GL account group your organization uses to track Net Assets. Please make a selection in only oneof these options; making a selection in both options will result in errors throughout the template.
Cell C17 presents a drop down list containing the Chart of Accounts from your Sage Intacct instance
Cell C19 presents a drop down list containing the GL Account Groups from your Sage Intacct instance
Choose which dimension your organization uses to track Net Asset Restriction. Cell C21 presents a drop down list containing your Sage Intacct dimensions.
Choose the Restriction Dimension ID your organization uses for tracking temporarily restricted Net Assets. Cell C24 presents a drop down list containing the dimension IDs for your chosen Restriction dimension.
Choose the Restriction Dimension ID your organization uses for tracking permanently restricted Net Assets. Cell C27 presents a drop down list containing the dimension IDs for your chosen Restriction dimension.
Choose the Restriction Dimension ID your organization uses for unrestricted Net Assets. Cell C30 presents a drop down list containing the dimension IDs for your chosen Restriction dimension.
Choose EITHER: (1) the GL account ID(s) OR (2) GL account group that your organization uses to track revenues. Please make a selection in only one of these options; making a selection in both options may result in errors throughout the template.
Cell C33 accepts an input of a single GL account code or a Velixo range expression for multiple GL account codes
Cell C35 presents a drop down list containing the GL Account Groups from your Sage Intacct instance
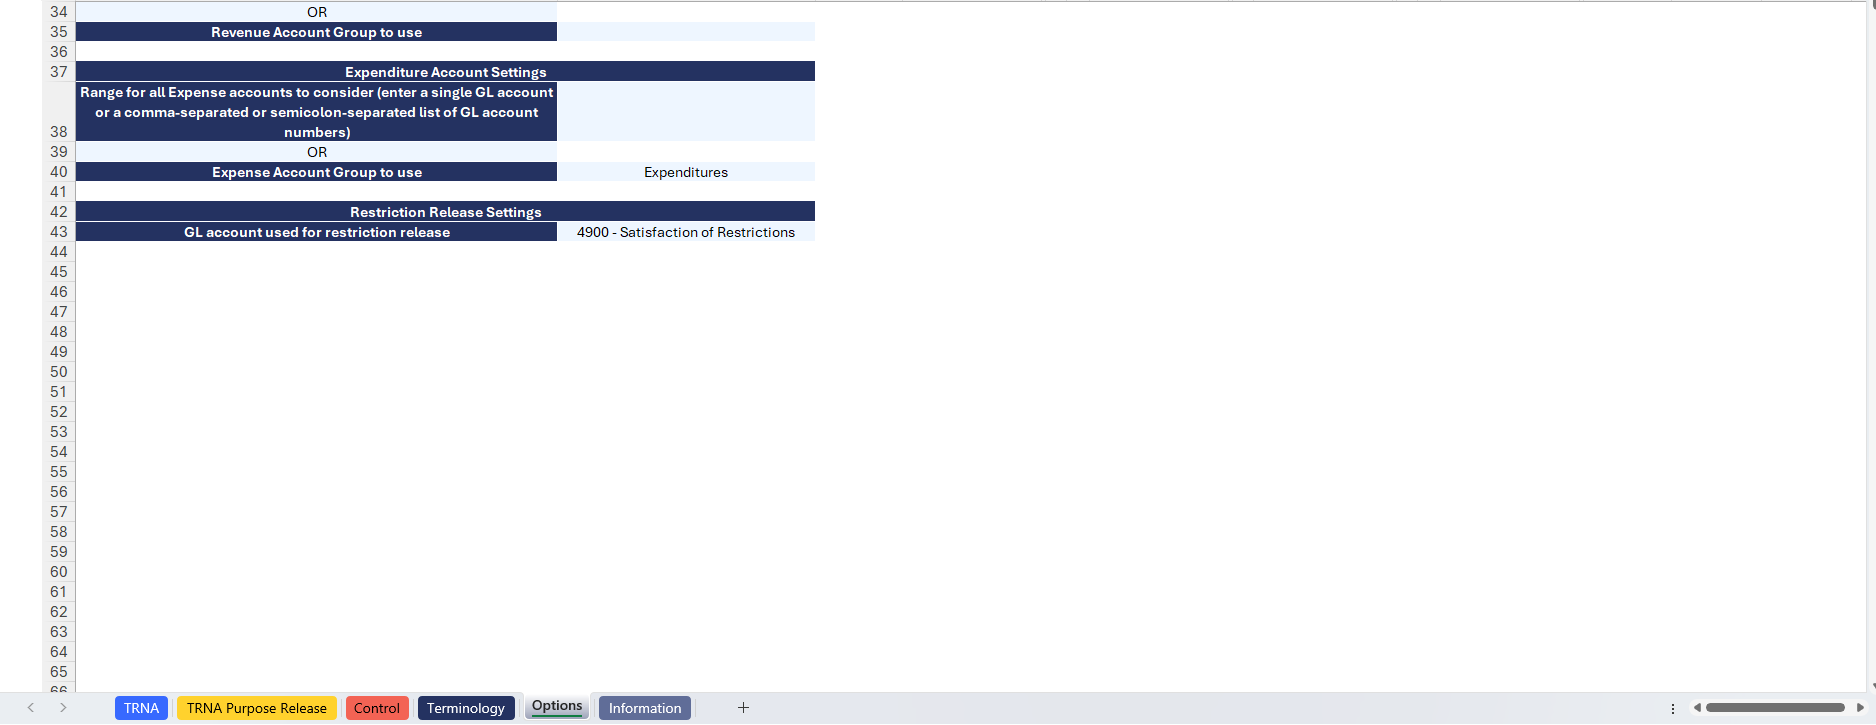
Choose EITHER: (1) the GL account ID(s) OR (2) GL account group that your organization uses to track expenditures. Please make a selection in only one of these options; making a selection in both options may result in errors throughout the template.
Cell C38 accepts an input of a single GL account code or a Velixo range expression for multiple GL account codes
Cell C40 presents a drop down list containing the GL Account Groups from your Sage Intacct instance
Choose the GL account your organization uses to release revenue from restriction. Cell C43 presents a drop down list containing the Chart of Accounts from your Sage Intacct instance.
Your choices here will control how dimensions are used on the TRNA and TRNAPurposeRelease tabs. Automatic impacts of your choice are as follows:
The dimension chosen as your Funding Source (which you select in cell C14 of the Options tab) will be the dimension expanded in the rows of your TRNA tab.
Your TRNA tab's Opening Balance, Donor-Restricted Revenue, Net Assets Released from Restriction, and Ending Balance columns will automatically be filtered to display temporarily restricted amounts, filtered using the Restriction dimension ID that you specify on cell C24 of the Options tab.
The Expenditures column is the only column on the TRNA tab which responds to filtering by your Restriction dimension.
The GL journal writeback for restriction release on the TRNAPurposeRelease tab will automatically include the following data points:
Location (all Sage Intacct entries need this)
Funding Source dimension
Restriction dimension, where the Temp Restricted ID is automatically populated with your selection from cell C24 on the Options tab and the Unrestricted ID is automatically populated with your selection from cell C30 on the Options tab. For positive amounts, the entry will Debit using the Temp Restricted ID and Credit using the Unrestricted ID
GL account, which uses the release from restriction GL from your selection on cell C43 of the Options tab

Choose Desired Filters: After updating the Options sheet and Net Asset classifications, select desired filters for the report:
Dimensions/Dimension Attributes
Books
Opening Balance Date
Closing Balance Date
Any filters selected here will automatically apply to all other tabs of the file. If you plan to work with a dimension in another tab, be sure to select it as a filter here. To include a dimension in other tabs without eliminating any values, select the <All> option (i.e., <All Locations>) for that dimension.
Automatic Report Update: Selecting any filter will automatically update report balances. Begin analyzing the report with the latest data.

Validation and analysis: ensure accuracy by verifying balances in the Control sheet. Confirm that differences for each total are zero.

Variances investigation: if discrepancies arise between data extracted at the account category and account code levels, conduct a thorough investigation to resolve any differences.
Using the Control report
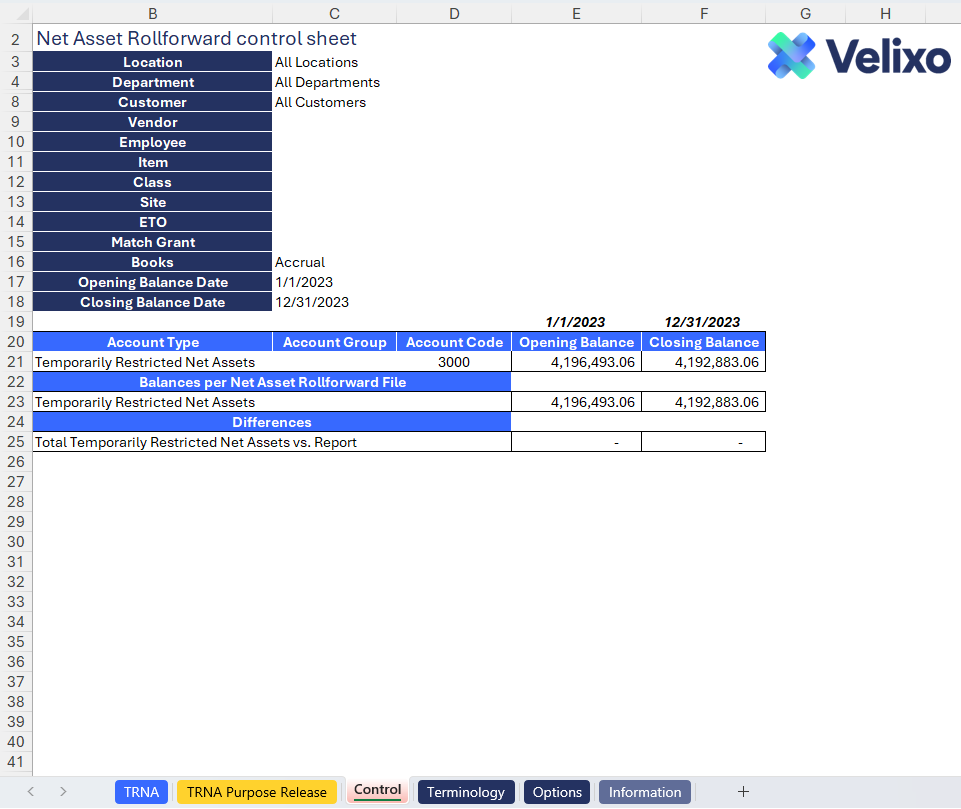
Committed to upholding data integrity across the report and Sage Intacct, the Control sheet serves as a supplementary component to the primary Net Asset Rollforward (TRNA) tab. Its purpose is to validate the data extracted by Velixo, which is expanded by Funding Source, by cross-referencing it with the extracted balances at the account group or account code level.
Given that the balances of all temporarily Funding Sources on the Net Asset Rollforward should aggregate to the temporarily restricted balance for the Net Asset account group or account code, the Control sheet ensures the absence of discrepancies in the total for your relevant temporarily restricted Net Assets. The verification process enhances the readability and accuracy of the overall financial reporting template.
The Control sheet is divided into three sections:
Account Group or Account Code Balance Check: Extracting balances at the account group or account code level (automatically populated using your selection on the Options tab) guarantee accurate capture and reconciliation of the relevant GL account(s) your organization uses for Net Assets. If your organization changes its selection on the Options tab, that change is automatically reflected here.
Balances per Net Asset Rollforward File: Displays total balances from the TRNA tab for reconciliation with the Account Group/Account Code balance section.
Differences: Highlights reconciliatory differences between the Account Group/Account Code and Net Asset Rollforward File sections, flagged with conditional formatting for investigation.
If any discrepancies in the report are displayed, it could be caused by failure to complete the Options tab selections, missing GL accounts in your ranges for revenues or expenditures on the Options tab (if you chose to define Revenues and Expenditures using range expressions instead of account groups), selection of an incorrect GL account or GL account group for Net Assets on the Options tab, or any user customizations.
To troubleshoot further, you could redownload or reconnect the report to your instance, verify that the TRNA tab does not return any error, and perform data validations by comparing this report with Sage Intacct's out-of-the-box financial reports. If you believe the report contains an error, please report it to Velixo Support.
Using the TRNA Purpose Release Tool
Velixo created the TRNA Purpose Release tab as a highly automated tool for nonprofit organizations to review and release revenue from restrictions with minimal action or inputs required by the user. This tool extracts expenditures the detail for all Expenditures shown on the TRNA tab, allowing the user to send a release from restriction journal entry to Sage Intacct with flexible choices regarding the level of expanded dimension detail that the entry contains. Alongside the entry writeback, a full expenditures General Ledger detail report appears for immediate reference and support of the journal entry's basis.
After setting your filters on the Net Asset Rollforward (TRNA) tab reviewing its preliminary output, you are ready to use the TRNA Purpose Release tool!
Left side of the tool: Journal Entry Writeback for Release of Revenue for Purpose Restrictions (Expenditure-Driven)
This tool is designed to be used "top to bottom," with the user collapsing sections as they go to stay focused on what matters. The top left section of the tool is simply a review - it highlights choices made on the Options tab and filtering selections from the TRNA tab. This also serves for context to support the scope of the release from restriction entry in a review/audit scenario. These should not be edited. If any of these choices need adjustment, go to their respective tabs to make changes. Once satisfied with their review of this information, the user can collapse this section.

The next section contains the journal batch (header) fields and settings. To the right side of this section there might be choices for the user to make, depending on the dimension filters you selected on the TRNA tab. The following dimensions are always included in the release from restriction entry, and you will never need to make a choice regarding their inclusion:
Location/Entity
Your organization's Funding Source dimension
Your organization's Restriction dimension
If you selected other dimensions on the TRNA tab, you can choose whether you want to include that level of dimension detail in your release from restriction entry. This choice is a simple "Yes/No" drop down selection for each dimension, which appears under the section entitled "Select Additional Dimensions to pass to the entry."
Again, if you did not use any other dimensions on the TRNA tab, then you may have no selections to make here.
If you want to add dimension detail but don't see a dimension to make a Yes/No selection for, ensure you have at least chosen the <All> option for that dimension on the TRNA tab.
Selecting "Yes" means each line of your release from restriction entry will contain the selected dimension's appropriate value (if tagged). Selecting "No" means that the dimension will not be included in any lines of your release from restriction entry.
On the left side, you have journal entry header and journal writeback option fields. These are fast, simple inputs.
In Journal batch fields, the minimum fields to complete are Journal (Journal ID), Posting date, and Description. Other fields are optional/situational, and you need only fill them out if you have a requirement to do so.
The Writeback options fields control certain options for Velixo's GL journal writeback. Complete the light blue fields - at minimum when completing your first writeback - and revise if/as needed.

The last section contains the line-level details for the release from restriction journal entries. Populated directly from your organization's expenditure activity, most details are dynamically pre-filled for the user, eliminating any manual entry calculation or preparation. In fact, the only inputs in this section are both optional unless your organization chooses to require them as a matter of policy:
Memo: enter a memo, which will appear as a memo on the journal entry line level for this row
Amount to Release Override: if you wish to release an amount from restriction that is different from the amount listed in the "Expenditures, Net of Previous Releases" column, enter that amount here. You can enter 0 to "skip" releasing revenue from restriction for this line
When you are satisfied with the journal entry, you are ready to write this data back to your ERP by clicking the Perform Writeback button and selecting Current Sheet.


This process may take several seconds; you can review the status of the operation in the Velixo Status pane.

If you selected "Open after upload" as Yes, a Sage Intacct browser window will open with your entry upon successful writeback (you may have to log in if you are not logged in already). If you set "Post?" to No, you can review and post the entry. Otherwise, the entry will already be posted.
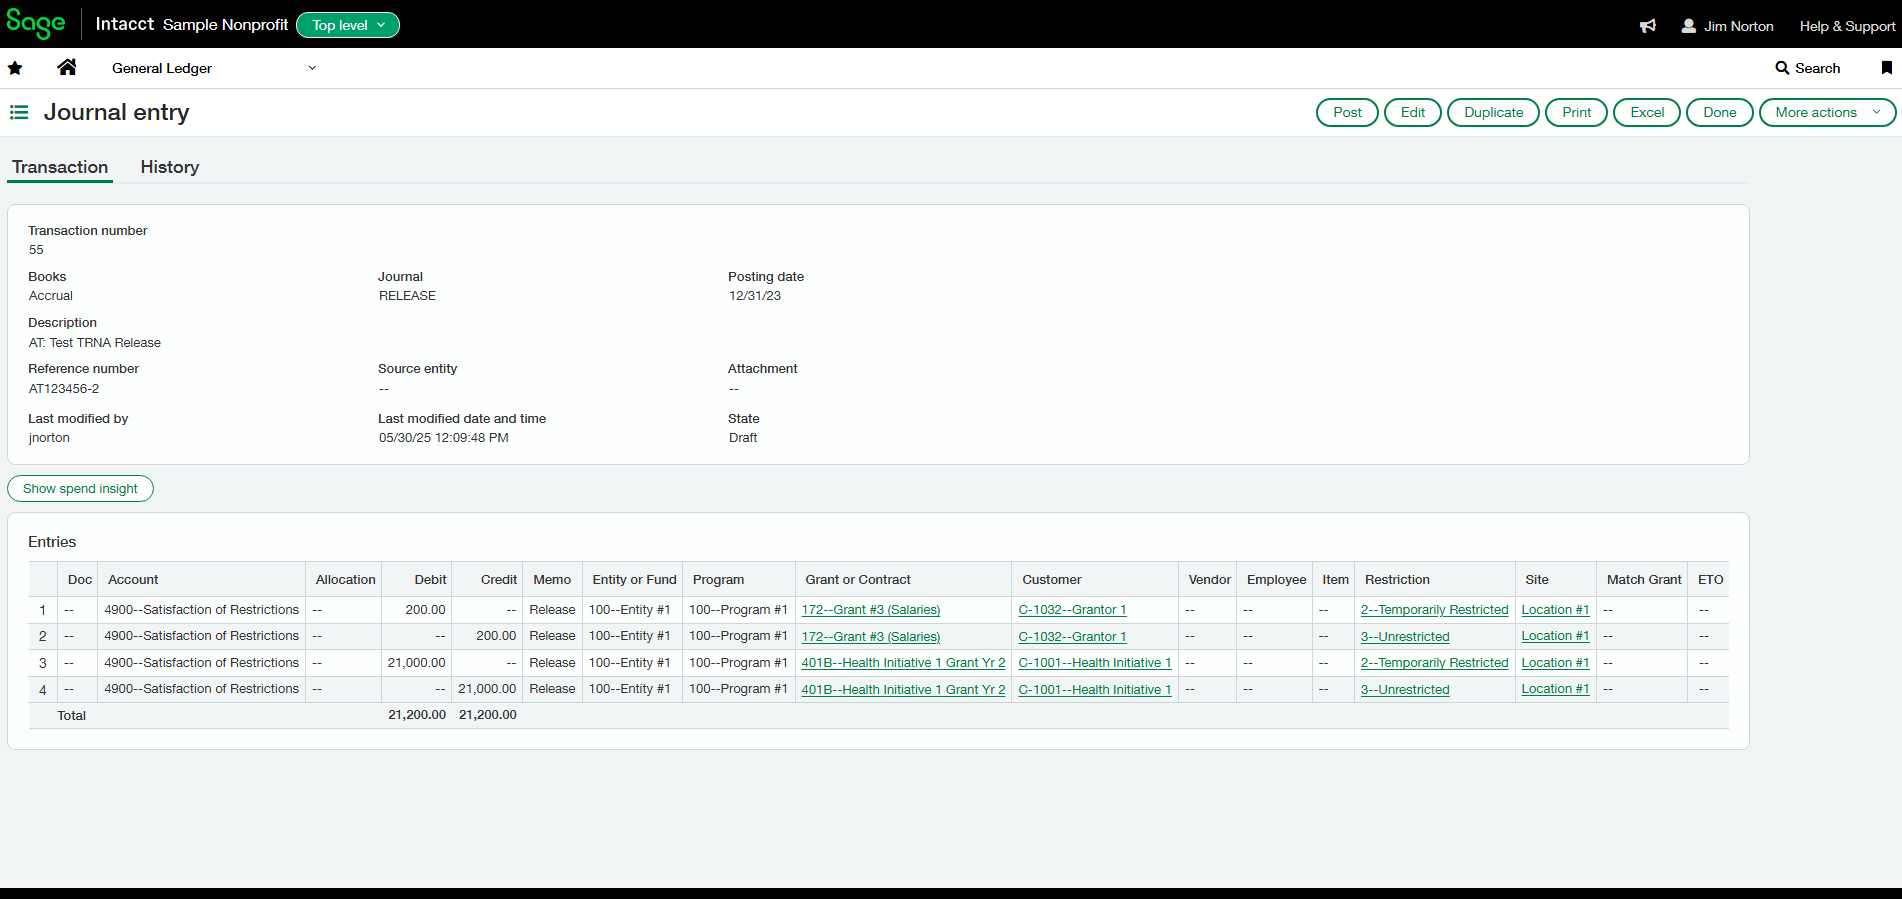
The journal batch number is automatically updated in your worksheet, reflecting the batch number sent to Sage Intacct, and the upload status is reflected.
Once you've posted any entries from the writeback process, selecting Refresh > Current Sheet (or Refresh > Entire Workbook, depending on your need) will immediately update your numbers


If you wish to explore/review the details of the data on this sheet further, you have several options:
Use Velixo drilldown on the amounts in the "Expenditures, Net of Previous Releases" column. If you wish to review, use one of the following options:
Right-click any amount and select Drilldown
Click on a cell with the amount you want to review, then in the Velixo NX ribbon select Drilldown > Drilldown
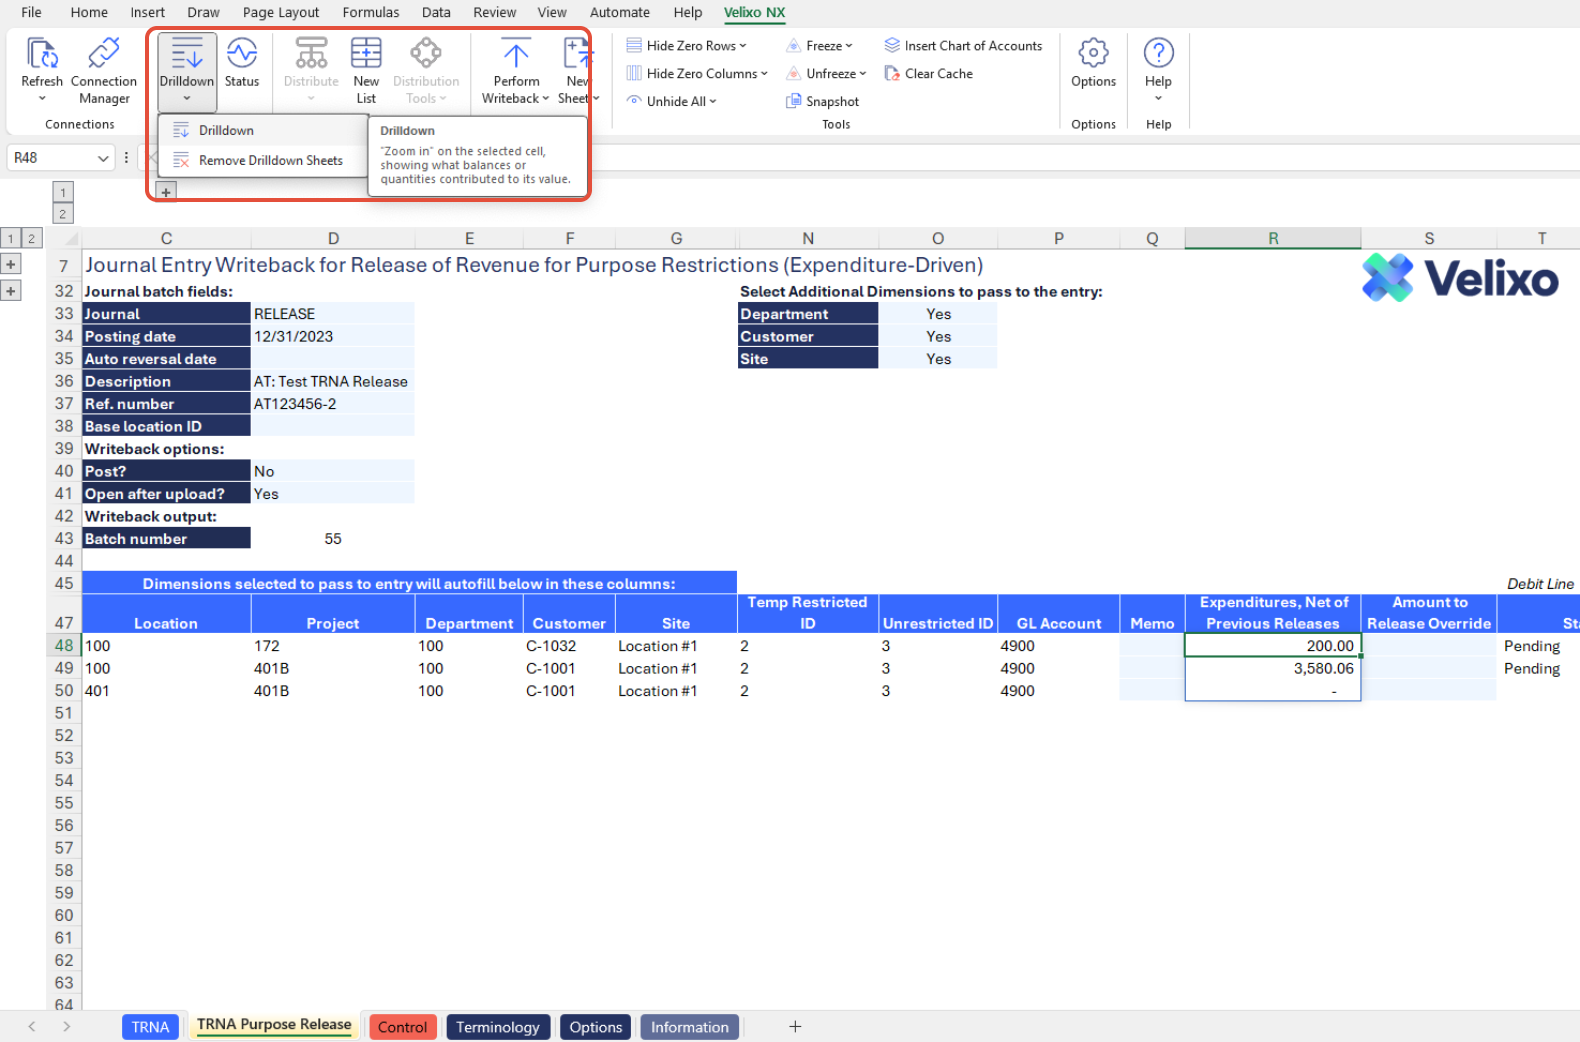
Either choice will begin the process, then open a tab with the details of the activity. From there, continue to drill down further, if desired, to your preferred level of information. See Drilldown for Sage Intacct for further information.
The Reference Data columns show the user a convenient recap of each combination of dimensions' amount of unreleased expenditures. Each column supports drilldown in the same manner referenced above. Accountants can easily reference this tab to review the following for the combination of dimensions indicated on each row:
Total Expenditures for Period
Total Amounts Released
The Net Amount, meaning Expenditures less any releases already performed. In many cases, organizations look for this amount to be zero, indicating they have completed all release from restriction entries for expenditures against purpose-restricted funds.
The Reference Data columns can be collapsed if the user wishes to hide them.

Right side of the tool: Expenditure GL Detail
The Expenditure GL Detail is intended for easy reference regarding the full contents of your organization's Expenditures for Period figure from the Reference Data section. Many organizations may find this useful as initial supporting documentation for their release from restriction journal entries.
The Expenditure GL Detail requires no additional action or selection by the user. It is generated automatically based on the following:
Options tab selections:
Funding Source Dimension Settings - this dimension is always included in your Expenditure GL Detail. Only Funding Sources which have expenditure activity per the TRNA tab are included in the Expenditure GL Detail
Dimension used for Restriction - this dimension is always included in your Expenditure GL Detail
Expenditure Account Settings - the range of GL accounts or account group that you select for expenditures will be used to generate the GL Detail
TRNA tab selections:
Other dimension filters - any other dimension filters you apply on the TRNA tab will be used in creating the Expenditure GL Detail. As indicated elsewhere, if you want to include a dimension without restricting which values appear, simply select the <All> filter for that dimension on the TRNA tab
Books - the Expenditure GL Detail will contain amounts from whichever Books you choose on the TRNA tab
Opening Balance Date/Closing Balance Date - the Expenditure GL Detail will contain amounts posted between the Opening Balance Date and Closing Balance Date (inclusive) as entered on the TRNA tab
Ultimately, the Expenditure GL Detail is simply a review and supporting documentation tool, and it is intended for use as such. It is fully collapsible.

Understanding the Report Formula
Velixo created the template using a combination of Excel functions and Velixo functions for the Net Asset Rollforward report. The report incorporates two primary formulas on the Net Asset Rollforward tab:
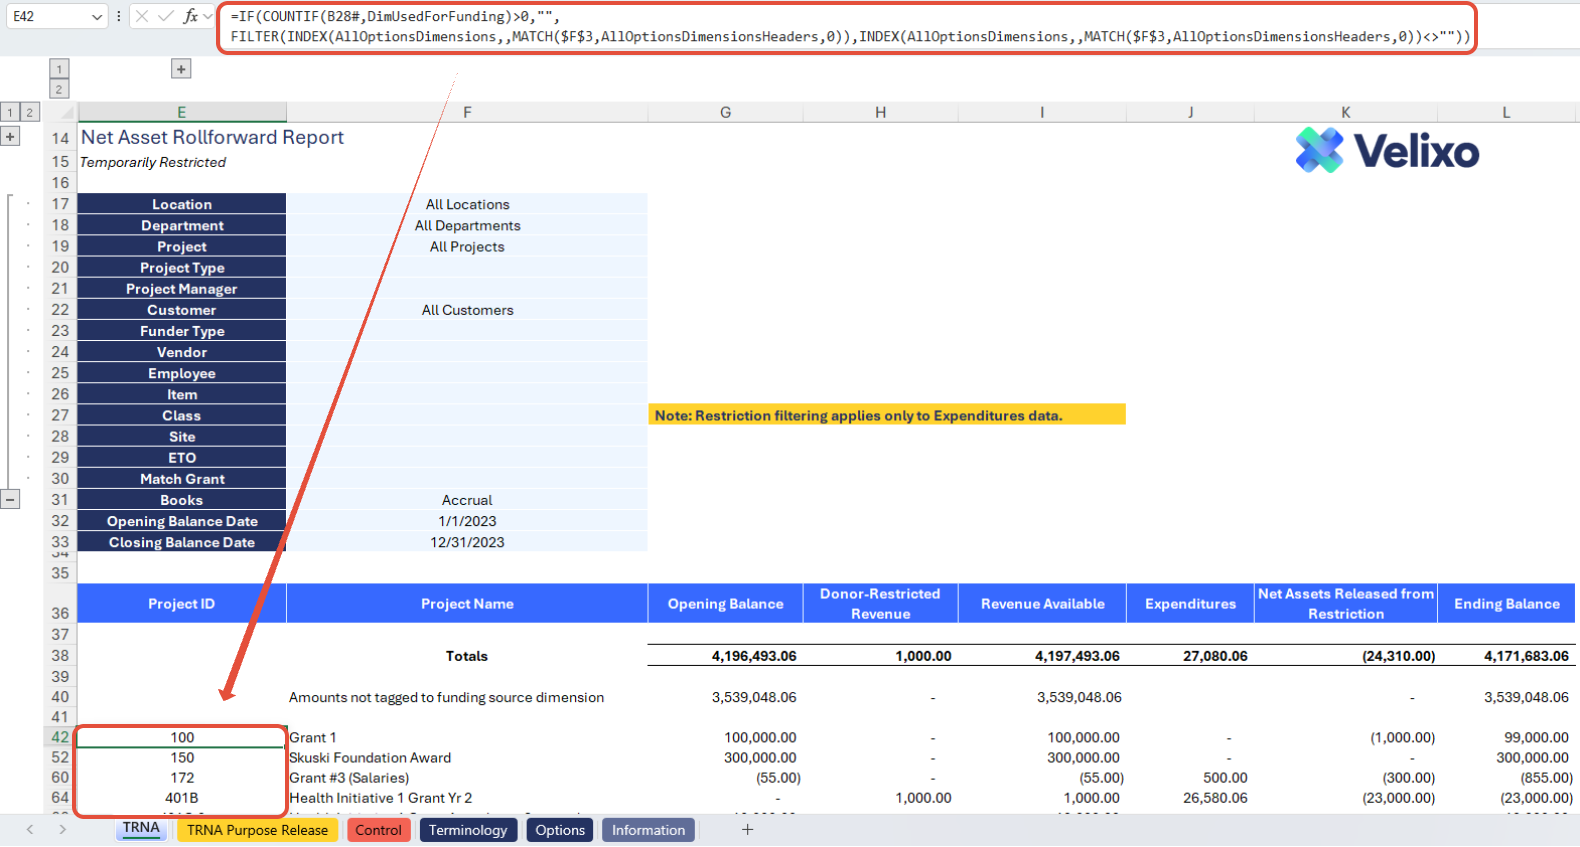
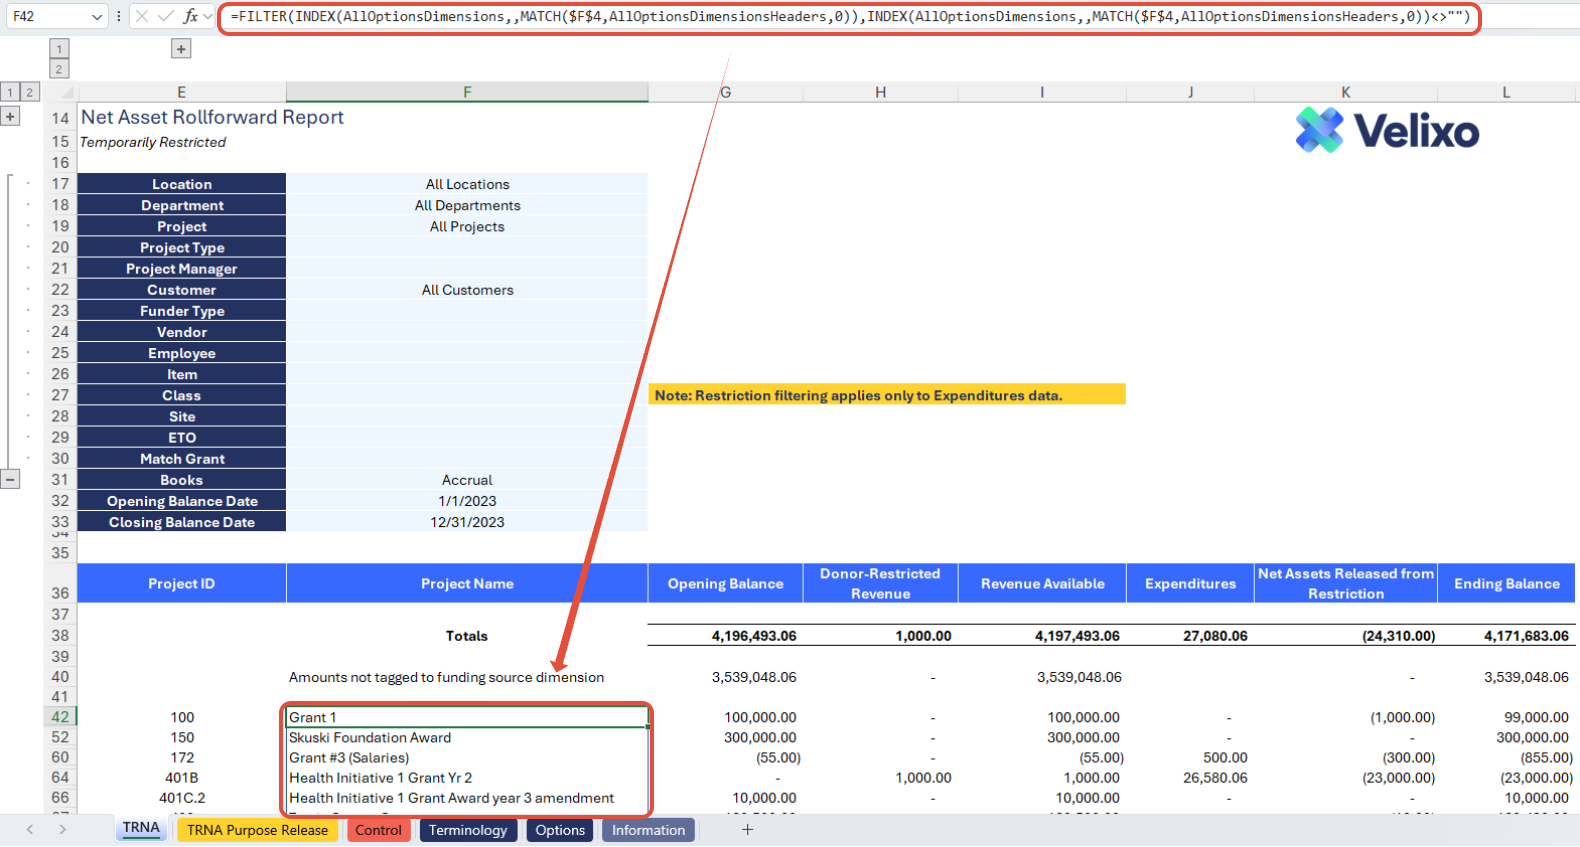
Defining Row Values - Funding Source Dimension List Retrievals
In Columns E and F, INDEX and MATCH formulas are used to determine the dimension chosen by the user for Funding Source on the Options tab, then retrieve the appropriate dimension list from the Option tab based on that selection and on the dimension's native name in Sage Intacct (hidden in column B).
Defining Column Values - Amount formulas
Velixo formulas power amounts in this report. The Opening Balance column leverages the SI.OPENINGBALANCE function. The Ending Balance column leverages the SI.CLOSINGBALANCE function. The Donor-Restricted Revenue, Expenditures, and Net Assets Released from Restriction columns leverage the SI.TURNOVER function. The Revenue Available column is a simple Excel formula with an addition operation (Opening Balance + Donor-Restricted Revenue).Data for the function's arguments comes from a few places:
Driven by your selection(s) on the Options tab:
AccountGroup / AccountCode
Driven by your filter choices on the TRNA tab:
StartDate / EndDate
Books
Driven by a combination of your Options tab and TRNA filter choices, depending on the use case (see the "Dimension Argument Determination - further detail on select arguments in the Velixo functions" section below):
Dimensions
UserDefinedDimensions
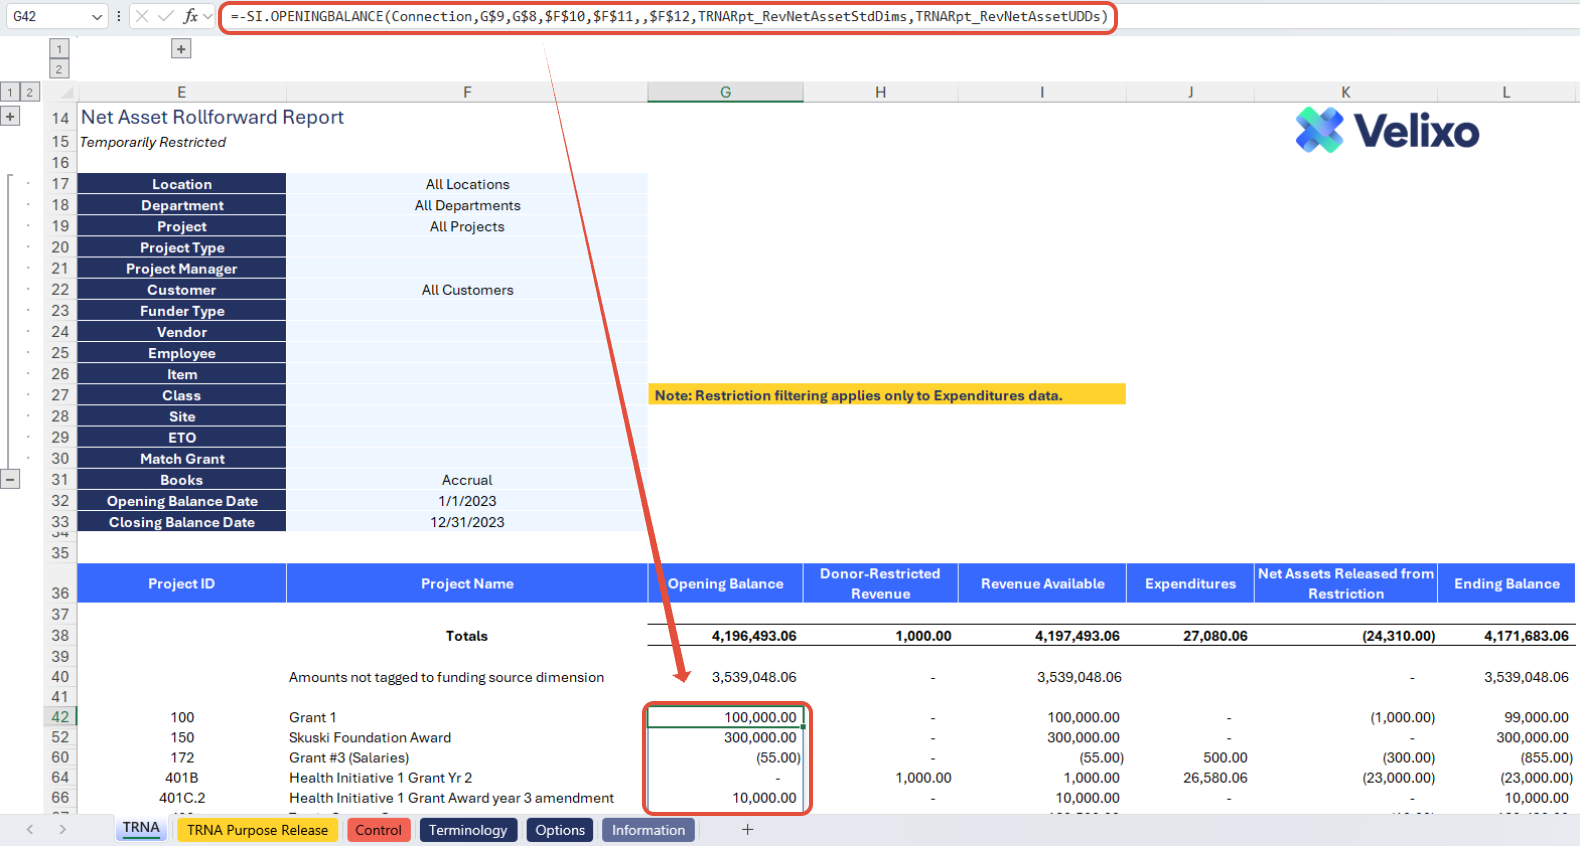
Example of a SI.OPENINGBALANCE formula used in the template
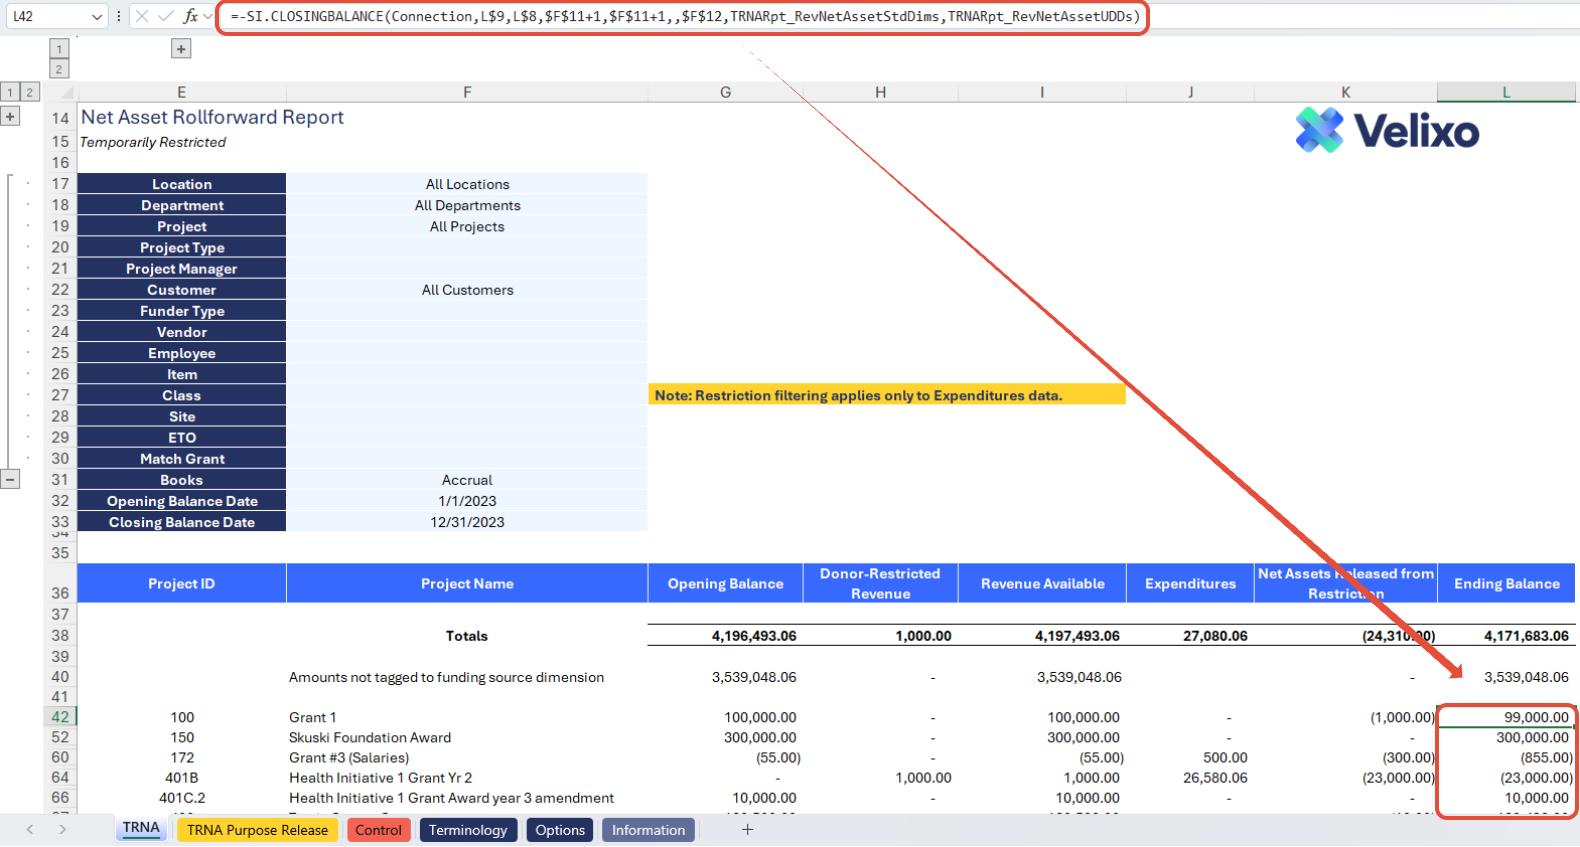
Example of a SI.CLOSINGBALANCE formula used in the template
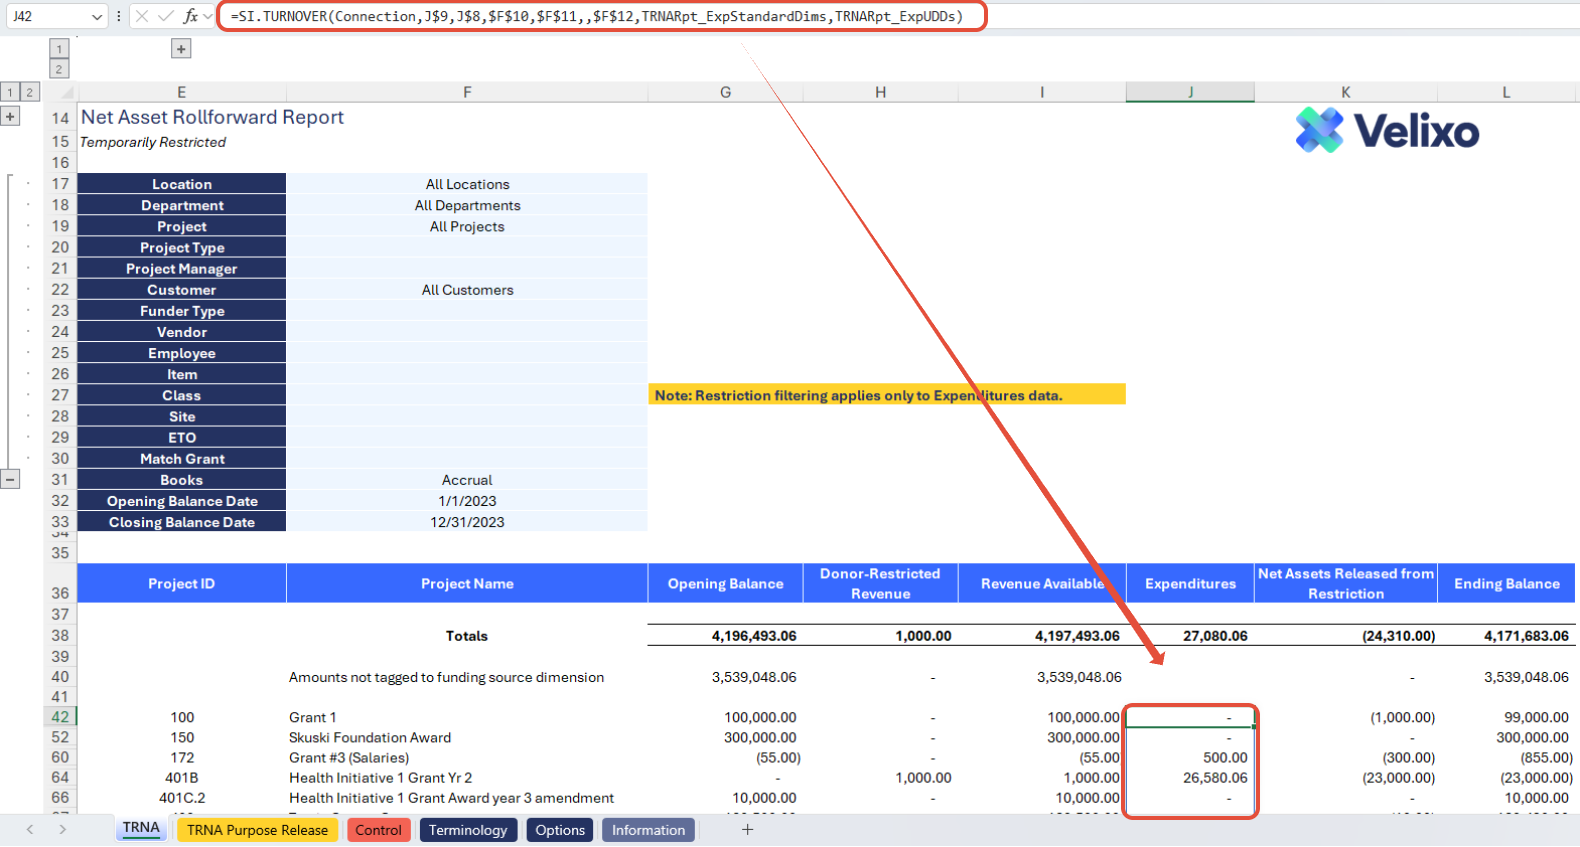
Example of a SI.TURNOVER formula used in the template
Dimension Argument Determination - further detail on select arguments in the Velixo functions
To produce an accurate Net Asset Rollforward Report, different types of dimension filters need to be applied to different columns of the report. Keep the following results in mind when considering how dimension filters are working in formulas:
The dimension for Funding source will always be used in each column, since the purpose of this report is to be able to report balances and activity by Funding source. The Funding source dimension filter value used in Velixo functions is obtained from the row level. Recall that the Funding sources displayed on the row level are automatically determined based on (1) the dimension you select for Funding source on the Options tab, and (2) the filters you select on the TRNA report tab.
For all columns except the Expenditures column, the Restriction dimension filter value used in Velixo functions is your Temporarily Restricted dimension value as selected on the Options tab. For the Expenditures column, the Restriction dimension filter value used in the Velixo function is based on your selection in the filters of your TRNA report tab (to allow flexibility for how organizations may choose to record expenses).
Values for all other filter selections on the TRNA tab are passed directly to Velixo functions for all columns without special circumstances.
Formulas on the TRNA Purpose Release Tool
The TRNA Purpose Release Tool incorporates four primary formulas:
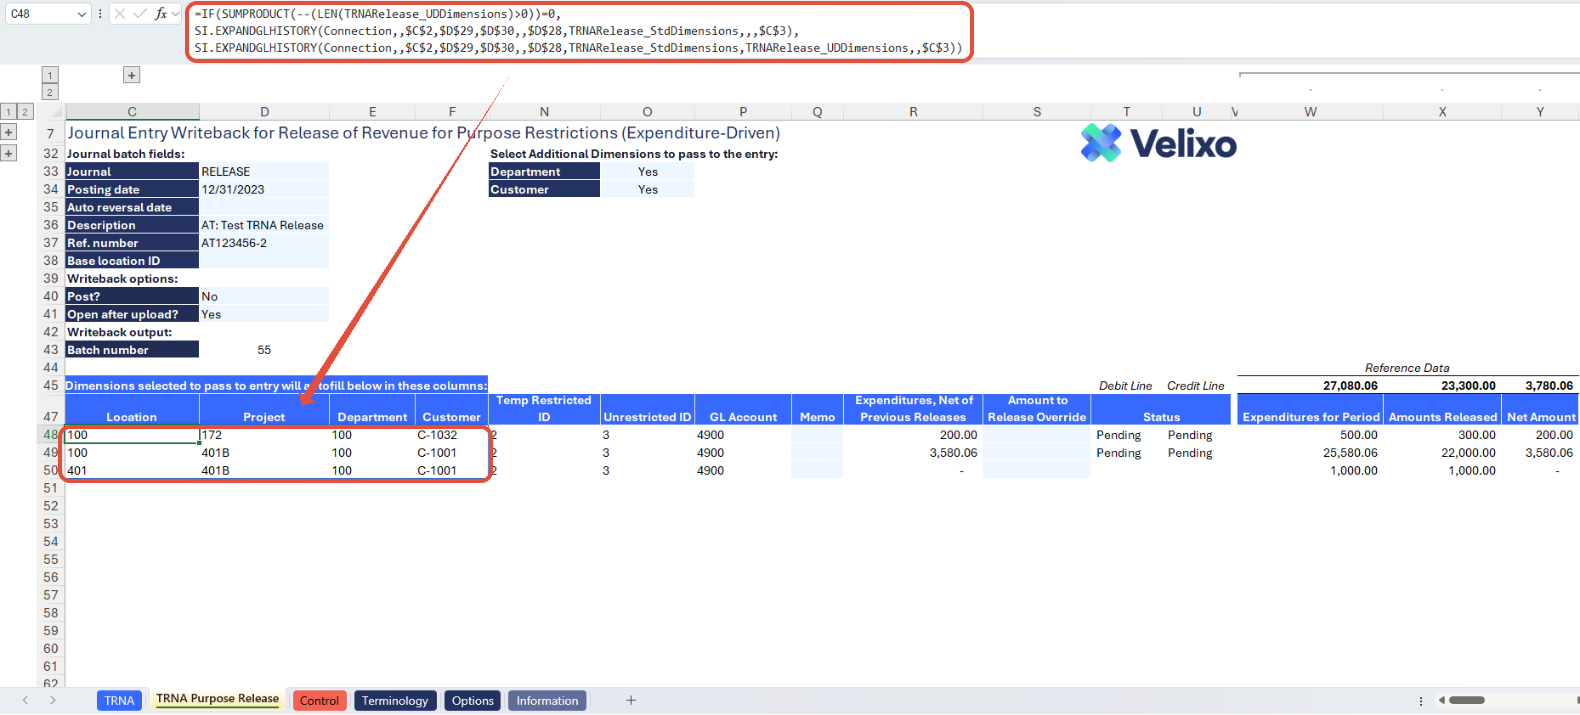
Dimension Detail formula for expenditure amounts: this formula's objective is to obtain every unique combination of dimensions that have expenditure activity within the scope of what was presented on your TRNA tab, and subject to the choices you made in the "Select Additional Dimensions to pass to the entry" drop down lists.
Velixo's SI.EXPANDGLHISTORY function powers this output.
Since passing a blank UserDefinedDimensions argument to SI.EXPANDGLHISTORY can sometimes result in errors, the function uses an IF statement to determine if user-defined dimensions (UDDs) are needed (i.e., checks whether they are present in any filtering criteria from the TRNA tab). If UDDs are needed, it uses a version of SI.EXPANDGLHISTORY with the UserDefinedDimensions argument included. If UDDs are not needed, it uses a version of SI.EXPANDGLHISTORY that excludes the UserDefinedDimensions argument.
The formula returns a dynamic array; columns automatically expand or retract to include/exclude relevant dimensions.
Expenditure amounts formula: this formula's objective is to obtain the amount expenditures attributable to the unique combination of dimensions listed on the row level - this amount is obtained in total, then we obtain the amounts released from restriction, then we calculate the net (total minus amounts released).
A combination of Velixo's SI.TURNOVER function and a simple Excel formula for subtraction powers these columns.
Since passing a blank UserDefinedDimensions argument when SI.EXPANDGLHISTORY is involved (even indirectly) can sometimes result in errors, the function uses an IF statement to determine if user-defined dimensions (UDDs) are needed (i.e., checks whether they are present in any filtering criteria from the TRNA tab). If UDDs are needed, it uses a version of SI.TURNOVER with the UserDefinedDimensions argument included. If UDDs are not needed, it uses a version of SI.TURNOVER that excludes the UserDefinedDimensions argument.
Since the dimension expansion in the left section of the journal entry is fully dynamic and users are free to choose which dimension they use for both Funding Source and Restriction, it is impossible to create a template that prescribes which column any standard or user-defined dimension will occupy. To solve for this challenge and ensure the user retained maximum flexibility without inheriting any extra manual steps, Velixo has created named ranges which reference data in hidden "helper" columns. These named ranges figure out and provide the Velixo functions with the necessary values in the Dimensions and UserDefinedDimensions arguments for you! See the note entitled "Further Detail on Release Entry Dimensions" at the end of this section for more information.

Formula for Expenditures for Period column - obtains the amount of expenditures for the combination of dimensions on the row level
Formula for Amounts Released column - obtains the amount for revenue released from restriction for the combination of dimensions on the row level
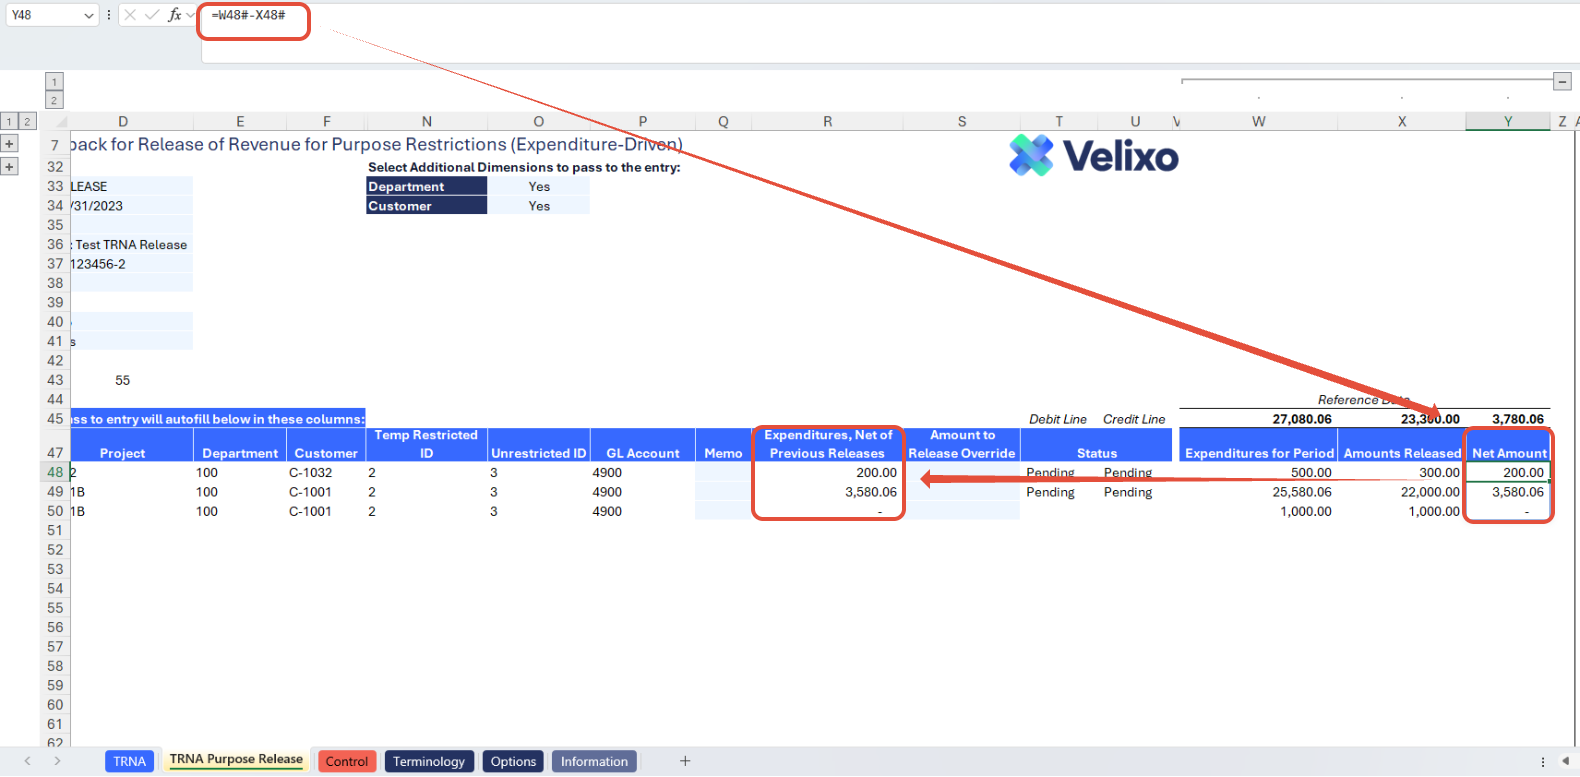
Formula for Net Amount column - subtracts Amounts Released from Expenditures for Period. This flows to the Expenditures, Net of Previous Releases column.
GL Journal writeback formula: this formula's objective is to send a journal entry to Sage Intacct to record the release of revenue from purpose-based restriction.
Velixo's SI.WRITEBACKJOURNAL function powers this capability.
To ensure flawless execution, an IF function ensures that the amount to release is not blank or zero. If either of these is the case, the row is skipped.
Additionally, since passing a blank UserDefinedDimensions argument when SI.EXPANDGLHISTORY is involved (even indirectly) can sometimes result in errors, the function uses an IF statement to determine if user-defined dimensions (UDDs) are needed (i.e., checks whether they are present in any filtering criteria from the TRNA tab). If UDDs are needed, it uses a version of SI.WRITEBACKJOURNAL with the UserDefinedDimensions argument included. If UDDs are not needed, it uses a version of SI.WRITEBACKJOURNAL that excludes the UserDefinedDimensions argument.
GL Journal writeback formula - restricted side of entry

GL Journal writeback formula - unrestricted side of entry
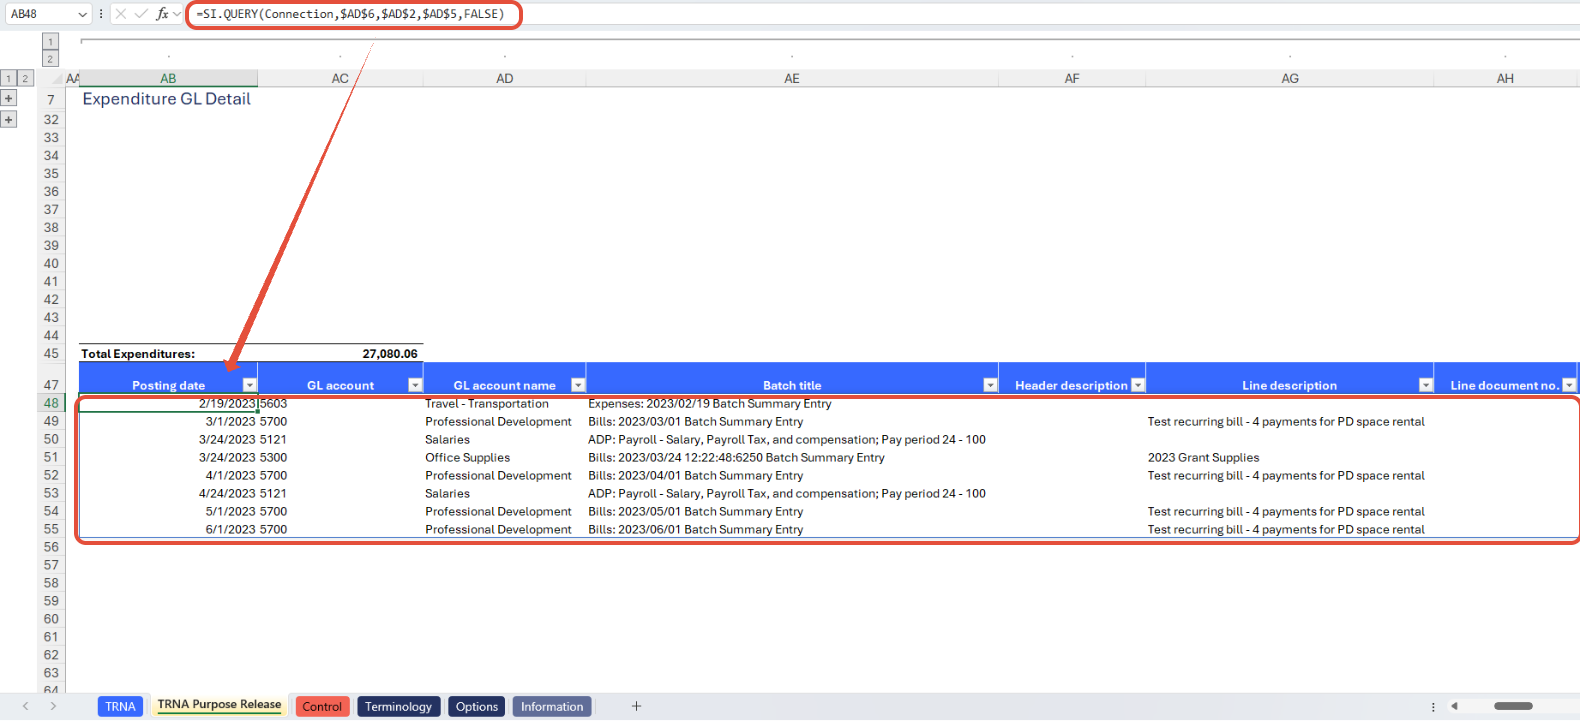
GL Detail formula: the objective of this formula is to produce a General Ledger detail report showing all contents that make up the Total Expenditures figure.
Velixo's SI.QUERY function powers this output, creating a dynamic array that contains your organization's GL detail.
The query filters are the same as any filters applied from the TRNA tab.
This was built in a fully dynamic fashion, so it is unlikely that the user should ever have to edit or interact with this data, unless you are making customizations to the template.
Customizing the Template
Reviewing the Options sheet
The Options tab comprises Sage Intacct dimensions, and other attributes and structures used in the report. The information updates in real-time with Velixo app refresh, facilitating immediate integration of newly added ERP data into the report as filters. Due to the volume of data potentially available, this information is organized into collapsed groupings for a less overwhelming, easier user experience.
This includes:
Connection Name
Accounting Settings
Funding Source Dimension Settings
Net Asset Settings
Restriction Dimension Settings
Temporarily Restricted Net Assets Dimension
Permanently Restricted Net Assets Dimension
Unrestricted Net Assets Dimension
Restricted Revenue GL Range or Group Setting
Expenditure GL Range or Group Setting
Restriction Release Settings
Standard Dimensions (Location, Department, Project, Customer, Vendor, Employee, Item, Class)
User Defined Dimension (Prebuilt to account for up to three UDDs, though you can customize for as many as you like if you have more)
Books
GL Accounts
Account Groups
Reporting Periods
Finally, a Template-Specific Lists/Filters section lists additional helpful information and gives you an optional template tool to create a query filter (if needed to create more complex grouping/filtering criteria). See the SI.QUERYFILTER and SI.QUERY topics for further information.

The Connection Name is subject to variation depending on the user input provided through the Velixo login portal. For convenience, users may add the connection name used on cell B5. This cell has been designated as a named range (Connection), ensuring its automatic application to all formulas throughout the sheet.

Users can also customize their dimensions by adding their preferred custom values, using a list and ranges as described in this article. The ability to define custom values for grouping is prebuilt into this template for standard dimensions, user defined dimensions, and books.
To do so:
Expand the column group for your desired dimension (e.g. Location or Department).
Then, simply input the desired values in the Group formula and Custom group name columns, highlighted in light blue for quick identification.

Managing TRNA Tab Structure
The calculated report amounts are determined solely by the selections made with your accounts and dimensions per the Options tab. This ensures the report is fully ready for use by anyone, 100% out-of-the-box, provided the selections you made have data in your Sage Intacct environment. The layout of the report is intended to address the information that most nonprofit organizations need for their purpose-restricted Net Asset balances on a periodic basis.
However, as outlined earlier in this document, users have the flexibility to tailor this report to their specific needs. It is not required, but advanced users may choose to customize this report based on specific requirements.
Adding Rows or Grouping
It should be unnecessary to add rows to this report if you are using it out-of-the-box. By default, the rows on your TRNA tab represent an Excel dynamic array and are covered by Velixo's Auto-Hide Zero Rows in Selected Range functionality. This means that all your Funding Source dimension IDs and names are always available, but will display on the report only if they have data. In other words, your rows will add and hide themselves automatically!
A possible use case for adding rows is to create a summarized or "grouped" presentation of several funding sources. If users desire a structure beyond the provided granular per-dimension listing, they can leverage Velixo range/wildcard expressions to create more summarized groupings. To do this, users should do the following:
Use Excel functions to add a new row in the desired section either above or below the range of your Funding Source IDs. It is important that you do not interrupt this array, as it will produce #SPILL errors.
Be cautious with formulas in newly added rows; copying from another row can be a starting point, but you may need to edit the Dimensions and UserDefinedDimensions arguments for any rows you add manually, since these rows are NOT part of the dynamic array of Funding Source IDs.
Take advantage of the SI.DIMENSIONS function!
Excel Named ranges DimUsedForRestriction and TempRestrictedNetAssets will give you the temporarily restricted dimension and dimension ID, respectively - needed for Restriction on Opening Balance, Donor-Restricted Revenue, Net Assets Released from Restriction, and Ending Balance.
The data in hidden (collapsed group) columns B and D will help with getting the correct arguments for your non-Funding Source, non-Restriction dimension IDs for all columns that need Dimensions and/or UserDefinedDimensions arguments. These should be used in the following columns:
Opening Balance
Donor-Restricted Revenue
Net Assets Released from Restriction
Ending Balance
For your Expenditures column only, data to help construct your SI.DIMENSIONS function to feed your your Dimensions or UserDefinedDimensions argument for your Restriction dimension should come from the data in hidden (collapsed group) columns B and D, not from the named ranges.

When customizing the report, users should take caution to avoid overlap in data. Opting for a granular funding source list helps to ensure data accuracy.
Removing Rows
Velixo templates make use of Velixo's automatic hiding of rows with zero values, which has been configured on all actual values.
This feature eliminates the need for manual deletions of account category rows and ensures the report remains fully dynamic should usage of dimension IDs change over years or transactions get created against new dimension IDs.
Since the Funding Source ID list is a dynamic array, you cannot delete rows. Instead, the strategy for "removing" rows (even if they are already hidden) is to create a Funding Source group on the Options tab and filter your TRNA tab to that Funding Source group. By using this filter, any Funding Source IDs outside your filter criteria will never display on the TRNA tab, regardless of whether they have data.
The only rows you might consider deleting on this report are the Totals row and the Amounts not tagged to funding source dimension row. If you choose to delete these rows:
Utilize Excel's delete row function for removal, followed by thorough data validation and reconciliation on the report.
Always validate data accuracy using the Control sheet. You will have to create a new reference on the Control sheet if you delete the Total row, as the Control sheet currently looks to the Total row for reconciliation purposes.
Adding Columns
The user can insert columns on the TRNA tab if there are additional details to be captured. Doing so should not have any adverse impact on reporting, though we always recommend thorough data validation/reconciliation and verifying data accuracy using the Control sheet.
Utilize Excel's add column function, followed by thorough data validation and reconciliation on the report.
Be cautious with formulas in newly added columns; ensure you understand the nature of the column you have added and copy a similar formula from the most appropriate existing column possible.
Removing Columns
The columns on this template generally represent the standard required for a Net Asset Rollforward report. Removal of columns is not necessarily recommended. You may instead consider use of Velixo's Hide Zero Columns functionality.
If you decide to remove columns:
Utilize Excel's delete column function for removal, followed by thorough data validation and reconciliation on the report.
Always validate data accuracy using the Control sheet.
Version history
Version | Released on | Changes |
1 | N/A - Early Adopters only | N/A. Initial version of the template. |
1.1 | August 5, 2025 |
|
1.2 | September 29, 2025 |
|