Add a Connection
If your workbook does not have a connection yet, follow our Connecting Velixo NX to an Acumatica-based ERP guide.
Your first formula
Let's begin with something very simple — retrieving the name of an account.
In the A1 cell, we will put an account code, in this case 40000.
In the B1 cell, we will use the ACCOUNTNAME function. As you start typing, notice that the add-in provides you with information about the function:

The first argument for the ACCOUNTNAME function is the name of the connection as it was defined in the Connection Manager - "Demo”. Then enter a comma to move on to the next argument.
The second argument that is required by this function is the ACCOUNT code. In our example, the account code is in cell A1. Click on that cell and Excel automatically adds a reference to the cell in the formula.
The complete formula should look like this:
=ACCOUNTNAME("Demo", A1)
Press the Enter key. Since this is the first time that you’re accessing the Accounts data, the add-in will attempt to bring the data in and cache it locally. Unless you have thousands of GL accounts, this should only take 2–3 seconds.
After this the data is present in the cache, Excel will retrieve it from there and will only load modified data from the ERP (and will only do that once each session).
Next, try to change the account code in the A1 cell, and then press enter to see an immediate update to the value of the account name cell.

All the functions in Velixo work in a similar way.
Get the balance of an account
Let’s continue to build our worksheet and do something more useful.
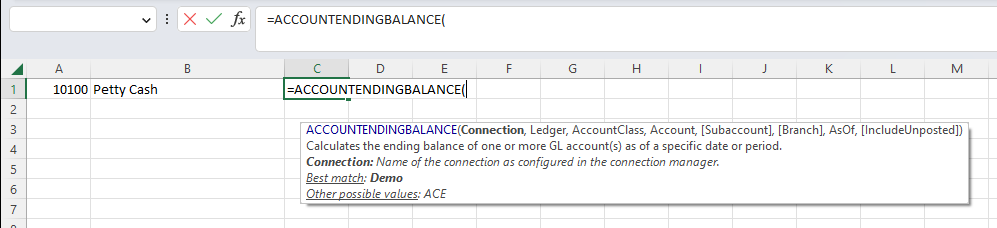
We’re going to get the current balance of the Petty Cash account (account 10100), using the ACCOUNTENDINGBALANCE function.
Complete list of functions: There are many more functions included in Velixo, and we invite you to explore them all when you complete this tutorial.
The ACCOUNTENDINGBALANCE function expects a few different arguments:
-
Connection— The name of the connection. In this example, it's “Demo”. -
Ledger— The ledger in which the calculation should be made. Every type of ledger is supported:Actual,Reporting,Statistical, andBudget. -
Account Class— In this example, leave this empty value since we are specifying the exactGLaccount to use. You have the options to:-
specify an account class only
-
an account only
-
or a combination of both
and the system will determine which account(s) to use for calculation.
-
-
Account— The account for which we want the balance. The value here could be written as “101009” directly in the formula. However, the account number is already in cell A1 so let's use that as a cell reference.
Click on the cell while typing out the formula to automatically enter the correct reference. This works even if the reference is on a different sheet.
-
Subaccount— In this example we avoid focusing on a specific subaccount, so this will remain empty. -
Branch— In this example we avoid focusing on a specific branch, so this will remain empty value. -
As Of— This is the financial period for the calculation. For this argument, we'll enter “11–2017” directly in the formula.
When entering financial periods in a function, don’t forget to surround the period with double quotes, because otherwise Excel will subtract the numbers and assume you want period -2006 (11 minus 2017)! -
Include Unposted- We can choose what combination of posted and unposted data we want to include in calculating the balance. If we use a 1, we'll include only Posted data, 2 - only UNposted, and 3 - both. For this example, we'll enter a 1 for just the posted data.
Press Enter to complete the formula. The ending balance will calculate automatically.

Since this the first time you’re calculating a value for this connection, ledger, and financial year, Velixo will connect to your ERP to retrieve and cache the necessary data. Any subsequent calculations in this spreadsheet will happen instantaneously.
Ranges and wildcards
Combine multiple accounts, subaccounts or branches
In the previous example, you saw how to get the balance of a single account.
Now, what if you want to get the total for multiple accounts, subaccounts, or branches?
Yes, you can use the + operator to add the values, but this could result in a messy formula and sluggish calculations. There's a better way—with ranges and wildcards.
For many Velixo functions, you can substitute a range or wildcards in any place that an account, subaccount, or branch is necessary.
Here are some examples of what’s possible:
-
Range — “20100:20150” will return all the accounts between 20100 and 20150
-
Wildcard — “6?000” will return any account that starts with a 6 and ends with 000 (examples would be 61000 and 63000).
-
Excluding or subtracting specific accounts from a range — "40000:49999;-45610" would show the balance for every account between 40000 and 49999, but subtract the balance of account 45610 from that total.
-
A mix of single accounts, ranges and wildcards can be combined together by using the “;” character — One example would be “6?000;61100;69000:69999”.
A complete example
By building on the formulas, tools, tips and tricks you've learned here, you should be able to build a full Trial Balance, balance sheet, or P&L using the Velixo add-in.
Example workbooks: Allow us to suggest that you download and explore one of the sample workbooks and connect it to your own ERP.