SI-NFP-TOOL7 Unbilled Projects & Grants Tool
Applies to
Product version: Velixo NX
ERP: Sage Intacct
Functional area: Financials, AP, EXP, CM
Industry: Not-For-Profit
Plan: Essentials, Professional, Premium
Template type: Production Report template
Description
The SI-NFP-TOOL7 Unbilled Projects & Grants Tool is an advanced nonprofit reporting template used for granular extraction and analysis of paid transaction line-level details. Many nonprofit organizations need to list and provide to their funders or grantors only those expenses which have been paid for a given date range. Traditionally, this is a cumbersome ask for organizations using accrual-basis accounting. This tool solves for the challenge, retrieving only paid transaction lines and making a variety of other transaction details available, all in a consolidated table for easy filtering and analysis by the user.
Seamlessly integrating with your Sage Intacct data, the tool provides a streamlined overview and user-friendly interface, reducing some relatively complex Excel operations to simple point-and-click selections on the part of the end user. The end result: you gain all the reporting power your organization needs in this area, and inherit none of the complexity!
The current version of the template is: v1.1.
Coverage
This workbook includes the following sheets:
Transactions: the detailed report consolidating granular transaction data from Accounts Payable, Credit Cards (Cash Management), Employee Expenses (Time & Expense), and General Ledger, based on user selection.
Transactions Summary: the summarized report showing transactions by source (subledger). This is in Pivot table format with slicers for easier visualization.
Control: a control report that can be used to confirm that the data is accurate and balances.
Table tabs: these tabs contain query tables with all transaction records from Sage Intacct, organized by source for easier reference.
Options: the template's settings sheet that is used for data validation lists and various lookups and configurations.
Terminology: a sheet that allows the user to override terminology (naming) used for their Sage Intacct dimensions within the template.
Information: the information sheet of the report, used for storing useful details about the report such as: code, version, article link to keep track of the origin of the report.
Typical audience
This tool supports the needs of a varied audience, including but not necessarily limited to Nonprofit Program teams (Program Directors, Managers, Executives) as well as Nonprofit Finance professionals (Accountants, CFOs, Controllers, and their audit firm(s)/committees).
Features
The following Velixo features are used by this report. To use this report, please ensure that your Velixo license includes all of them (or contact Support or Sales if not):
Financial functions
Query functions
Dimension functions
Preview

Download
To download this and other templates, go to the Velixo Portal template gallery.
Documentation
Navigating and utilizing the SI-NFP-TOOL7 Unbilled Projects & Grants Tool report is a very straightforward process, designed for simplicity, maximum flexibility, and efficiency. There are some complex Excel operations in this template, but its design is meant to ensure that any user can work with this tool, regardless of technical proficiency level. The template comes pre-configured with connections to all necessary Sage Intacct objects/records so you can seamlessly select your chosen account and dimension values where needed, streamlining the reporting process with minimal user effort.
Filters
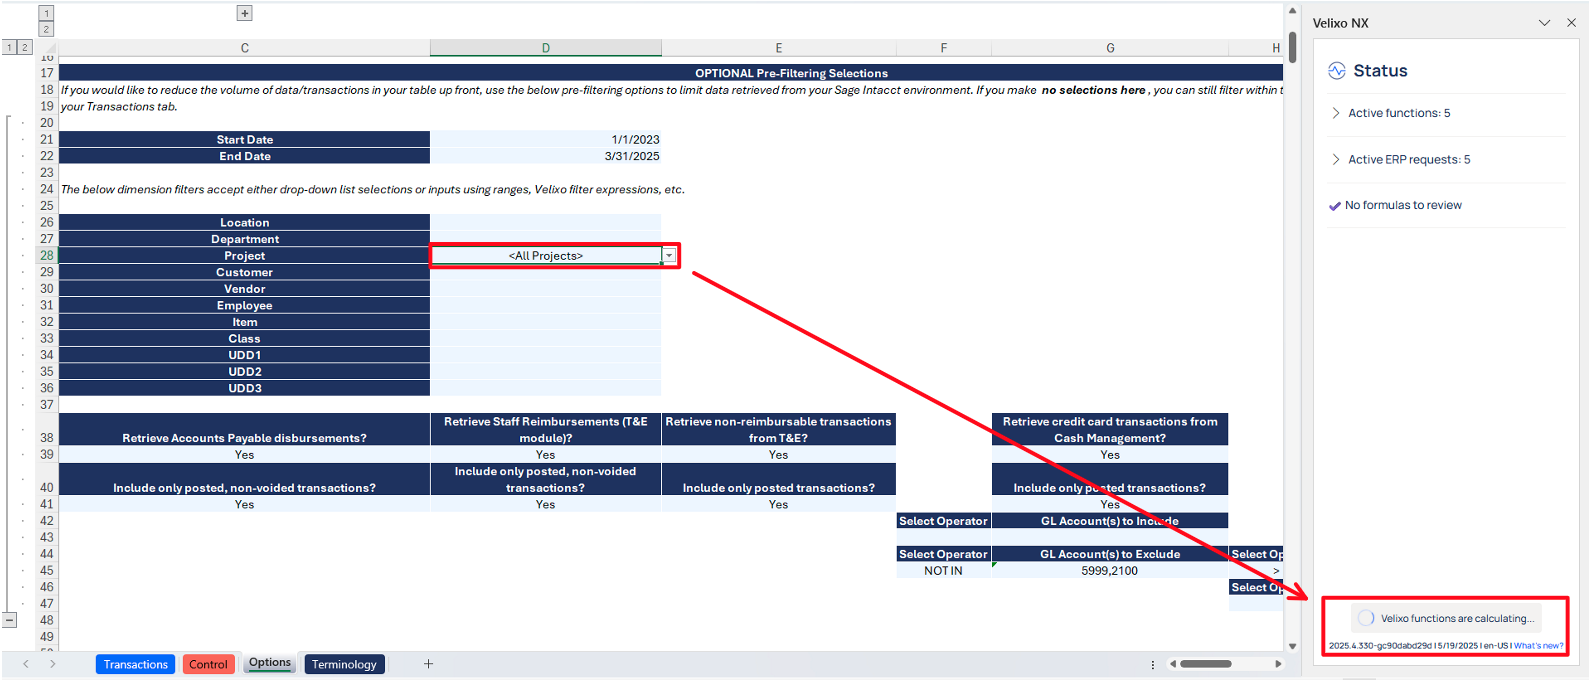
The primary filtering for this report comes from the "OPTIONAL Pre-Filtering Selections" section on the Options tab. With a user-friendly interface, accessing the required information about your unbilled project and grant transactions requires minimal effort. The filters include options for date range, dimensions, and modules to be included.
While filters are optional, it is strongly recommended that you use them. Removing unnecessary data from the report leads to better, faster performance all around!
Date Range and Dimension Selections
Start Date: The first date for which you want to retrieve transactions from Sage Intacct.
End Date: The last date for which you want to retrieve transactions from Sage Intacct.
Location: Lists all Entities and Locations present in your Sage Intacct instance, including any custom groups you defined in the Options sheet.
Department: Lists all Departments present in your Sage Intacct instance, including any custom groups you defined in the Options sheet.
Project: Lists all Projects present in your Sage Intacct instance, including any custom groups you defined in the Options sheet.
Customer: Lists all Customers present in your Sage Intacct instance, including any custom groups you defined in the Options sheet.
Vendor: Lists all Vendors present in your Sage Intacct instance, including any custom groups you defined in the Options sheet.
Employee: Lists all Employees present in your Sage Intacct instance, including any custom groups you defined in the Options sheet.
Item: Lists all Items present in your Sage Intacct instance, including any custom groups you defined in the Options sheet.
Class: Lists all Classes present in your Sage Intacct instance, including any custom groups you defined in the Options sheet.
User defined dimensions: For each user defined dimension, the filter will list each UDD name present in your Sage Intacct instance, including any custom groups you defined in the Options sheet. In the below screenshot, UDD1, UDD2, and UDD3 are user defined dimensions. The template is prebuilt to display up to three user-defined dimensions.
The dimension filters also accept input of Velixo range expressions. For more information on range expressions, see this article.


Module Selections
Retrieve Accounts Payable disbursements? Choose "Yes" to include paid transactions from Accounts Payable in your transactions data. Choose "No" to exclude them.
If you choose "Yes," you have another selection:
Include only posted, non-voided transactions? Choose "Yes" to include only posted, non-voided transactions. Choose "No" if you want your transactions data to include voided and potentially unposted transactions.
Retrieve Staff Reimbursements (T&E module)?
Choose "Yes" to include paid transactions from Staff expenses (Time & Expenses module). Choose "No" to exclude them.
If you choose "Yes," you have another selection:
Include only posted, non-voided transactions? Choose "Yes" to include only posted, non-voided transactions. Choose "No" if you want your transactions data to include voided and potentially unposted transactions.
Retrieve non-reimbursable transactions from T&E? Choose "Yes" to include non-reimbursable transactions from the Time & Expenses module (i.e., company-paid card charges entered through the module). Choose "No" to exclude them.
If you choose "Yes," you have another selection:
Include only posted transactions? Choose "Yes" to include only posted transactions. Choose "No" if you want your transactions data to include potentially unposted transactions.
Non-reimbursable transactions are always considered "paid" for the purposes of this template, since they have been paid by the employee (usually via credit card).
Retrieve credit card transactions from Cash Management? Choose "Yes" to include credit card transactions recorded via the Cash Management module. Choose "No" to exclude them.
If you choose "Yes," you have additional selection options:
Include only posted transactions? Choose "Yes" to include only posted transactions. Choose "No" if you want your transactions data to include potentially unposted transactions.
GL Account(s) to Include: Optionally, choose a single GL account from the dropdown or enter a comma-separated list of GL accounts to be included when extracting credit card activity. Use the "Select Operator" field to the left for some expressions to help create more dynamic criteria.
GL Account(s) to Exclude: Optionally, choose a single GL account from the dropdown or enter a comma-separated list of GL accounts to be excluded when extracting credit card activity. Use the "Select Operator" field to the left for some expressions to help create more dynamic criteria.
Note: these transactions are always considered "paid" for the purposes of this template, since they have been paid by credit card.
Retrieve direct General Ledger postings? Choose "Yes" to include journal entry transactions recorded via the General Ledger. Choose "No" to exclude them.
If you choose "Yes," you have additional selection options:
Include only posted transactions? Choose "Yes" to include only posted transactions. Choose "No" if you want your transactions data to include potentially unposted transactions.
Book(s) to Include: Choose which reporting book(s) you want to include in GL journal transactions retrieved. This field accepts selection of a single value from the dropdown, selection of a custom group as defined by you on the Options tab, or entry of a Velixo range expression.
GL Account(s) to Include: Optionally, choose a single GL account from the dropdown or enter a comma-separated list of GL accounts to be included when journal entry activity. Use the "Select Operator" field to the left for some expressions to help create more dynamic criteria.
GL Account(s) to Exclude: Optionally, choose a single GL account from the dropdown or enter a comma-separated list of GL accounts to be excluded when extracting journal entry activity. Use the "Select Operator" field to the left for some expressions to help create more dynamic criteria.
Note: these transactions are always considered "paid" for the purposes of this template, since there is no field that defines the paid state of a journal entry transaction.

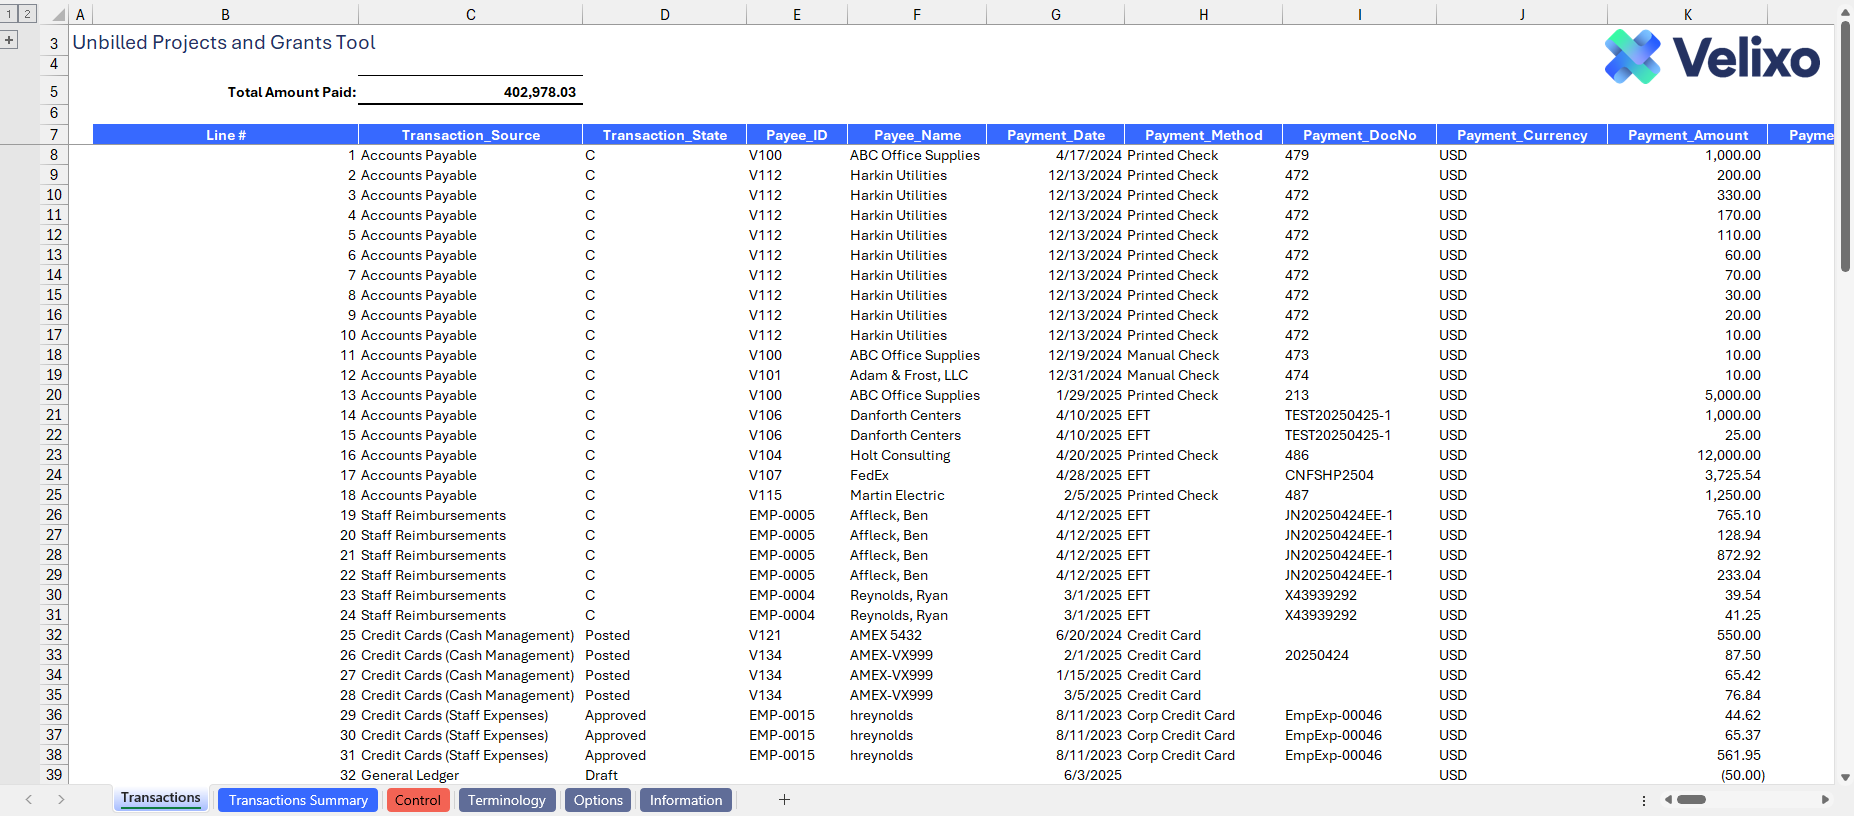
Structure - Transactions tab
As the granular detailed report for the template, the Transactions tab contains a plethora of information. The columns represent various detail fields that Velixo has included by default in the consolidated output. Note: each dimension can be renamed from its original presented name using the Terminology tab. Inherently, the columns will be named as follows, though you are free to simply type over any column header in row 7 if you wish to rename it. You are also free to hide/unhide any columns as you wish:
Line Number: a simple calculation that determines the row number within the table, useful for referencing and filtering to a particular table row
Transaction_Source: the source/module that this transaction came from
Transaction_State: that state of the transaction as returned by Sage Intacct - options vary by module (i.e. C, Posted, Approved, V, etc.), useful for filtering based on a particular transaction state (or filtering out particular transaction states)
Payee_ID: the Payee ID, if one was available. Usually refers to the Vendor or the Employee on the transaction, depending on the source module. GL journal transactions are often less likely to have a value for this filter column.
Payee_Name: the Payee Name, if one was available. Usually refers to the Vendor or the Employee on the transaction, depending on the source module. GL journal transactions are often less likely to have a value for this filter column.
Payment_Date: the payment date of the transaction, for those transactions with a payment date. For transactions without a payment date (i.e., GL journal), the posting date of the transaction.
Payment_Method: the payment method of the transaction per Sage Intacct, if one was available.
Payment_DocNo: the document number (i.e. check number, ACH number, etc.) associated with the payment transaction in Sage Intacct, if one was available.
Payment_Currency: the currency of the payment recorded in Sage Intacct.
Payment_Amount: the payment amount from Sage Intacct. This refers to the payment amount applied to the line level in case partial payments are applied.
Payment_Transaction_Amount: the payment amount from Sage Intacct in the Payment Currency (relevant only if you are using multi-currency).
Paid_Transaction_Doc_Number: the document number (i.e. bill number, expense report number, etc.) associated with the paid transaction in Sage Intacct, if one was available.
Paid_Transaction_Doc_Date: the document date (i.e. bill date, expense report date, etc.) associated with the paid transaction in Sage Intacct, if one was available.
Paid_Transaction_Doc_GL_Posting_Date: the GL posting date associated with the paid transaction in Sage Intacct.
Paid_Transaction_Doc_Currency: the currency of the transaction paid (relevant only if you are using multi-currency).
Base Currency: the Base Currency of the entity paying the transaction (relevant only if you are using multi-currency).
Exchange_Rate_Date: the date used for calculating the currency exchange rate (relevant only if you are using multi-currency).
Exchange_Rate_Type: the Exchange Rate Type, per Sage Intacct, used for calculating the currency exchange (relevant only if you are using multi-currency).
Exchange_Rate: the Exchange Rate used on the payment transaction (relevant only if you are using multi-currency).
Paid_Transaction_Line_GL_AccountNo: the GL account number coded to on the line level of the paid transaction
GL_Account_Name: the name of the GL account number coded to on the line level of the paid transaction
Memo: the memo from the line level of the paid transaction
LocationID: the Location dimension ID coded to on the line level of the paid transaction
LocationName: the name of the Location dimension coded to on the line level of the paid transaction
DepartmentID: the Department dimension ID coded to on the line level of the paid transaction
DepartmentName: the name of the Department dimension coded to on the line level of the paid transaction
ProjectID: the Project dimension ID coded to on the line level of the paid transaction
ProjectName: the name of the Project dimension coded to on the line level of the paid transaction
CustomerID: the Customer dimension ID coded to on the line level of the paid transaction
CustomerName: the name of the Customer dimension coded to on the line level of the paid transaction
VendorID: the Vendor dimension ID coded to on the line level of the paid transaction
VendorName: the name of the Vendor dimension coded to on the line level of the paid transaction
EmployeeID: the Employee dimension ID coded to on the line level of the paid transaction
EmployeeName: the name of the Employee dimension coded to on the line level of the paid transaction
ItemID: the Item dimension ID coded to on the line level of the paid transaction
ItemName: the name of the Item dimension coded to on the line level of the paid transaction
ClassID: the Class dimension ID coded to on the line level of the paid transaction
ClassName: the name of the Class dimension coded to on the line level of the paid transaction
UDD1ID: the ID of your first user-defined dimension coded to on the line level of the paid transaction
UDD1Name: the name of your first user-defined dimension coded to on the line level of the paid transaction
UDD2ID: the ID of your second user-defined dimension coded to on the line level of the paid transaction
UDD2Name: the name of your second user-defined dimension coded to on the line level of the paid transaction
UDD3ID: the ID of your third user-defined dimension coded to on the line level of the paid transaction
UDD3Name: the name of your third user-defined dimension coded to on the line level of the paid transaction
Attachment_ID: the Attachment ID of the Attachment on the transaction in Sage Intacct
Drilldown_URL: the URL of the paid transaction in Sage Intacct (this column is hidden by default).
RefRecordKey: a reference to the transaction's header level record ID, (this column is hidden by default)
Attachment_Object: the object that this transaction comes from in Sage Intacct
UniqueID: a unique identifier for this transaction line (this column is hidden by default).
View Transaction: a hyperlink to view the transaction (not that informative for filtering)
Get Attachments: a column containing a Velixo function that extracts attachments from the Sage Intacct transaction during Distribution (this column is hidden by default)
Caption: a column that creates the Caption (using simple concatenation) displayed on the attachment during Distribution (this column is hidden by default)

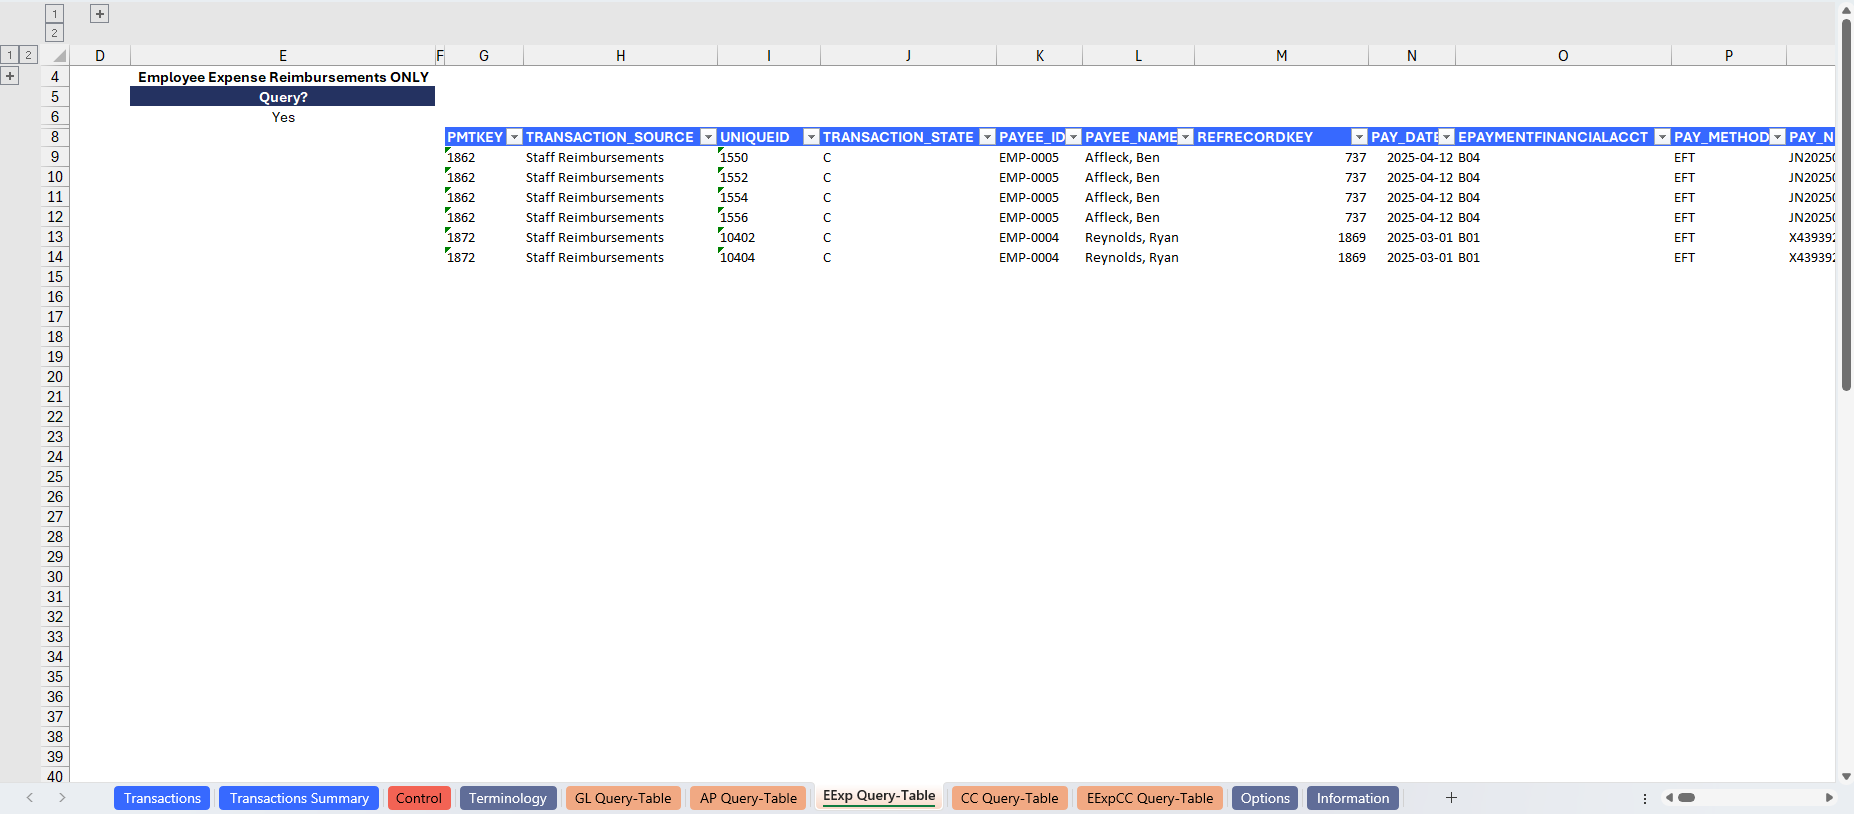
Structure - Table tabs
To accurately generate the Transactions tab, several tables have been created to represent different types of transactions in the Sage Intacct instance. The data in all of these tabs is filtered based on the parameters set in the Options sheet. These are available for optional reference purposes, and editing them is generally not recommended.
The tabs are as follows:
GL Query-Table: contains the journal entry (GL) transactions recorded in Sage Intacct.

AP Query-Table: contains the AP payment transactions recorded in Sage Intacct

EExp Query-Table: contains the Staff Reimbursement transactions recorded via the Expense module in Sage Intacct.
CC Query-Table: contains the Credit card transactions recorded via Cash Management in Sage Intacct.

EEExpCC Query-Table: contains the nonreimbursable Staff Expense transactions recorded via the Expense module in Sage Intacct.

Structure - Transactions Summary tab
The summarized report is derived from the details on the Transactions tab and is presented in a Pivot table format. It is categorized by module and displays column and row-level totals. Users have the flexibility to customize the table accordingly based on their needs.
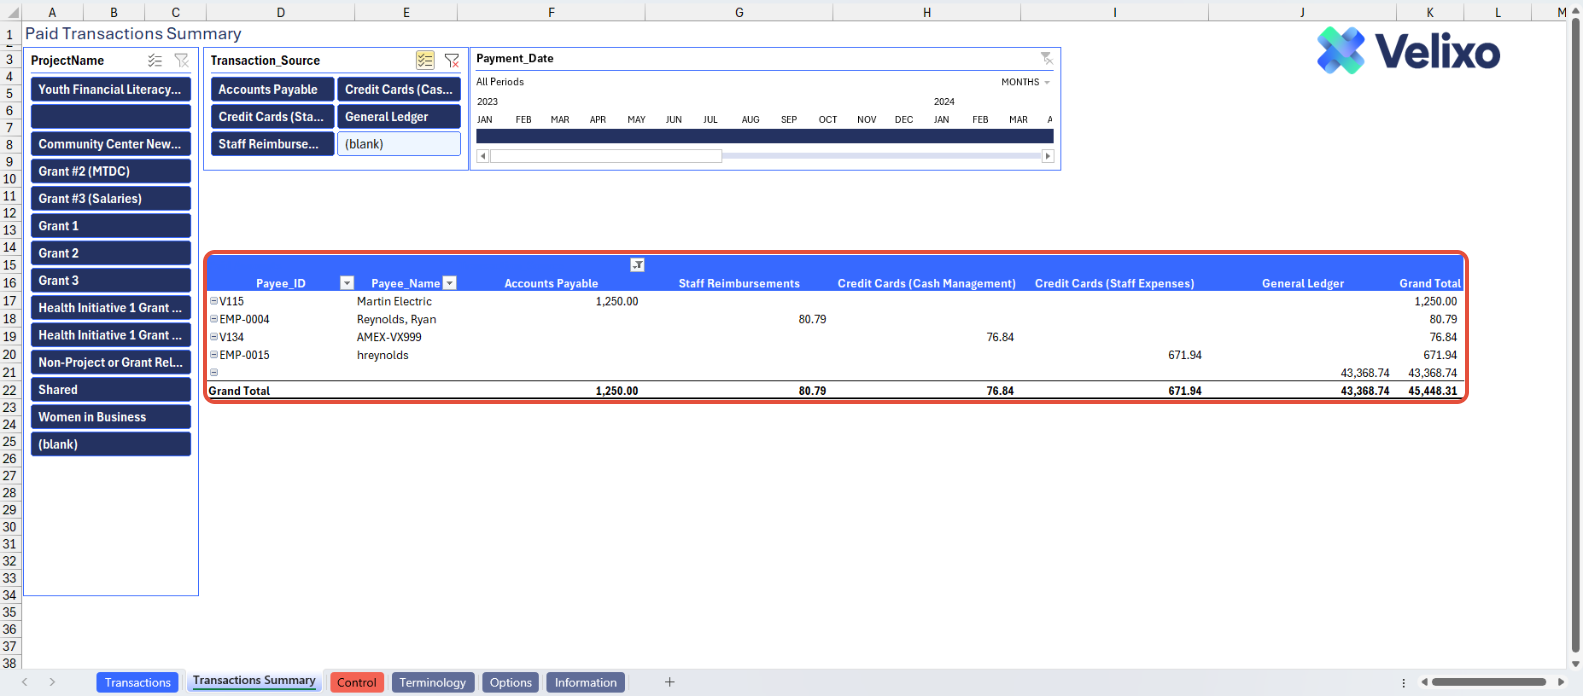
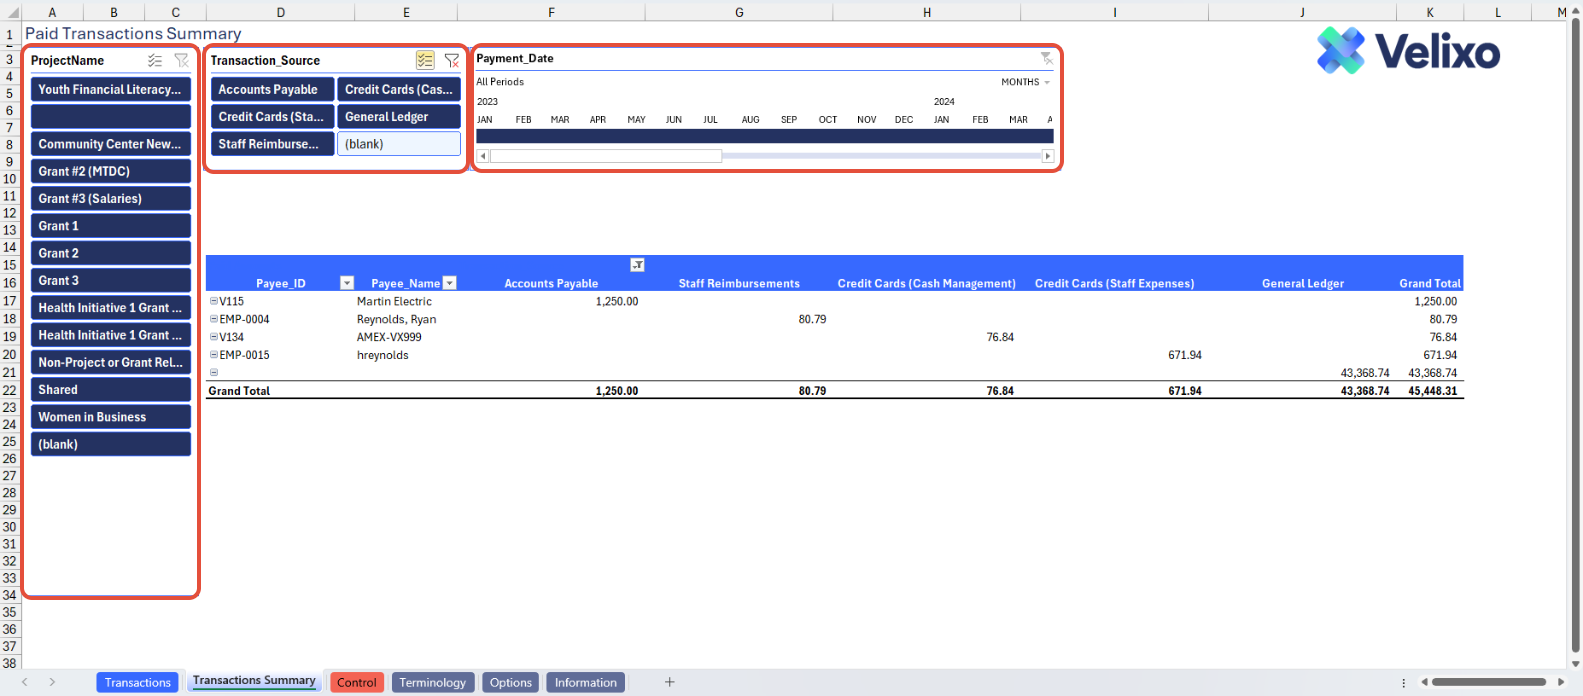
For user convenience in isolating Projects/Grants, Transaction Sources, or Date Ranges within the Pivot table, Velixo has added Slicers. This feature allows users to seamlessly filter the table to exclusively display amounts related to their criteria.
Time Period
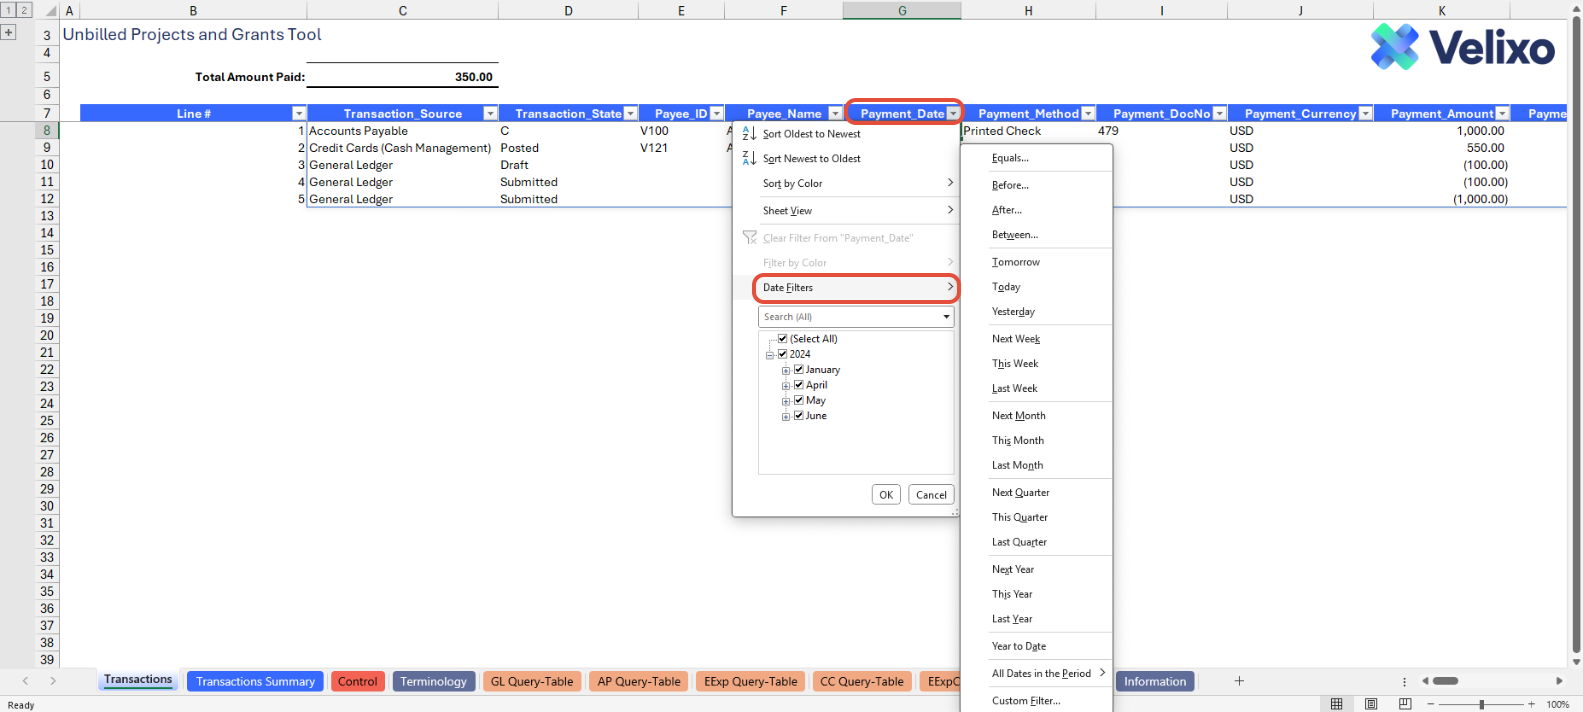
The time period for data pulled into the tool can be determined two ways:
First, it is driven by the user's date range selections made on the Options tab. If the user makes no selection for date range, all dates will be pulled in. This may result in less than optimal speed, and is often unnecessary, so we recommend using the Start Date and End Date filters on the Options tab to "pre-filter" the output.

Second, you can use standard Excel functionality to add filtering and filter on any date field within the Transactions tab itself. As mentioned, it can be more efficient to do this after applying filters on the Options tab, because you have already used the Options tab to weed unnecessary data out of your table, but the filtering mechanism exists in the table regardless.
Similarly, you can use the Payment Date slicer on the Transactions Summary tab to narrow your Pivot table date range.

User Guide
Using the report
Now that we've covered the report overview, let's dive into a step-by-step guide on effectively utilizing the report.
Set the Connection Name on the Options Sheet: crucial for all processes, set the Connection Name on the Options sheet by updating cell C4. Ensure it matches the name used during Velixo application login.

Update the Terminology Sheet: The Terminology tab lists your organization's Sage Intacct dimensions along with the dimension's native name and its name in your Sage Intacct instance. You can use this tab to further customize the names you would like to use for some or all of your Sage Intacct dimensions throughout the template. To do so, simply input your desired name in the light blue cells for Singular Term and Plural Term for the dimension. The changes will immediately and automatically persist throughout the template.
If your organization leverages user-defined dimensions (UDDs), you must also input the exact integration name for each UDD to ensure seamless use of the dimension throughout the template. Note that the integration name and the Object (record) name are not always the same; check with your Sage Intacct implementer if you are unsure. A user with the appropriate permissions can find the UDD's integration name in Sage Intacct by going to Platform Services > All > Objects and locating the UDD in the Objects list.


Example of finding the Integration name for a user-defined dimension (UDD)
We recommend updating the Terminology tab before setting any report filters.
Update the Options Sheet: As the foundation for filters on the other tabs, keep the Options sheet up to date. It should always and automatically capture the latest dimensions and structures from your Sage Intacct instance; however, you can also customize it. Thorough completion of the Options sheet is particularly helpful when using the Unbilled Projects & Grants tool.
If your organization uses special reporting books, you can choose to enable or disable the use of those books in your template. This applies to the following book types available in Sage Intacct, with Yes/No selections to enable or disable their use in cells D7 through D11:
GAAP
Cash (when using Cash and Accrual accounting)
Tax
User Defined Books
Consolidation Books (when using Sage Intacct Global or Domestic Consolidations)
If you have the multi-currency subscription in Sage Intacct, choose "Yes" to enable it here. This makes certain currency-related fields unhidden by default. Otherwise, choose "No."
If you would like to use Velixo's Distribution feature to send a PDF report version of information from your attachments tab and have Velixo pull and include copies of all attachments for transactions on the report inside that same PDF file, choose "Yes" to enable it here. Otherwise, choose "No."

Update your OPTIONAL Pre-Filtering Selections as described in the Filters section of this article above.
Impact of updating Options tab Pre-Filtering Selections: Selecting/changing any of the pre-filtering selections on the Options tab will automatically update the data pulled for the report. Go to the Transactions tab to begin analyzing the latest data.

Using the Control report
Committed to upholding data integrity across the report and Sage Intacct, the Control sheet serves as a supplementary component to both the Transactions tab. Its purpose is to validate the data extracted by Velixo, which is granular and has gone through procedures to consolidate into table format by cross-referencing it against a fresh/raw query of data directly from Sage Intacct.
This sheet is a comparison of the total Transactions tab amount, not considering any table-level filters applied, to ensure that the full set of data you are working with can be reconciled.
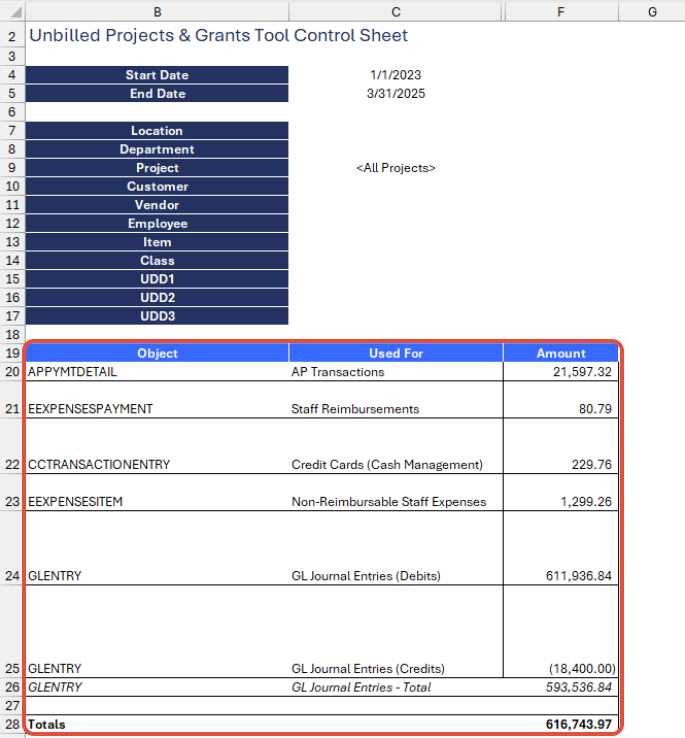
The Control sheet starts with a review of the filters that you have applied per the Options tab. Then, it is divided into three sections:
Sage Intacct - "Raw" Query of Object Check: Extracting a summarized total amount of the transactions for each relevant Sage Intacct object helps guarantee accurate capture and reconciliation of all transaction amounts.
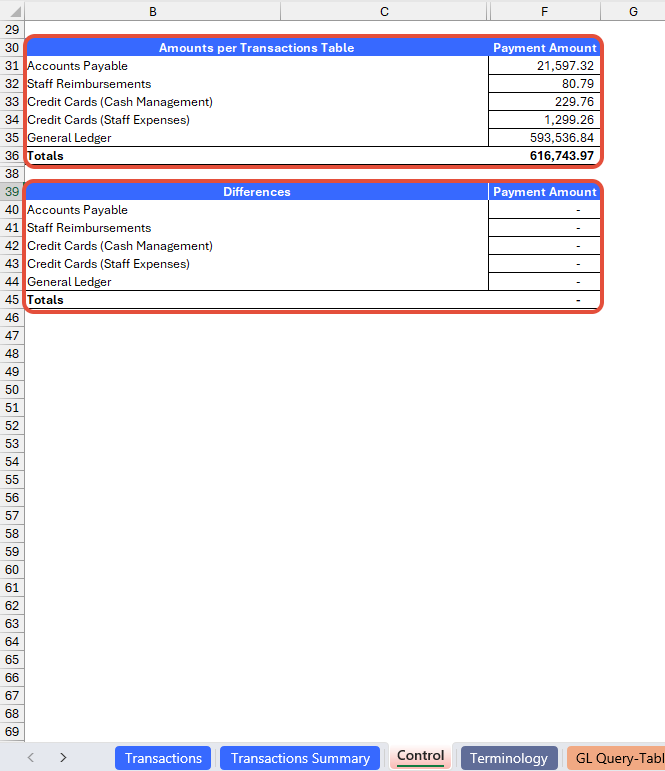
Amounts per Transactions Table: Displays total amounts from the Transactions tab for each transaction area included in the table.
Differences: Highlights reconciliatory differences between the Sage Intacct "raw" query and the Transactions table, with discrepancies flagged in conditional formatting for investigation.
Velixo Auto-Hide Zero Rows and Auto-Hide Zero Columns functionality has been configured on this tab to automatically hide features you are not using per the Options tab. If you are not using multi-currency, the Transaction Amount column will not show. If you have opted out of a certain transaction type, the rows for that transaction type will not show. If you begin using any of these features and update the Options tab, the Control sheet will automatically unhide the appropriate columns/rows upon refresh. The Control sheet will continue to function as expected while any unused columns/rows remain hidden.
If any discrepancies in the report are displayed, it could be caused by an invalid input on the Options tab or any user customizations.
To troubleshoot further, you could redownload and reconnect the reporting tool to your instance, verify that no hidden query sub-tabs return any errors, and perform data validations by comparing this reporting tool with Sage Intacct's out-of-the-box reports. If you believe the reporting tool contains an error, please report it to Velixo Support.
For reference, Sage Intacct out-of-the-box report/screen options that may serve useful for comparison against this tool include but are not necessarily limited to:
Posted payments (Accounts Payable)
Check register (Accounts Payable)
Credit card register (Cash Management)
Credit card transactions (Cash Management)
Check register (Expenses)
Posted reimbursements (Expenses)
Expense ledger (Expenses)
General Ledger report (General Ledger)
Journals report (General Ledger)
Using Distribution to send report data with underlying attachments
Some Nonprofit organizations need to extract and provide supporting attachments for all expense transactions they plan to report back to a funder. In reviewing use of the template so far, we've covered how to report on the transaction data. Now, we will cover an optional feature for organizations that would like to output the data as a report and include attachments for the transactions on that report.
At this time, Velixo's Distribution list functionality is available for Windows operating systems only. It is not available for Mac or Excel Online.
For more information on initial setup and use of the Distribution feature, please review this help article.
To send data from your Transactions tab along with underlying attachments, note the following steps:
Set a Print Area for your Transactions tab that includes the data you want included
On the Velixo NX ribbon, in the Distribution section, select New List
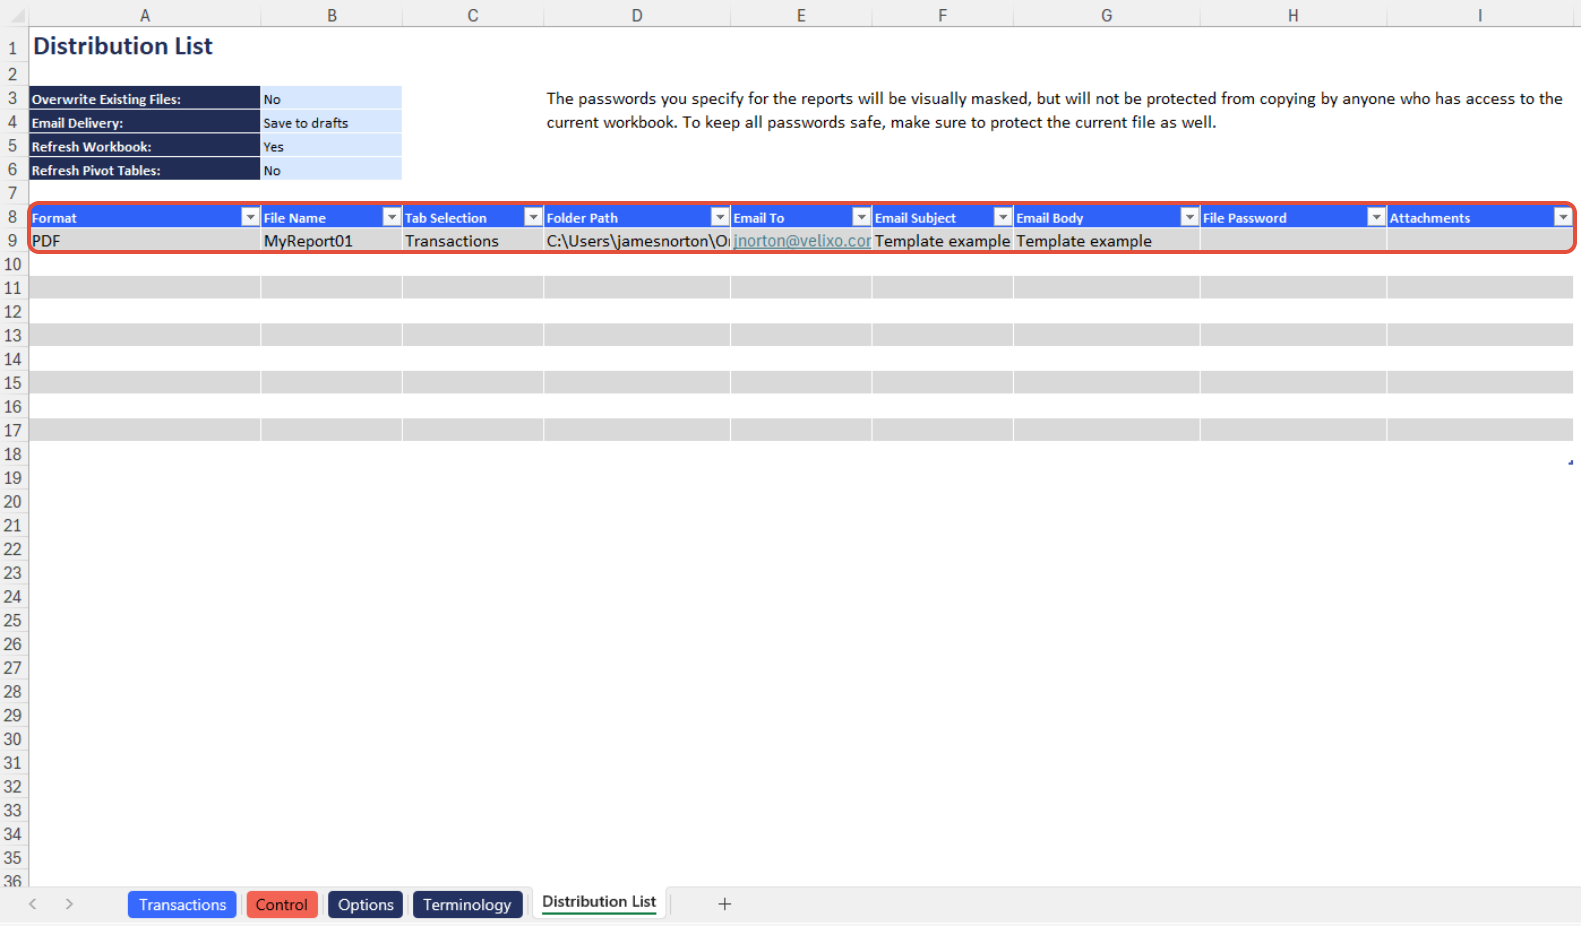
On the new Distribution List tab, on the first row, select Format PDF
In the File Name column, enter a unique File Name (i.e. MyReport050125)
In the Tab Selection column, enter the EXACT name of the tab you want to include (i.e. Transactions). This must match the spelling/syntax of the tab name precisely.
In the Folder Path column, from the Velixo NX ribbon, use Distribution Tools > Insert Folder Path, then choose a folder to save the file in. A copy of the file generated by Distribution will be saved here.
In the Email To column, enter the email address to send the report to. Multiple email addresses should be separated by a semicolon.
In the Email Subject column, enter a subject for the email (or link this information from somewhere in the file).
In the Email Body column, enter body text for the email (or link this information from somewhere in the file).
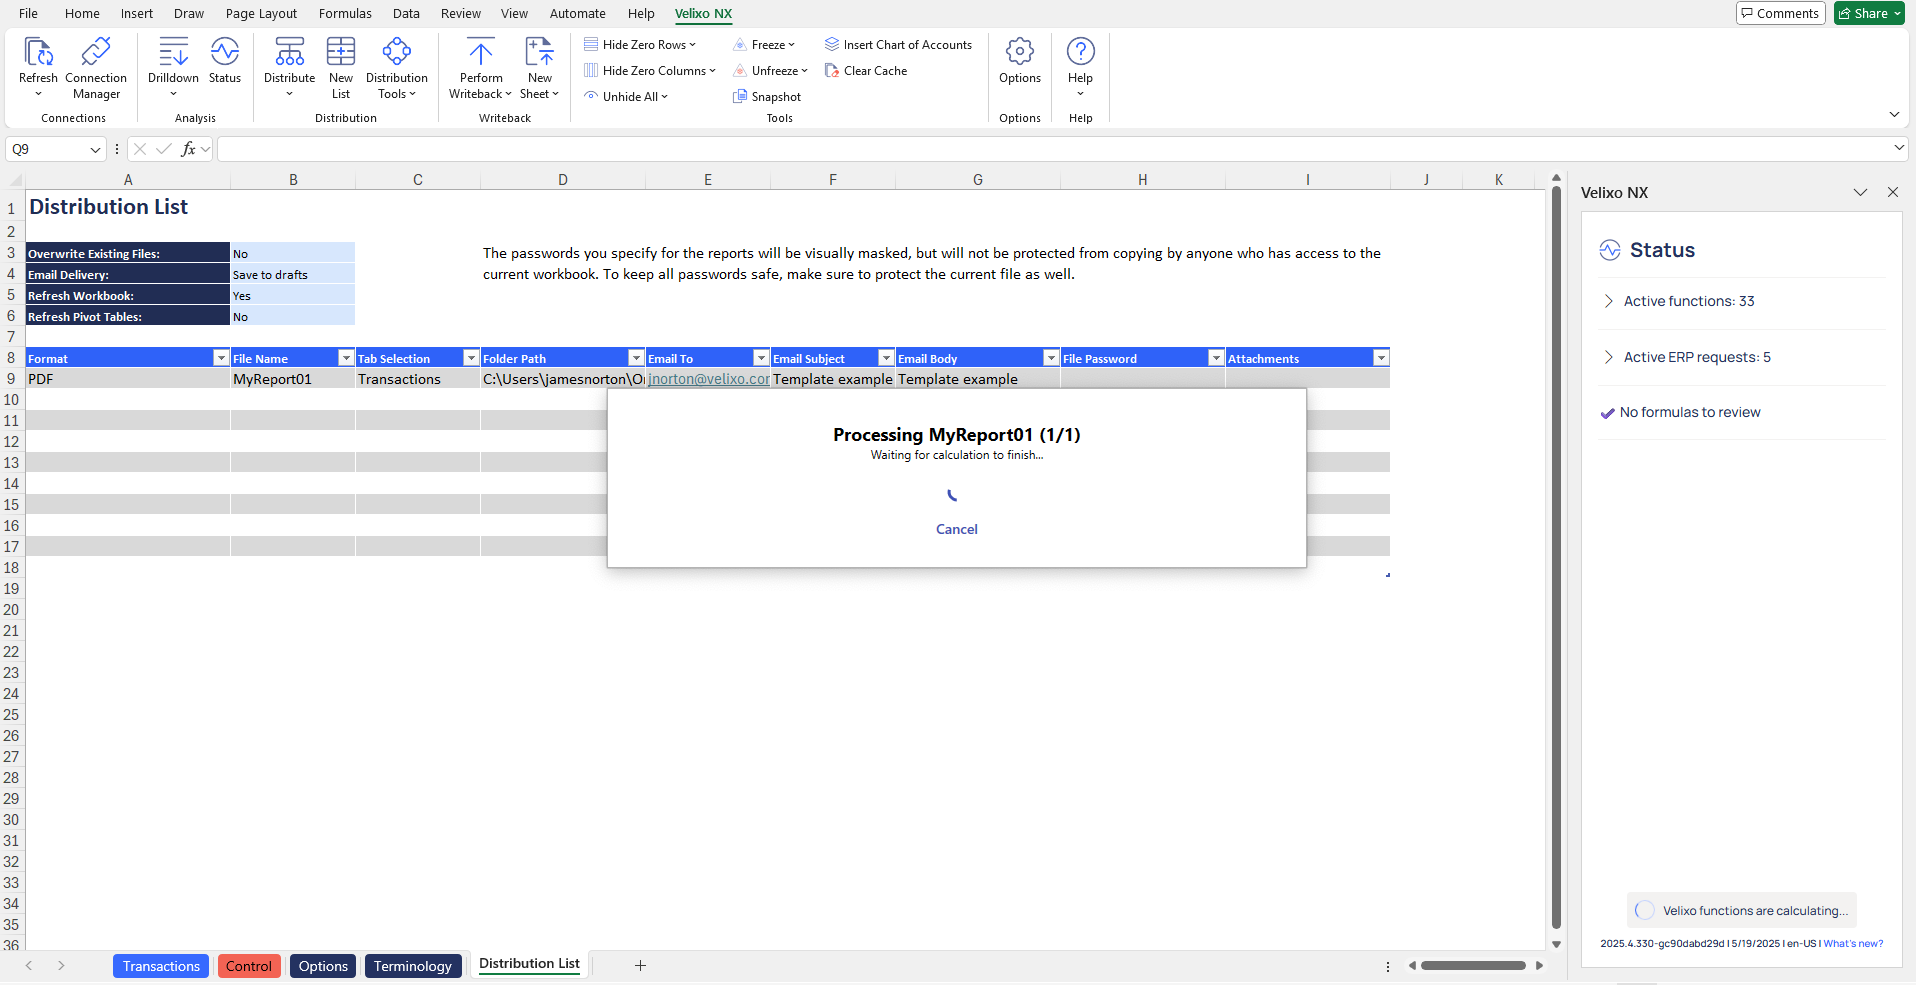
After completing the fields in the Distribution List, from the Velixo NX ribbon, click Distribute > Distribute All or Distribute > Distribute Selected Rows, depending on your use case. This will initiate the Distribution process, which may take several seconds. Status information will appear on screen.


Understanding the Report Formula
Velixo created the template using a combination of Excel functions and Velixo functions.
To simultaneously retrieve both the kind of granular, transaction line-level coding and payment information needed and return header-level details (posting date, attachment ID, document numbers, etc.), creating this template required separately querying each possible data source where pertinent data could reasonably be expected to exist. Accordingly, the report in the main Transactions tab is in fact a collection of data aggregated from the table tabs. The table tabs are designed to be fully automated based on user selections in the Options tab; there should be no reason a user needs to modify them unless they are customizing the template.
Within each of the table tabs, there are two primary formula types used:
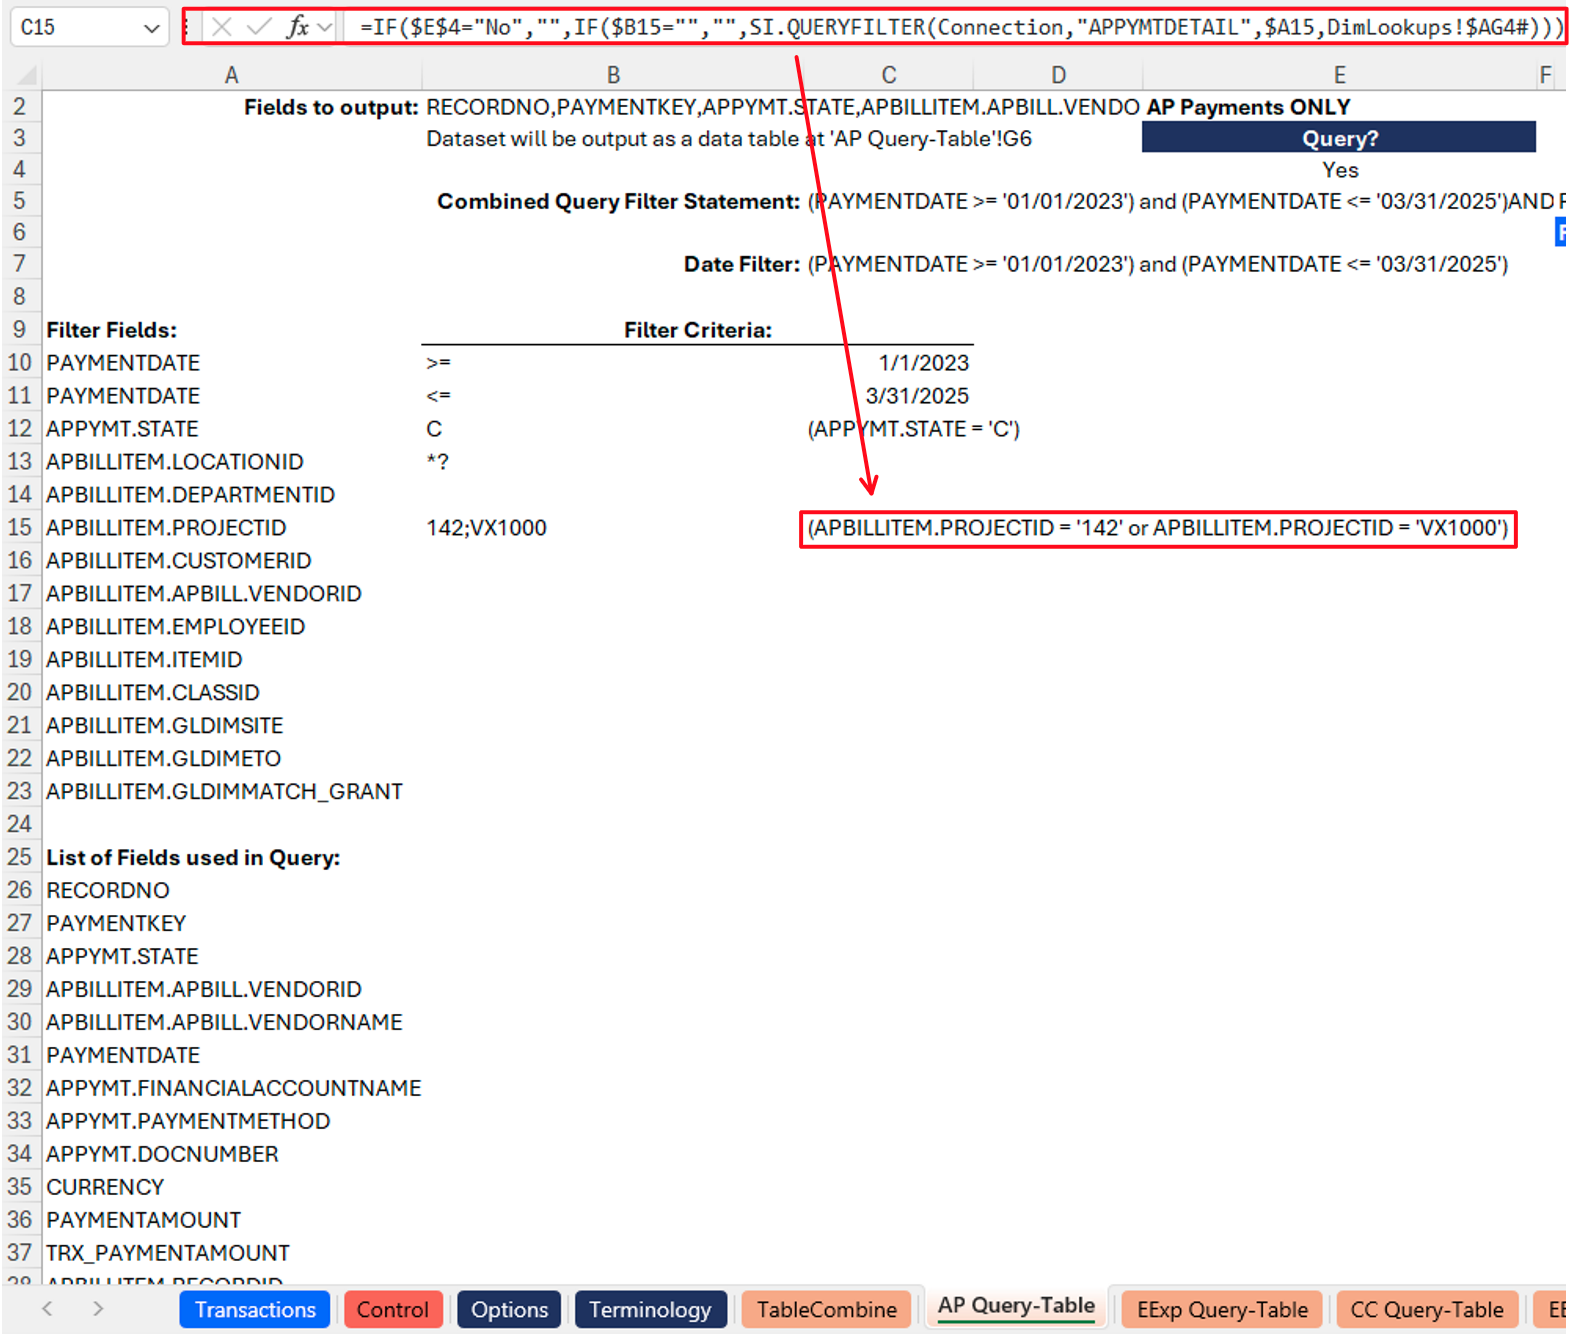
Defining query filter criteria: the objective of this formula is to apply any date range and dimension filters the user chooses on the Options tab to the data being queried from each transaction area.
To ensure flawless execution, this formula uses a combination of Excel IF statements and Velixo's SI.QUERYFILTER function. The formula first checks if the transaction area is in scope (i.e., make sure the user did not select "No" for retrieving transactions for it on the Options tab) and returns blank if the transaction area is out of scope, stopping the process. Otherwise, for each filter field, the formula checks if a filter criteria is present. If a criteria is present, then the SI.QUERYFILTER function is used to generate a filtering statement, which will be passed into the SI.QUERY function later.
An example of this concept from the APQuery-Table tab:
To seamlessly handle multiple filtering criteria, an Excel TEXTJOIN statement is used to combine the individual SI.QUERY outputs into a single filter statement so that it can be passed seamlessly into the SI.QUERY function. An example of this concept from the APQuery-Table tab:

Querying data from Sage Intacct: the objective of this formula is to query (look up) and return data from your Sage Intacct environment subject to any filter criteria you defined on the Options tab.
The formula contains two layers of error prevention to ensure flawless execution. First, the entire formula is wrapped in an IFERROR statement so that it will return "No transaction exist for filter criteria" if an error occurs. Second, an IF statement checks if the transaction area is in scope (i.e., make sure the user did not select "No" for retrieving transactions for it on the Options tab), and returns blank if the transaction area is out of scope, stopping the process. Otherwise, the formula executes Velixo's SI.QUERY function on the relevant data object for the transaction area.
The function references the combined output from the SI.QUERYFILTER functions referenced above.
The query returns a list of fields as defined/listed in hidden column A in the tab.
Note: to accommodate the need for additional calculations and to most easily allow for flexibility in future changes, the query results are output to a table using Per Column Mirroring. Please reference Velixo's help article on Table Mirroring for further information.
An example of this concept from the APQuery-Table tab:

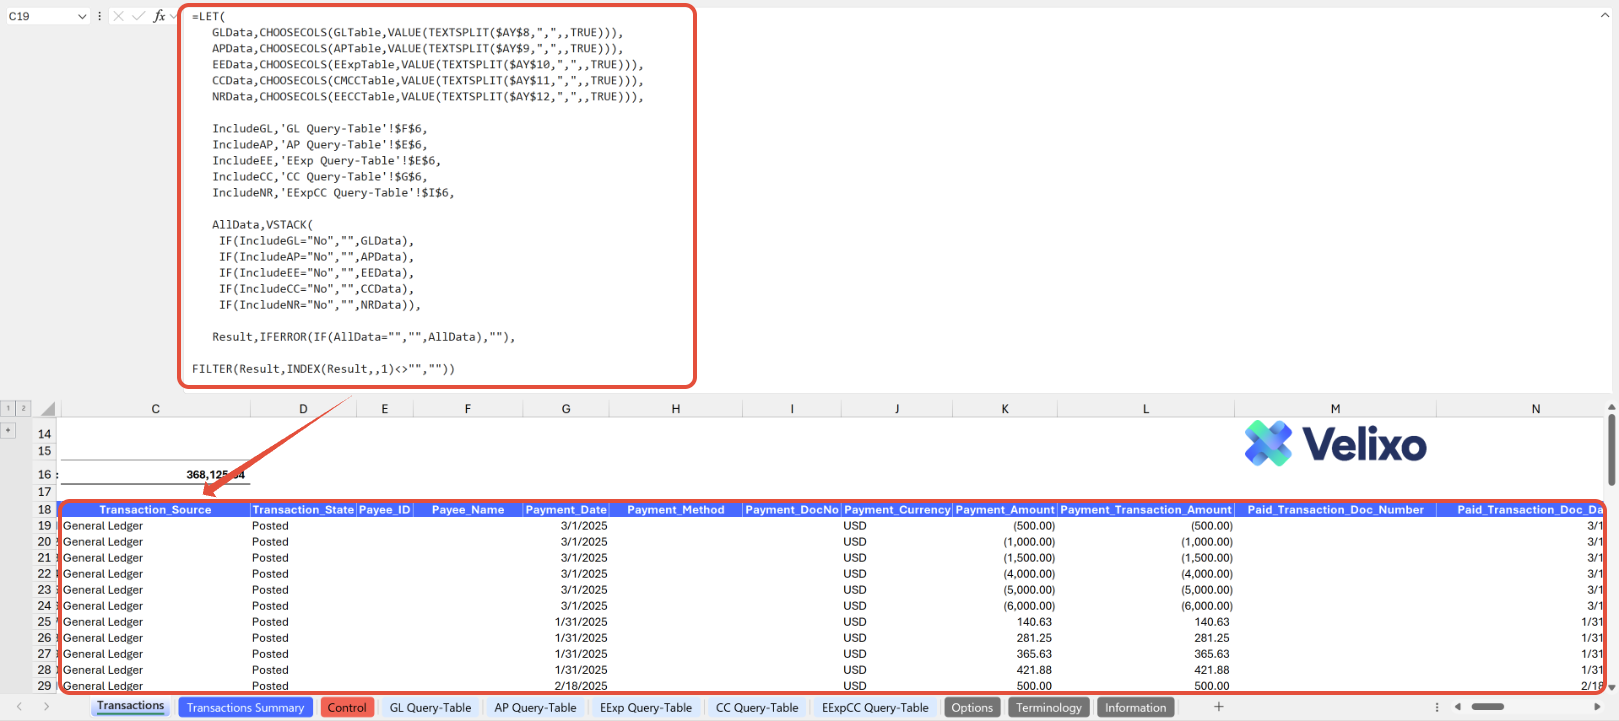
The aggregation of the table tabs occurs in cell C8 of the Transactions tab, using standard Excel functions. For ease of use and readability, Velixo used a LET function to clearly define the variables considered when combining table data. The combination of table data primarily leverages Excel's standard functions CHOOSECOLS, VSTACK, and FILTER to ensure that, if a transaction area is enabled for data retrieval and has data, its data is retrieved from each Query Table tab and stacked in the appropriate order.
To maintain proper alignment, the function references each Query Table's column order, which is visible (for reference only) in the collapsed row grouping at the top of the tab.
Velixo has built this template in an automated fashion such that users should have no reason to interact with this formula unless they are advanced users intending to customize the template. Please contact support if you require assistance with customization.
Customizing the Template
Reviewing the Options sheet
The Options tab comprises Sage Intacct dimensions, and other attributes and structures used in the report. The information updates in real-time with Velixo app refresh, facilitating immediate integration of newly added ERP data into the report as filters. Due to the volume of data potentially available, this information is organized into collapsed groupings for a less overwhelming, easier user experience.
This includes:
Connection Name
General Accounting Options
OPTIONAL Pre-Filtering Selections
Standard Dimensions (Location, Department, Project, Customer, Vendor, Employee, Item, Class)
User Defined Dimension (Prebuilt to account for up to three UDDs, though you can customize for as many as you like if you have more)
Books
GL Accounts
Account Groups
Reporting Periods
Finally, a Template-Specific Lists/Filters section contains the array used to construct the Pivot table on the Transactions Summary tab. Editing this array is not recommended.

The Connection Name is subject to variation depending on the user input provided through the Velixo login portal. For convenience, users may add the connection name used on cell C4. This cell has been designated as a named range (Connection), ensuring its automatic application to all formulas throughout the sheet.

Users can also customize their dimensions by adding their preferred custom values, using a list and ranges as described in this article. The ability to define custom values for grouping is prebuilt into this template for standard dimensions, user defined dimensions, and books.
To do so:
Expand the column group for your desired dimension (ex. Location or Department).
Then, simply input the desired values in the Group formula and Custom group name columns, highlighted in light blue for quick identification.

Managing Transaction Tab Structure
The calculated report amounts are determined solely by the selections made with your accounts and dimensions per the Options tab, the information for which is synced directly from your Sage Intacct instance. This ensures the report is fully ready for use by anyone, 100% out-of-the-box, provided the selections you made have data in your Sage Intacct environment. The layout of the report is intended to provide granular information to address the information that most nonprofit organizations are likely to need for this commonly requested scenario.
However, as outlined earlier in this document, users have the flexibility to tailor this reporting tool to their specific needs. Making these changes should be relatively simple, as the guidance for making changes to a mirrored table is already documented in Velixo's Table Mirroring help article.
Adding Columns
There are two scenarios in which a user might want to add columns: cases where the column represents a user-defined calculation, and cases where the column represents additional data to be queried from Sage Intacct. These cases are handled differently.
You can add columns to the end of the Transactions tab if those columns represent your own calculations.
For example, you might want to add a column into the table that performs some computation using data from within the report. Since the report represents a Dynamic Array, you cannot add data inside the bounds of the array, but you can safely add a column anywhere after the array without disrupting its operation. This also serves to ensure the integrity of your data extracted directly from the ERP.
You can add columns to the Transactions Summary tab using standard Excel Pivot table functionality.
If you'd like to add a column that represents additional data to be queried from Sage Intacct, this is a more extensive modification that requires:
Editing the queries on the table tabs to include the data in each table tab's query output, then
Editing row 18 of the Transactions tab to add the common header name(s) for your newly added field(s), then
Editing the appropriate reference ranges in grouped rows 1-14 at the top of the Transactions tab to reflect your newly added column(s)
We recommend contacting Velixo support if you need assistance.
Removing Columns
Removal of columns is not recommended. It is recommended to simply hide columns you do not wish to see or use.
We recommend contacting Velixo support if you need assistance.
Version history
Version | Released on | Changes |
1 | N/A - Early Adopters only | N/A. Initial version of the template. |
1.1 | August 5, 2025 |
|