SI-NFP-RPT6 Trial Balance Expanded
Applies to:
Product version: Velixo NX
ERP: Sage Intacct
Functional area: Financials
Industry: Not-For-Profit
Plan: Essentials, Professional, Premium
Template type: Production Report template
Description
The SI-NFP-RPT6 Trial Balance Expanded is an advanced nonprofit reporting template. This reporting tool addresses a common nonprofit need to extract trial balance data from Sage Intacct expanded by GL account and any number of dimensions. Taking it a step further, the tool adds easy column reordering and straightforward functionality to report on data over time in either a rolling or trailing fashion.
Seamlessly integrating with your financial data, it provides a streamlined overview and user-friendly interface, reducing some relatively complex Excel operations to simple point-and-click selections on the part of the end user. The end result: you gain all the reporting power your organization needs in this area, and inherit none of the complexity!
The current version of the template is: v1.2.
Coverage
This workbook includes the following sheets:
ExpandedTrialBalance: The Expanded Trial Balance allows you to report your Trial Balance, filtered to any combination of GL accounts, dimensions, books, and date range you wish. You choose which dimensions are added as columns for detail and which order the columns appear in.
ExpandbyTime: The Expand by Time tab takes the Expanded Trial Balance concept and layers on additional functionality. Here, the user chooses whether they want to see a rolling (time periods going forward) or trailing (time periods going backward) presentation, and whether the figures presented should be Closing Balances or Turnover (Activity).
Control: a control report that can be used to confirm that the data is accurate and balances.
Options: the template's settings sheet that is used for data validation lists and various lookups and configurations.
Terminology: a sheet that allows the user to override terminology (naming) used for their Sage Intacct dimensions within the template.
Information: the information sheet of the report, used for storing useful details about the report such as: code, version, article link to keep track of the origin of the report.
Typical audience
The typical audience of this report are nonprofit finance professionals: Accountants, CFOs, Controllers, and their audit firm(s)/committees.
Features
The following Velixo features are used by this report. To use this report, please ensure that your Velixo license includes all of them (or contact Support or Sales if not):
Financial functions
Query functions
Dimension functions
Preview

Download
To download this and other templates, go to the Velixo Portal template gallery.
Documentation
Navigating and utilizing the SI-NFP-RPT6 Trial Balance Expanded report is a very straightforward process, designed for simplicity, maximum flexibility, and efficiency. There are complex Excel operations in this template, but its design is meant to ensure that any user can work with this tool, regardless of technical proficiency level. The template comes pre-configured with connections to all necessary Sage Intacct objects/records so you can seamlessly select your chosen account and dimension values where needed, streamlining the reporting process with minimal user effort.
Filters
Located in the upper left of the sheet, the filters include the following (note: each dimension filter can be renamed using the Terminology tab). For ease of use, Velixo shows you both the Dimension ID and Name for included standard dimensions. If you leverage user defined dimensions ("UDDs"), Velixo shows the name only, consistent with UDDs' behavior in Sage Intacct. The Display name for each filtering selection is configurable in the Options sheet.
GL account selection or range input: lists all GL accounts from your Sage Intacct instance, accepts input of a single GL account code, or accepts input of a GL account range using a Velixo range expression. If you made a choice in the GL account group selection, leave this blank. Choosing an option in both selections will result in an error.
GL account group: lists all GL account groups for your Sage Intacct instance. If you made a choice in the GL account selection or range input selection, leave this blank. Choosing an option in both selections will result in an error.
Location: lists all Entities and Locations present in your Sage Intacct instance, including any custom groups you defined in the Options sheet.
Department: Lists all Departments present in your Sage Intacct instance, including any custom groups you defined in the Options sheet.
Project: Lists all Projects present in your Sage Intacct instance, including any custom groups you defined in the Options sheet.
Customer: Lists all Customers present in your Sage Intacct instance, including any custom groups you defined in the Options sheet.
Vendor: Lists all Vendors present in your Sage Intacct instance, including any custom groups you defined in the Options sheet.
Employee: Lists all Employees present in your Sage Intacct instance, including any custom groups you defined in the Options sheet.
Item: Lists all Items present in your Sage Intacct instance, including any custom groups you defined in the Options sheet.
Class: Lists all Classes present in your Sage Intacct instance, including any custom groups you defined in the Options sheet.
User defined dimensions: For each user defined dimension, the filter will list each UDD name present in your Sage Intacct instance, including any custom groups you defined in the Options sheet. In the above "Preview" screenshot, Site, ETO, and Match Grant are user defined dimensions.
Books: Lists every type of books defined in your Sage Intacct instance, subject to the selections you made on the Options sheet. The report defaults to the Accrual book, but the user can add multiple books by creating custom book groups in the Options sheet, then choosing the group from the Books filter.
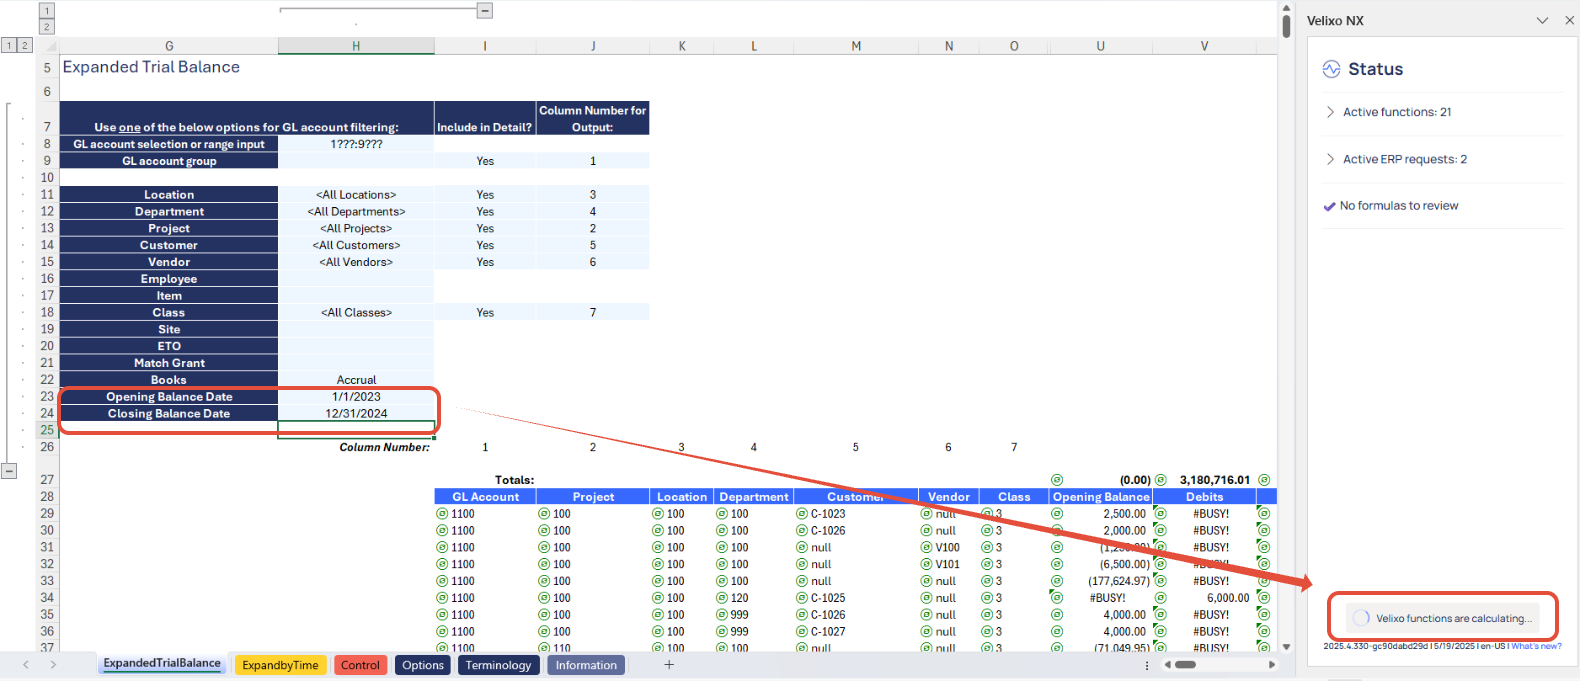
Opening Balance Date: a date field, representing the start date you want to use. This will be your opening balance date and the start of the date range for your turnover (Debits and Credits) data. Please enter a date.
Closing Balance Date: a date field, representing the end date you want to use. This will be your closing balance date and the end of the date range for your turnover (Debits and Credits) data. Please enter a date.
These filters are seamlessly linked to the data on the Options tab. The section can be collapsed and expanded easily to maximize space available for report data.

Structure
Sections: Velixo has thoughtfully structured the Trial Balance Expanded using a common layout that should be generic, by default. There is essentially only one section, with each report row representing the unique combination of GL account and dimensions containing data for the filter parameters selected and included in the report. This section is fully dynamic, meaning that it may not look the same on two different organizations' reports. That is intentional - since Velixo has given users the option to choose whether dimensions get included in the Detail expansion and to choose which column the data populates in, the positioning of volume of data within the section is very fluid, even if the underlying concepts and end goal achieved are the same.

Metrics: The report includes the following metrics (columns):
Cols I - T (Details): these represent the GL account and dimension coding details for the balance/turnover amounts on each row level. The details displayed, and which column those details display in, will vary based on user selection. GL Account is always included, but all other details are technically optional. For any Dimension in the filters section where a user applies a filter, selects "Yes" for "Include in Detail", and assigns a Column Number for Output, the dimension-level detail will be included as a column in the report.
Col U (Opening Balance): the balance for the combination of GL account and dimensions on the row level as of the Opening Balance Date indicated in the report filter selections, subject to any other filter selections applied.
Col V (Debits): the debit amounts between the Opening Balance Date and Closing Balance Date (inclusive) for the combination of GL account and dimensions on the row level, subject to any other filter selections applied.
Col W (Credits): the credit amounts between the Opening Balance Date and Closing Balance Date (inclusive) for the combination of GL account and dimensions on the row level, subject to any other filter selections applied.
Col X (Closing Balance): the balance for the combination of GL account and dimensions on the row level as of the Closing Balance Date indicated in the report filter selections, subject to any other filter selections applied.

Auto-Hide Zero Columns in Selected Range has been applied to columns K through T. This means that, if the user has not made a selection to include a level of detail in one of these columns, it will automatically be hidden and the report will continue to function as expected. If the user changes their selection to start including a level of detail in a column, the hidden column(s) will automatically unhide and populate the selected data.
Time Period
The report uses a single time period, which is defined by the user's input of Opening Balance Date and Closing Balance Date in the report filters.
Current Period:
Provides the Opening Balance as of the Opening Balance Date, Closing Balance as of the Closing Balance Date, and debit and credit turnover (activity) between the two dates.
For example, if a user selects Opening Balance Date 12/1/2024 and Closing Balance Date 12/31/2024, they will receive the following:
Opening Balance as of 12/1/2024
Debits: debit activity for 12/1/2024 - 12/31/2024
Credits: credit activity for 12/1/2024 - 12/31/2024
Closing Balance as of 12/31/2024
This automatically supports the flexibility for any variation of date range requirements a user might have (fiscal years, periods shorter or longer than 12 months, etc.) as you are free to define any date range so long as your From Date is not after your To Date!

Auto Hide Zero Rows in Selected Range has been configured on the Opening Balance, Debits, Credits, and Closing Balance columns. That means that GL account and dimension combinations which have a zero for all four of those columns will be automatically hidden, and the report will continue to function as expected.
Expand by Time Tab Structure
To ensure continuity and help users work faster, the Expand by Time tab is structured mostly the same as the Expanded Trial Balance, with just a few important differences:
In the Filters section, the user has 3 choices that are NOT on the Expanded Trial Balance tab:
Initial Closing Balance Date: this is the first period the report should pull data for. For instance, entering 12/31/2023 means the first period for the report will be December 2023.
# of Months to Expand (+ / -): this is the number of months you want the report to expand from the initial closing balance date. A positive number will expand future months. A negative number will expand previous months. For example, if your Initial Closing Balance Date was 12/31/2023 and you entered -6, you should expect 6 columns from left to right, starting with December 2023 and ending with July 2023.
Show: a drop down list with two selections: Closing Balance or Turnover. Choosing Closing Balance will cause the report to display closing balance amounts for the periods in the report. Choosing Turnover will cause the report to display Turnover (activity) amounts for the periods in the report.
All other filters are exactly the same as the Expanded Trial Balance tab.

The Sections information for the Expand by Time tab is the same as the Expanded Trial Balance. This report has one section, consisting of the combination of GL account and dimensions with activity for the filter selections chosen.
Velixo Auto-Hide Zero Rows was configured on all columns (U-CB) that might have actuals through row 9999. This means that, if amounts do not exist for the row-level combination of GL account and dimensions for any time period displayed, the row will automatically be hidden and the report will continue to function as expected. If your report extends beyond row 9999, or if you wish to reduce the scope of the auto-hide feature, use Excel's Name Manager to find and edit the range named VelixoAutoHideZeroRows scoped to the ExpandbyTime tab.
The Metrics (Columns) for the Expand by Time tab are as follows:
Cols I - T (Details): these represent the GL account and dimension coding details for the balance/turnover amounts on each row level. The details displayed, and which column those details display in, will vary based on user selection. GL Account is always included, but all other details are technically optional. For any Dimension in the filters section where a user applies a filter, selects "Yes" for "Include in Detail", and assigns a Column Number for Output, the dimension-level detail will be included as a column in the report.
Cols U - CB (Time Periods): these columns populate with data based on the number of months the user selects. The template is prebuilt for up to 60 months of expansion. Users may choose to customize it to accommodate longer expansions.

Velixo's Auto-Hide Zero Columns was configured on columns K through CB. This means that, if the user has not made a selection to include a level of detail or time period in one of these columns, it will automatically be hidden and the report will continue to function as expected. If the user changes their selection to start including a level of detail or time period in a column, the hidden column(s) will automatically unhide and populate the selected data. If you wish to reduce the scope of the auto-hide feature, use Excel's Name Manager to find and edit the range named VelixoAutoHideZeroColumns scoped to the ExpandbyTime tab.
User Guide
Using the report
Now that we've covered the report overview, let's dive into a step-by-step guide on effectively utilizing the report.
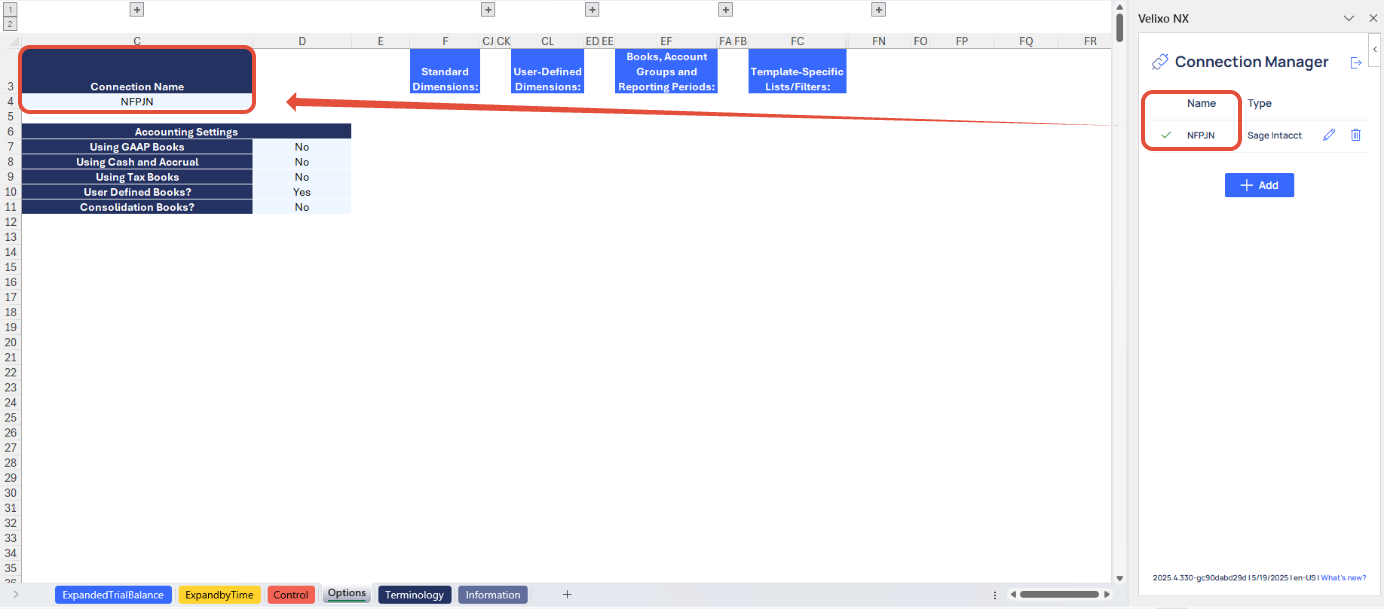
Set the Connection Name on the Options Sheet: crucial for all processes, set the Connection Name on the Options sheet by updating cell C4. Ensure it matches the name used during Velixo application login.
Update the Terminology Sheet: The Terminology tab lists your organization's Sage Intacct dimensions along with the dimension's native name and its name in your Sage Intacct instance. You can use this tab to further customize the names you would like to use for some or all of your Sage Intacct dimensions throughout the template. To do so, simply input your desired name in the light blue cells for Singular Term and Plural Term for the dimension. The changes will immediately and automatically persist throughout the template.
If your organization leverages user-defined dimensions (UDDs), you must also input the exact integration name for each UDD to ensure seamless use of the dimension throughout the template. Note that the integration name and the Object (record) name are not always the same; check with your Sage Intacct implementer if you are unsure. A user with the appropriate permissions can find the UDD's integration name in Sage Intacct by going to Platform Services > All > Objects and locating the UDD in the Objects list.


Example of finding the Integration name for a user-defined dimension (UDD).
We recommend updating the Terminology tab before setting any report filters.
Update the Options Sheet: As the foundation for filters on the other tabs, keep the Options sheet up to date. It should always and automatically capture the latest dimensions and structures from your Sage Intacct instance; however, you can also customize it.
If your organization uses special reporting books, you can choose to enable or disable the use of those books in your template. This applies to the following book types available in Sage Intacct, with Yes/No selections to enable or disable their use in cells D7 through D11:
GAAP
Cash (when using Cash and Accrual accounting)
Tax
User Defined Books
Consolidation Books (when using Sage Intacct Global or Domestic Consolidations)

Choose Desired Filters: After updating the Options sheet, select desired filters for the Expanded Trial Balance report:
GL account codes or group
Dimensions
Books
Opening Balance Date
Closing Balance Date
If you want to include a dimension in your column detail expansion, be sure to select it as a filter. To include a dimension in your detail expansion without eliminating any values, select the <All> option (i.e., <All Locations>) for that dimension.
Choose Detail columns: Next to each Dimension filtered, a drop down selection is available in Column I for "Include in Detail?" Conditional formatting is applied to make this easier; your drop down selection is valid only where column I is light blue.
Select "Yes" to include a column for this dimension in your Expanded Trial Balance.
Select "No" to leave this dimension out of your Expanded Trial Balance.
This allows you to use it as a filtering criteria without having to overload your report with more detail than you might be looking to display.
Choose Column order: If you select "Yes" to include something as a column detail, then you decide, in Column J, which column number the data should occupy. This is a simple numeric input. Conditional formatting is applied to make this easier; your column number inputs are valid only where the column J is light blue.
The first column of your report (Column I) is column 1, and the highest possible column number is 12.
So, assign each detail (GL or dimension) a column number between 1 and 12 based on the order you'd like them to display. You can change this at will.
Take caution; assigning two details to the same number will not work - this will result in neither of your desired datasets being displayed.

Automatic Report Update: Selecting/modifying any filter as mentioned above will automatically update report balances. Begin analyzing the report with the latest data.
Validation and analysis: ensure accuracy by verifying balances in the Control sheet. Confirm that differences for each total are zero.

Variances investigation: if discrepancies arise between data extracted at the account and dimension detail vs. account code levels, conduct a thorough investigation to resolve any differences.
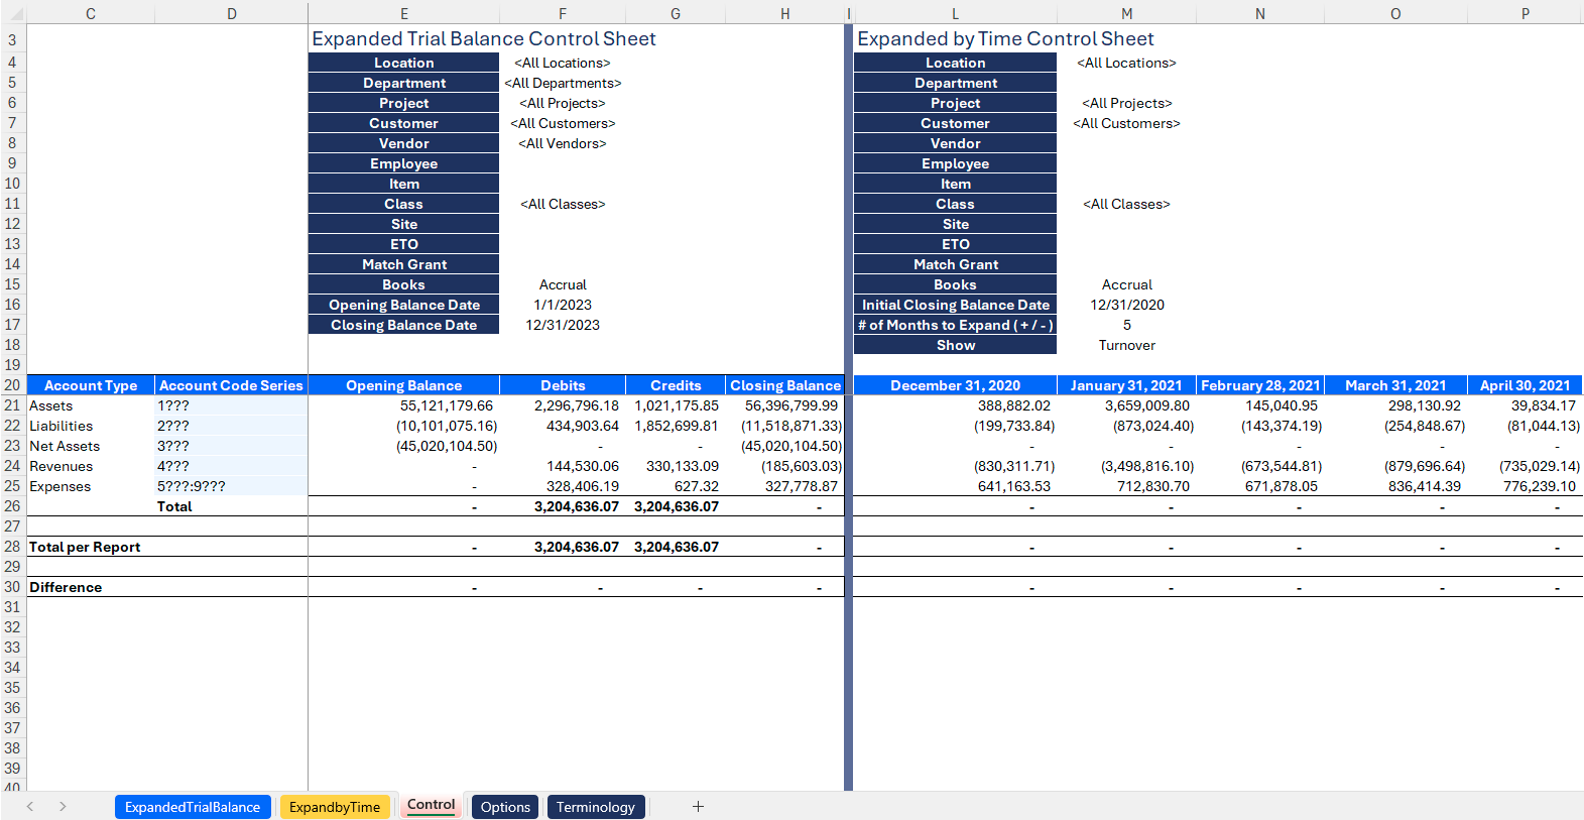
Using the Control report
Committed to upholding data integrity across the report and Sage Intacct, the Control sheet serves as a supplementary component to both the Expanded Trial Balance and Expand by Time tabs. Its purpose is to validate the data extracted by Velixo, which is expanded by the user's selection of GL account and dimension detail, by cross-referencing it with the extracted balances at the account code level.
Given that the balances of all GL account and dimension combinations should aggregate to the account code level balances when filtered the same way, the Control sheet helps to ensure the absence of discrepancies in your report. The verification process enhances the readability and accuracy of the overall financial reporting template.
If you are using this template to extract true Trial Balance reports, you should expect that**:
Debit and Credit totals should match (and net to zero)
Opening and Closing Balances should have a total of zero
The Control sheet serves the dual purpose of reconciling both the Expanded Trial Balance tab and the Expand by Time tab. Users need only input their desired account ranges in Column D using a Velixo range expression. Then, the Control report will handle the rest! The sections of this report are as follows:
Account Code Balance Check: Extracting balances at the account code level guarantees accurate capture and reconciliation of the relevant GL accounts for your organization. You can refine these choices any time.
Total per Report: Displays total amounts from the Expanded Trial Balance and Expand by Time tabs, respectively, in their appropriate sections on the sheet.
Differences: Highlights reconciliatory differences between the Account Code totals and the totals per your report tabs, flagged with conditional formatting for investigation.
If any discrepancies in the report are displayed, it could be caused by misalignment between GL account ranges used on the Control tab vs. the GL account ranges or groups selected on the Expanded Trial Balance tab or Expand by Time tab, or any user customizations.
To troubleshoot further, you could redownload or reconnect the report to your instance, verify that the TRNA tab does not return any error, and perform data validations by comparing this report with Sage Intacct's out-of-the-box financial reports. If you believe the report contains an error, please report it to Velixo Support.
In some cases, organizations may choose to filter on subsets of dimension activity which are not self-balancing. If you filter reporting on dimensions that are not self-balancing, it is expected that your Opening and Closing Balances may indeed be some number other than zero and that your Debits and Credits may not be equal. This is not a report build or structure inaccuracy, and we recommend that you review your underlying transaction data closely in such cases.
For example, an organization may record a journal entry to accrue expenses; on the entry, they may record 10 debit lines, each line recorded against an expense GL account and a different Vendor dimension. BUT, when the user records the credit side of the entry to accrued expenses, they record a single credit and do not tag the Vendor dimension. A Trial Balance filtered by one of the Vendors from that accrued expense entry would now be unbalanced, because the Vendor has a debit amount from expense but no credit amount from accrued expense. This same concept is possible with any dimension that does not require balancing.
If your goal is to report total balances or activity for a dimension/subset of dimensions and you know they are not self-balancing, you may not care that the Opening/Closing Balances are not zero or that the Debits and Credits are not equal, so long as the totals on an account-code basis still reconcile to the totals from your report tab(s). Whichever path you take, your Difference on the Control sheet should be zero!
Using the Expand by Time tab
Velixo created the Expand by Time tab in response to a common request from the nonprofit community: we want to pull all GL accounts and dimensions with activity, but then we want to expand their balances or turnover on a rolling or trailing basis. This tab does exactly that.
Using the Expand by Time tab works substantially the same as using the Expanded Trial Balance. In the interest of brevity where possible, below are the only different choices to make on the Expand by Time tab:
Initial Closing Balance Date: enter the first period that you want activity (either Closing Balance or Turnover) data for.
# of Months to Expand ( + / - ): use this selection to achieve either a rolling or trailing presentation:
If you would like a rolling presentation (expanding data for future months past your Initial Closing Balance Date), enter a positive number
If you would like a trailing presentation (expanding data for past months prior to your Initial Closing Balance Date), enter a negative number
Show: choose an option from the drop down:
Select "Closing Balance" if you would like to see the Closing Balance for each period
Select "Turnover" if you would like to see the Turnover (activity) for each period
The report will automatically update, same as documented above in the Expanded Trial Balance.
Use the Control sheet to help with data validation/verification.

Understanding the Report Formula
Velixo created the template using a combination of Excel functions and Velixo functions for both the Expanded Trial Balance and Expand by Time tabs of this report.
The report incorporates two primary formulas on the Expanded Trial Balance tab:
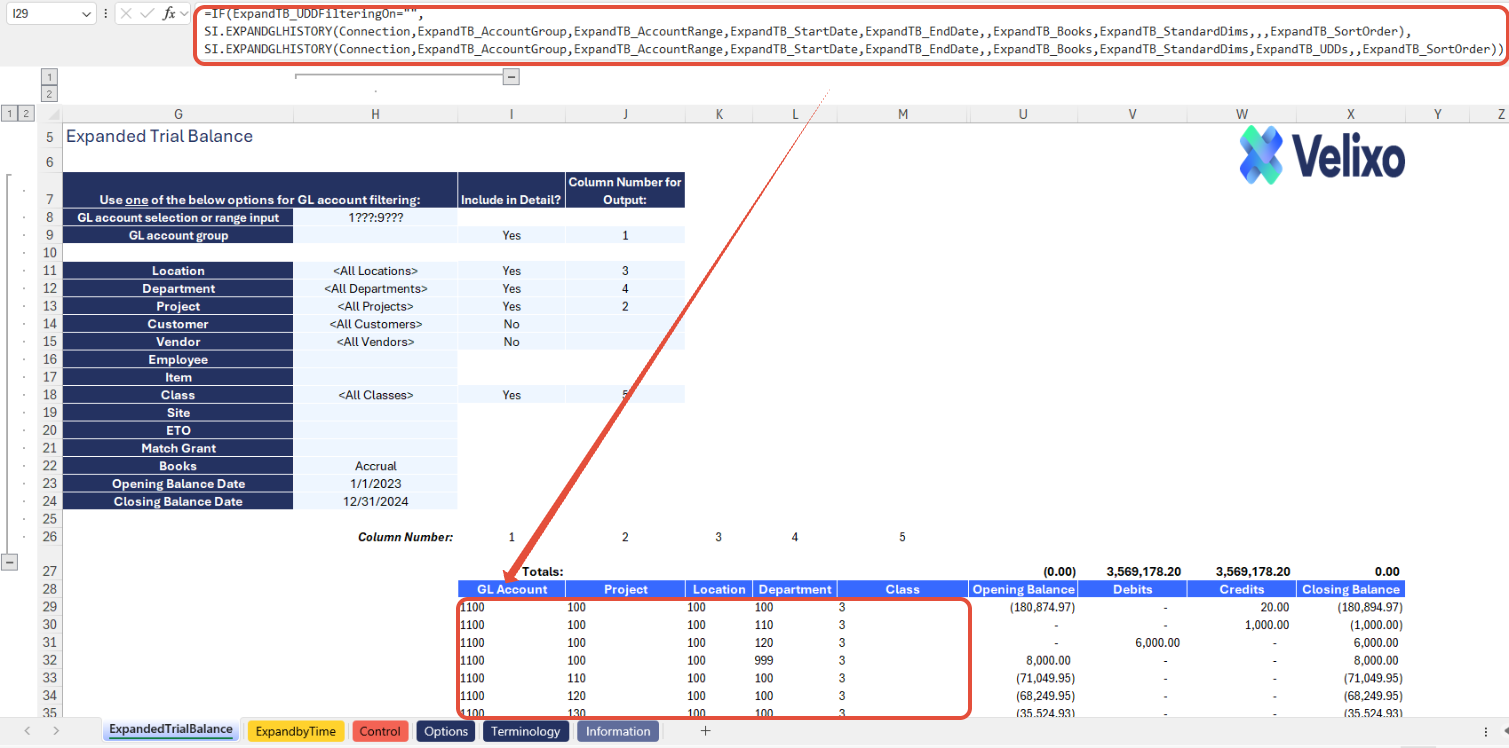
GL Account and Dimension Detail expansion
In Column I, the Velixo function SI.EXPANDGLHISTORYis used to extract all combinations of GL accounts and dimensions that have activity, meet the report filter criteria, and have been selected for inclusion in the column details. This formula returns a dynamic array as a result.
To ensure flawless execution of this function, an IF statement checks if user defined dimensions (UDDs) are being prompted. If UDDs are not prompted, the IF statement returns the SI.EXPANDGLHISTORY function with the UserDefinedDimensions argument skipped to prevent potential errors associated with a blank UDD argument in the function. If UDDs are prompted, the IF statement returns the SI.EXPANDGLHISTORY function with the UserDefinedDimensions argument populated.
Amount formulas: Velixo has used multiple financial functions to extract the balances per column. These formula too, return dynamic arrays as results.
Each formula uses an IF statement to ensure flawless execution - if UDDs are prompted, the formula returns a version of the Velixo function that includes the UserDefinedDimensions argument. If UDDs are not prompted, the formula returns a version of the appropriate Velixo function that skips the UserDefinedDimensions argument to prevent potential errors associated with a blank UDD argument when SI.EXPANDGLHISTORY is involved (even indirectly).
These formulas receive their filter arguments (AccountCode, StartDate, EndDate, Books, Dimensions, UserDefinedDimensions) by referencing the information already available and presented on the Expanded Trial Balance tab.
Opening Balance: the function SI.OPENINGBALANCE is used to extract the balances for this column. The function retrieves the balances for the combination of GL account and dimensions per the row and report filters as of the Opening Balance Date specified on the report

Debits / Credits: the functions SI.DEBITS and SI.CREDITS are used to extract the amounts for these columns. These are movement balances between the Opening Balance Date and the Closing Balance Date (inclusive) for each combination of GL account and dimensions per the row and report filters.


Closing Balance: the function SI.CLOSINGBALANCE is used to extract the balances for this column. The function retrieves the balances for the combination of GL account and dimensions per the row and report filters as of the Closing Balance Date specified on the report

The Expand by Time tab incorporates the same formulas as Expanded Trial Balance, with functions again returning dynamic arrays for results.
GL Account and Dimension Detail expansion: deployed the same way as Expanded Trial Balance.
Amount formulas:the Expand by Time tab uses less Velixo functions than the Expanded Trial Balance, though the functions are familiar.
The formula in columns U through CB is a nested IF formula to both evaluate multiple conditions and ensure flawless execution:
First, the formula checks if the column represents a time period that needs to be expanded. If not, then it stops there and returns nothing.
Next, the formula checks the user's selection in cell H26 to determine if the user selected "Closing Balance" or "Turnover"
If the user selected "Closing Balance," the formula uses the SI.CLOSINGBALANCE function to return the Closing Balance for the time period attributable to the column. One last IF statement is built into this to check if UDDs are prompted. If UDDs are prompted, the formula returns a version of the Velixo function that includes the UserDefinedDimensions argument. If UDDs are not prompted, the formula returns a version of the appropriate Velixo function that skips the UserDefinedDimensions argument to prevent potential errors associated with a blank UDD argument when SI.EXPANDGLHISTORY is involved (even indirectly).
If the user selected "Turnover", the formula uses the SI.TURNOVER function to return the Turnover (activity) for the time period attributable to the column. One last IF statement is built into this to check if UDDs are prompted. If UDDs are prompted, the formula returns a version of the Velixo function that includes the UserDefinedDimensions argument. If UDDs are not prompted, the formula returns a version of the appropriate Velixo function that skips the UserDefinedDimensions argument to prevent potential errors associated with a blank UDD argument when SI.EXPANDGLHISTORY is involved (even indirectly).
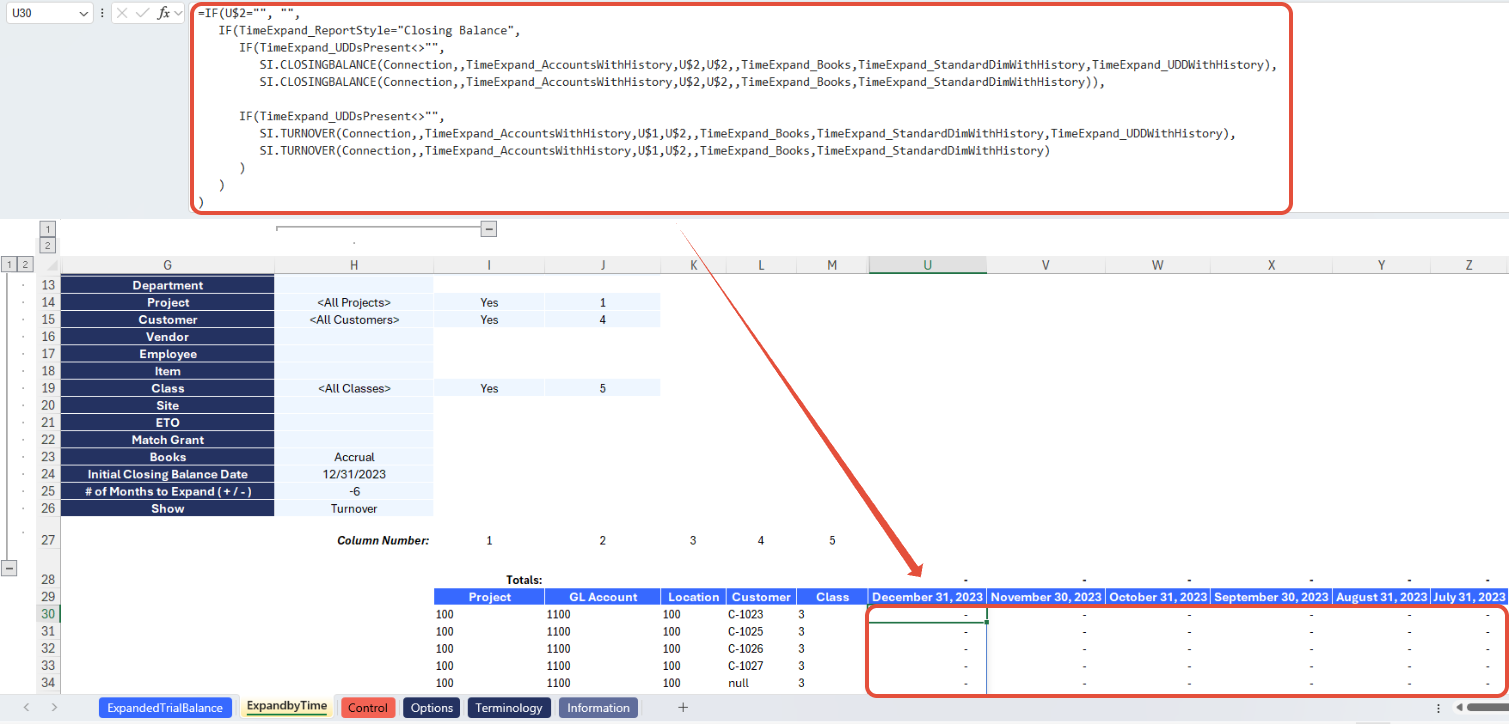
To achieve an automatic time expansion and provide the StartDate/EndDate arguments needed, Velixo used standard Excel formulas in (normally hidden) rows 1 and 2.
The process begins with the calculation in cell U2. This formula takes the Initial Closing Balance Date per cell H24, then uses the # of Months to Expand per cell H25 to dynamically calculate and expand the range of end dates (month ends) needed.

Cell U1 contains a formula to calculate the first day of each month based on the month end date in U2. Essentially, if the cell below it is not blank, then the start date of the month is calculated. This formula was then copied across from U1 through CB1, which offers the user prebuilt dynamic expansion for up to 60 months.

Customizing the Template
Reviewing the Options sheet
The Options tab comprises Sage Intacct dimensions, and other attributes and structures used in the report. The information updates in real-time with Velixo app refresh, facilitating immediate integration of newly added ERP data into the report as filters. Due to the volume of data potentially available, this information is organized into collapsed groupings for a less overwhelming, easier user experience.
This includes:
Connection Name
Accounting Settings
Standard Dimensions (Location, Department, Project, Customer, Vendor, Employee, Item, Class)
User Defined Dimension (Prebuilt to account for up to three UDDs, though you can customize for as many as you like if you have more)
Books
GL Accounts
Account Groups
Reporting Periods
Finally, a Template-Specific Lists/Filters section lists additional helpful information and gives you an optional template tool to create a query filter (if needed to create more complex grouping/filtering criteria). See the SI.QUERYFILTER and SI.QUERY topics for further information.

The Connection Name is subject to variation depending on the user input provided through the Velixo login portal. For convenience, users may add the connection name used on cell C4. This cell has been designated as a named range (Connection), ensuring its automatic application to all formulas throughout the sheet.

Users can also customize their dimensions by adding their preferred custom values, using a list and ranges as described in this article. The ability to define custom values for grouping is prebuilt into this template for standard dimensions, user defined dimensions, and books.
To do so:
Expand the column group for your desired dimension (eg. Location or Department).
Then, simply input the desired values in the Group formula and Custom group name columns, highlighted in light blue for quick identification.

Managing Report Tab Structures
The calculated report amounts are determined solely by the selections made with your accounts and dimensions per each report tab's filters, the information for which is synced directly from your Sage Intacct instance. This ensures the report is fully ready for use by anyone, 100% out-of-the-box, provided the selections you made have data in your Sage Intacct environment. The layout of the report is intended to address the information that most nonprofit organizations need for this commonly requested scenario.
However, as outlined earlier in this document, users have the flexibility to tailor this report to their specific needs. It is not required, but advanced users may choose to customize this report based on specific requirements.
Adding Rows or Grouping
It should be unnecessary to add rows to these reports if you are using them out-of-the-box. By default, the rows on your Expanded Trial Balance and Expand by Time tabs represent Excel dynamic arrays and are covered by Velixo's Auto-Hide Zero Rows in Selected Range functionality. This means that all your GL account and dimension combinations are always available, but will render and display on the report only if they have data. In other words, your rows will add and hide themselves automatically!
If you encounter a use case where you choose to add a row, note the following:
Use Excel functions to add a new row either above or below the range of your existing expanded output. It is important that you do not interrupt this array, as it will produce #SPILL errors.
Be cautious with formulas in newly added rows; copying from another row can be a starting point, but you will need to edit the AccountGroup, AccountCode, Dimensions and UserDefinedDimensionsarguments for any rows you add manually, since these manually added rows are NOT part of the existing dynamic array output.
Take advantage of the SI.DIMENSIONS function for your Dimensions and UserDefinedDimensions arguments!
The data in hidden columns A and B will help with getting the correct arguments for all Dimensions and/or UserDefinedDimensionsarguments. This information might be used to feed the arguments for functions in the following columns, depending on your use case:
In the Expanded Trial Balance tab
Expansion details (Col I)
Opening Balance (Col U)
Debits (Col V)
Credits (Col W)
Closing Balance (Col X)
In the Expand by Time tab
Expansion details (Col I)
Amount formulas (Col U through Col CB)

To group data, users have two primary options:
Utilize functionality already built into the templates by:
Choosing GL account ranges with wildcards, Velixo range formulas, etc. or using GL account groups
Creating custom groups for dimensions on the Options tab and using them as filter selections
Add rows to the report leveraging techniques as described in Filtering techniques for use with many Velixo functions
When customizing the report, users should take caution to avoid overlap in data. Opting for a granular funding source list helps to ensure data accuracy.
• Utilize Excel's add row function, followed by thorough data validation and reconciliation on the report.
• Always validate data accuracy using the Control sheet.
Removing Rows
Velixo templates make use of Velixo's automatic hiding of rows with zero values, which has been configured on all actual values.
This feature eliminates the need for manual deletions of detail rows and ensures the report remains fully dynamic should usage of GL account or dimension IDs change over years or transactions get created against new IDs.
Since the detail expansion is a dynamic array, you cannot delete rows. Instead, the strategy for "removing" rows (even if they are already hidden) is to:
Use GL account range expressions OR GL account group filters that include only those GL accounts you want
Create custom dimension groups on the Options tab and filter your report tabs using those groups
By using these filtering techniques, any detail rows outside your filter criteria will never display on the report tabs, regardless of whether they have data.
Adding Columns
The user can insert columns on the report tabs if there are additional details to be captured. We always recommend thorough data validation/reconciliation and verifying data accuracy using the Control sheet.
If you choose to insert columns, please note the following recommendations:
We recommend that you do not add columns inside the GL and dimension detail expansion range (Col I through Col T on both the Expanded Trial Balance and Expand by Time tabs). These columns expand and retract dynamically based on user dimension selection, and changing their structure could have an adverse impact.
If you choose to add columns within the Expand by Time tab's amounts section (Col U through Col CB), review the hidden formulas that dynamically calculate end dates in rows 1 and 2 carefully, and make any adjustments if necessary.
Note: No matter which path you take, always follow the below best practices when adding columns.
• Utilize Excel's add column function, followed by thorough data validation and reconciliation on the report.
• Be cautious with formulas in newly added columns; ensure you understand nature of the column you have added and copy a similar formula from the appropriate existing column possible.
Removing Columns
The columns on this template generally represent the standard required for an Expanded Trial Balance and rolling/trailing presentation use case. Removal of columns is not necessarily recommended. Velixo's Hide Zero Columns functionality has already been configured on the Expanded Trial Balance and Expand by Time tabs to automatically hide columns without data.
If you decide to remove columns:
Utilize Excel's delete column function for removal, followed by thorough data validation and reconciliation on the report.
Always validate data accuracy using the Control sheet.
Version history
Version | Released on | Changes |
1 | N/A - Early Adopters Only | N/A. Initial version of the template. |
1.1 | August 5, 2025 |
|
1.2 | August 19, 2025 |
|
Appendix
Explanation of Key Named Ranges (for Advanced Users)
To simplify data references, maximize flexibility for the user, and promote formula readability, Velixo created various named ranges when building this template. Note that, unless you intend to customize this report in a way that might impact these items, it is unlikely you will have to edit or interact with these named ranges. For advanced users who may wish to customize, information on key named ranges used in this template follows.
On the Expanded Trial Balance tab, users will notice that the SI.EXPANDGLHISTORY formula arguments are comprised of Excel named ranges. You can begin to find further information on these ranges by going to Formulas > Name Manager in your Excel worksheet. The ranges are well-organized to help users visually understand what they relate to. For instance, ranges important for the Expanded Trial Balance have a prefix of "ExpandTB_" in the name.

In some/many cases, looking in the Name Manager makes it immediately clear which information a named range is referring to, since the name is simply used as a "friendly term" for a cell reference. For example, a user can type =ExpandTB_StartDate instead of having to remember that Start Date resides in cell H23 (and, since Excel makes things easy, you could start typing =Start and Excel would quickly start suggesting named ranges that match or contain Start in them, one of which would be this named range).
In other cases, the cell reference behind a named range is covering some more advanced work so that the formula you consume on a regular basis is easy to digest. This is the case for our named ranges which refer to the Lookups tab.
The Lookups tab is hidden by default, and we recommend that you leave this tab hidden unless you are customizing the template in such a way that you will need to make changes to it.
This tab exists because the column detail expansion on both the Expanded Trial Balance and Expand by Time tabs is fully dynamic in that users are free to choose which dimensions they want to include and what column order those dimensions occupy. With this kind of flexibility, it is impossible to create a template that prescribes which column any standard or user-defined dimension will occupy. To solve for this challenge and ensure the user retained maximum flexibility without inheriting any extra manual steps, the named ranges Velixo has created reference "helper" columns on the Lookups tab. These columns calculate and provide the Velixo functions with the necessary values in the AccountCode, Dimensions and UserDefinedDimensions arguments for you!
These are advanced formulas; this was built in a fully dynamic fashion, so it is unlikely that the user should ever have to edit or interact with this data, unless you are making customizations to the template that would impact this tab.
ExpandTB_AccountswithHistory: used as the AccountCode argument on the Expanded Trial Balance for Opening Balance, Debits, Credits, and Closing Balance. This named range returns all GL accounts listed on the Expanded Trial Balance report.
Tip: When reading a LET function, read the last part of it first. This tells you what it's returning, and can make an otherwise complex-looking function quite simple! For example, below the last part of this function is AccountValues. Through a little bit of "reading backwards" up the function, one can determine that AccountValues should return our ColumnValues where the ColumnHeader is "ACCOUNTCODE." In other words, this should return our GL accounts, which is exactly what it does!

ExpandTB_StandardDimWithHistory: used as the Dimensions argument on the Expanded Trial Balance for Opening Balance, Debits, Credits, and Closing Balance. This named range returns an array of all standard dimension names and IDs displayed on the Expanded Trial Balance report.
The most complex parts of this formula are filtering out the rest of the data that are NOT standard dimension names or IDs so you are left with only what you need for your function argument.

ExpandTB_UDDWithHistory: used as the UserDefinedDimensionsargument on the Expanded Trial Balance for Opening Balance, Debits, Credits, and Closing Balance. This named range returns an array of all user-defined dimension names and values displayed on the Expanded Trial Balance report.
The most complex parts of this formula are filtering out the rest of the data that are NOT user-defined dimension names or values so you are left with only what you need for your function argument.

The named ranges for the Expand by Time tab work exactly the same, providing the appropriate AccountCode, Dimensions and UserDefinedDimensions arguments to the appropriate functions, except that their names are prefixed with TimeExpand_ to distinguish them easily. The Lookup tab columns R through AE provide this data.