SI-NFP-TOOL8 Allocations - Allocate by Actuals (Single GL Approach)
Applies to:
Product version: Velixo NX
ERP: Sage Intacct
Functional area: Financials
Industry: Not-For-Profit
Plan: Essentials, Professional, Premium
Template type: Production Report template
Description
The SI-NFP-TOOL8 Allocations - Allocate by Actuals (Single GL Approach) is part of a series of advanced nonprofit reallocation tools. This template provides your organization with the ability to reallocate your account activity or ending balances based on actual results using any combination of date, book, GL account and dimension filters needed. Leveraging Velixo's journal writeback functionality, sending your allocation journal entry to Sage Intacct is a one-click process. This tool is designed for an output with lower output complexity on the GL account distribution side; it covers the use case where the organization wishes to use a single GL account on the debit side of the allocation journal entry and a single GL account on the credit side of the allocation journal entry.
Seamlessly integrating with your Sage Intacct data, this tool provides a streamlined process and user-friendly interface. The necessary advanced Excel calculations are pre-built in a dynamic fashion to relieve the user of managing complexity. Finally, the tabs in this template offer full transparency into the calculations that produce your allocated figures, giving your organization immediate ready-made audit evidence.
The current version of the template is: v1.
Coverage
This workbook includes the following sheets:
0.Instructions: a worksheet explaining the workflow of the Allocations tool
1.Allocation Setup: the main input tab for the tool, where the user defines the parameters for executing allocations
2.Review Allocations: the main review tab of the tool, where the user can review the allocation breakout and customize a Pivot Table summary of the potential impact. Provides full transparency into the dynamic Cartesian product which performs all necessary math to derive the correct allocations
Data: a supporting detail tab providing full transparency to the underlying data used to perform allocations, which the user can drill down on for additional information
Source Splits: an automatically generated, detailed supporting report tab providing full transparency into the pre-allocation distribution of the amounts to be allocated
Driver Splits: an automatically generated, detailed supporting report tab providing full transparency into the ratios that will be used to drive allocation of amounts by each relevant dimension
3.Writeback: the writeback tab for the tool, containing the allocation journal entry to be sent to Sage Intacct.
4.Control: a control report that can be used to confirm that the data leveraged in allocations is accurate and balances.
Terminology: a sheet that allows the user to override terminology (naming) used for Sage Intacct dimensions within the template.
Options: the template's settings sheet that is used for data validation lists and various lookups and configurations.
Information: the information sheet of the report, used for storing useful details about the report such as: code, version, article link to keep track of the origin of the report.
Typical audience
The typical users of this type of report are Finance professionals: Accountants, CFOs, Controllers
Features
The following features are used by this report. To use this report, please ensure that your Velixo license includes all of them, (or contact Support or Sales if not):
Financial functions
List functions
Query functions
Journal Writeback
Preview


Download
To download this and other templates, go to the Velixo Portal template gallery.
Documentation
Navigating and utilizing the SI-NFP-TOOL8 Allocations - Allocate by Actuals (Single GL Approach) tool is a very straightforward process, designed for minimal user inputs, efficiency, and maximum transparency/auditability. There are some complex Excel operations in this template, but they are designed to work autonomously and dynamically with the intention that any user can work in this tool, regardless of technical proficiency level. The template comes pre-configured with connections to all necessary Sage Intacct objects/records so you can seamlessly select your chosen account and dimension values where needed, streamlining the allocation process with minimal user effort.
Structure - 1.Allocation Setup tab
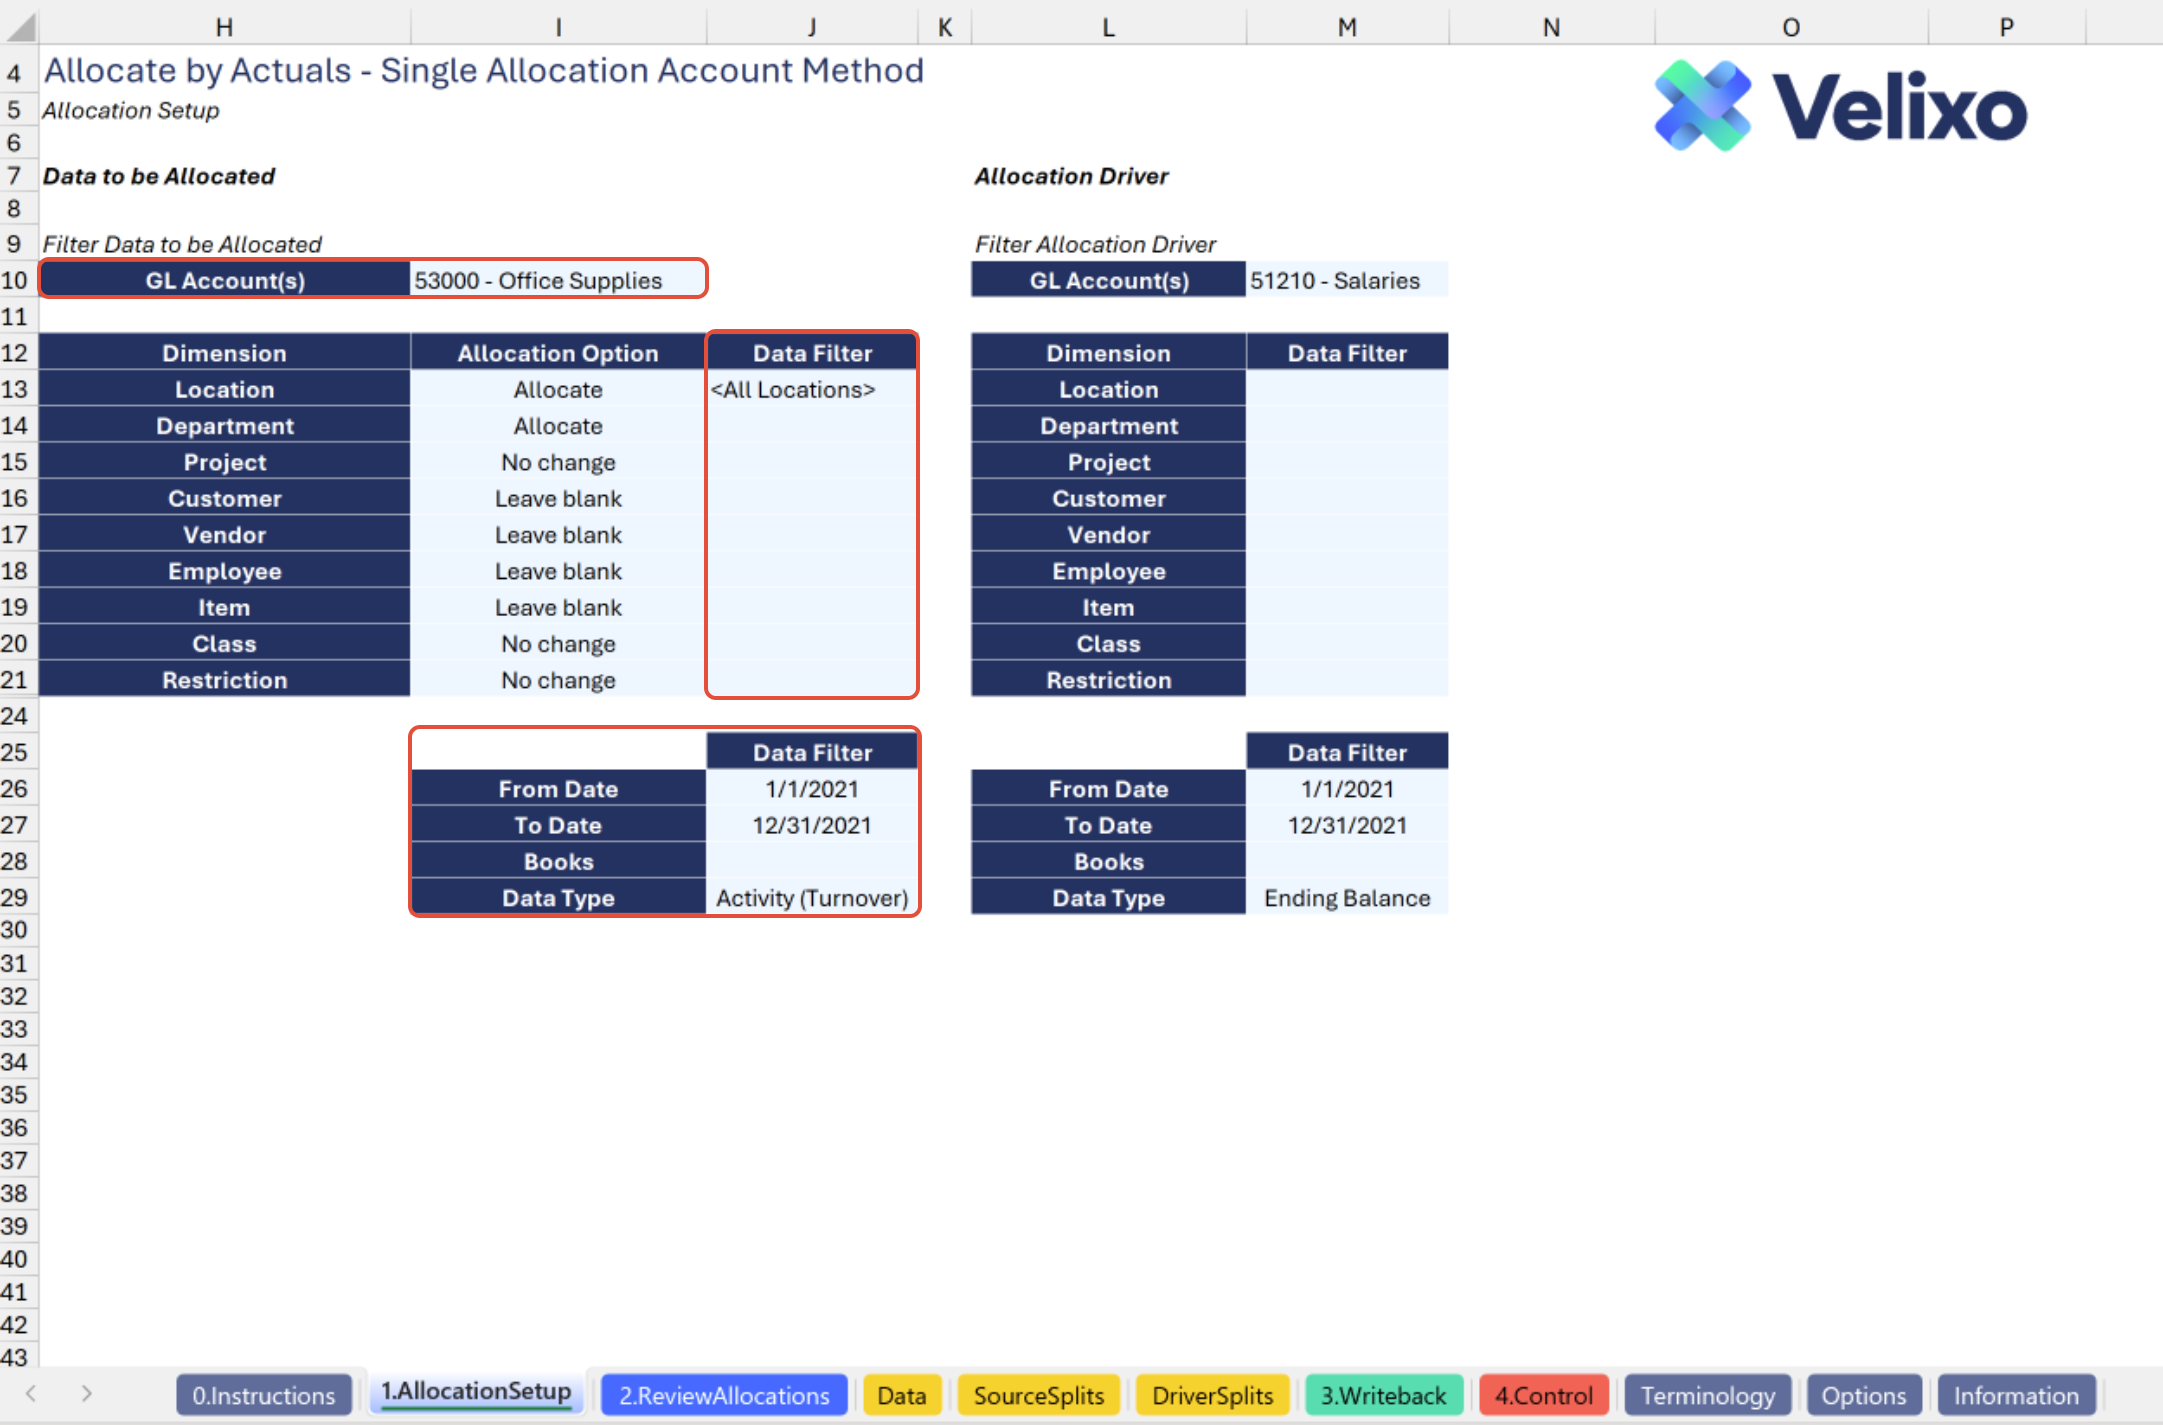
The tool filters exist on the 1.Allocation Setup tab, and are the key inputs that determine your allocated results. With a simple and familiar user-friendly interface, setting the parameters for your desired allocation is fast and easy. The filters include options related to both data to be allocated and allocation driver. In both cases, users can select filters for date range, books, activity type, GL account(s), and any standard and/or user defined dimension(s) needed. This is one of few tabs in the tool that requires any user input.
Users will find the below filtering options for both the Data to be Allocated and Allocation Driver pools. The below list uses standard Sage Intacct dimension names; your names may vary if you set custom terminology.
GL Account(s): lists all GL accounts present in your Sage Intacct instance. This field also accepts entry of a Velixo range expression.
Location: lists all Entities and Locations present in your Sage Intacct instance, including any custom groups you defined in the Options sheet.
Department: lists all Departments present in your Sage Intacct instance, including any custom groups you defined in the Options sheet.
Project: lists all Projects present in your Sage Intacct instance, including any custom groups you defined in the Options sheet.
Customer: lists all Customers present in your Sage Intacct instance, including any custom groups you defined in the Options sheet.
Vendor: lists all Vendors present in your Sage Intacct instance, including any custom groups you defined in the Options sheet.
Employee: lists all Employees present in your Sage Intacct instance, including any custom groups you defined in the Options sheet.
Item: lists all Items present in your Sage Intacct instance, including any custom groups you defined in the Options sheet.
Class: lists all Classes present in your Sage Intacct instance, including any custom groups you defined in the Options sheet.
User defined dimensions: for each user defined dimensions, the filter will list each UDD name present in your Sage Intacct instance (if applicable), including any custom groups you defined in the Options sheet. In the below screenshot, "Restriction" is a user-defined dimension. The template is prebuilt to work with up to three user-defined dimensions.
From Date: the first date for which you want to retrieve data from Sage Intacct.
To Date: the last date for which you want to retrieve data from Sage Intacct.
Books: lists all reporting books present in your Sage Intacct instance, including any custom groups you defined in the Options sheet.
Data Type: a validation drop down with a choice of Activity (Turnover) or Ending Balance. This determines which type of Sage Intacct data will be pulled.
These filters are seamlessly linked to the data on the Options tab.

For each dimension, the user can select the Desired Allocation Behavior in the Data to be Allocated section. This also acts like a filter, controlling which dimensions are reallocated, which are left at their existing distribution splits, and which are left blank in the allocation journal entry produced by the tool.
The Allocation Option filter consists of the following options for each dimension:
Allocate: dimensions set as 'Allocate' will have their activity or ending balance reallocated.
No change: dimensions set as 'No change' will have the same activity or ending balance percentage post-allocation as they had pre-allocation.
Leave blank: dimensions set to 'Leave blank' will be left blank on both the debit and credit side of the allocation journal entry.
The 'Leave blank' option is not a selection for the Location dimension, since Sage Intacct generally requires the Location dimension for journal entries.

Structure - 2.Review Allocations tab
Velixo has thoughtfully structured the Allocation tool templates using common data presentation structures that should be generic, by default. The 2.Review Allocations tab is the tool's primary engine, performing the calculations that produce your desired allocated result. This tab synthesizes data from other areas of the tool and generates a Cartesian product based on your selections made in the 1.Allocation Setup tab. Using a Cartesian product ensures complete and accurate allocation by systematically covering every possible combination across all dimensions, leaving no gaps or overlaps.
Providing full and detailed transparency to the allocation calculations, this tab serves as invaluable documentation for both internal review and external audit support. A Pivot Table, easily customizable by the user, offers the capability to analyze summarized allocation impact on the fly.
This tab uses Velixo's auto-hide zero columns feature to hide columns related to dimension filters not relevant for your environment or selections.
Data is displayed on this tab for any dimensions used in the allocation - that is, any dimensions set to either 'Allocate' or 'No change' on the 1.Allocation Setup tab. Information necessary to perform the calculation is obtained from the results on the Driver Splits tab (covered later).
This tab displays the following information (metrics) in columns E through AB:
# of Dimension Combinations Produced: a figure, for reference, displaying the number of unique dimension combinations resulting from your allocation option and filtering choices
Amount to Distribute: the total amount that will be allocated, as it appears in the Data to be Allocated section of your Allocation tab
Dimensions: a series of all dimension IDs to be used in the allocated entry (one column for each dimension with the rows consisting of all dimension IDs relevant for the allocation), identified by their native names in Sage Intacct (i.e., Location, Department, Class, etc.)
Dimension Weight: a series of the appropriate distribution ratios for each dimension ID (one column for each dimension with the rows consisting of the distribution ratio for the corresponding row-level dimension ID - i.e., Location Weight, Department Weight, Class Weight, etc.)
Attributable Split Ratio (Row Weight): the Cartesian Product, signifying the appropriate distribution ratio attributable to the unique row-level combination of dimensions
Amount: the amount to be allocated to the unique row-level combination of dimensions
Calculated Allocation (before rounding): a check figure verifying that the total amount being allocated agrees to your amount to distribute

On the right side of the tab (beginning in column AD), the user will find a Pivot Table. While this Pivot has a default layout, the user is free to edit this Pivot Table interactively using standard Excel Pivot Table capabilities. The default structure of the Pivot Table is as follows:
Pivot Table rows: Location dimension IDs and values
Pivot Table columns: three sets of columns:
(1) Data to be Allocated ("source" data) amounts and percentages, which shows the distribution of your data by dimension(s) displayed in the Pivot within the data to be allocated pool (as defined by your selections on the 1.Allocation Setup tab)
(2) Unrounded Entry Data amounts and percentages, which shows what the distribution of your data by dimension(s) displayed in the Pivot Table should be within the data to be allocated pool after you perform the allocation journal entry. These figures may go beyond 2 decimal places in precision, although only 2 decimal places are shown.
(3) Prospective Allocation - Rounded amounts and percentages, which shows what the distribution of your data by dimension(s) displayed in the Pivot Table should be within the data to be allocated pool after you perform the allocation journal entry. These figures are rounded to 2 decimal places, since a journal entry will not accept figures with more than 2 decimal places.

If your Unrounded Entry Data and Prospective Allocation - Rounded figures do not agree exactly, it is likely that you need to assign dimensions to your rounding line on the allocation journal entry. This is covered later in the documentation. Once dimensions are assigned to your rounding line, a simple refresh of the Pivot Table will align the figures!
Structure - Data tab
Serving as a supporting tab to the main tool tabs, the Data tab providers core information used by other tool operations and offers an easy reference for the user to provide additional transparency and audit support for the underlying data used in allocations. The tab uses a clean and simple structure, laid out as follows:
Data to be Allocated: the left side of the tool displays your Data to be Allocated("source") data combinations. Columns B through N will include the following details, where applicable based on your environment and filter selections.
GL Account(s): the GL account(s) returned that meet your overall filter criteria from your Data to be Allocated filters.
Location: the Location(s) returned that meet your overall filter criteria from your Data to be Allocated filters.
Department: the Department(s) returned that meet your overall filter criteria from your Data to be Allocated filters.
Project: the Project(s) returned that meet your overall filter criteria from your Data to be Allocated filters.
Customer: the Customer(s) returned that meet your overall filter criteria from your Data to be Allocated filters.
Vendor: the Vendor(s) returned that meet your overall filter criteria from your Data to be Allocated filters.
Employee: the Employee(s) returned that meet your overall filter criteria from your Data to be Allocated filters.
Item: the Item(s) returned that meet your overall filter criteria from your Data to be Allocated filters.
Class: the Class(es) returned that meet your overall filter criteria from your Data to be Allocated filters.
User-defined dimension 1 (UDD1): the UDD1(s) returned that meet your overall filter criteria from your Data to be Allocated filters. (This is reflected as "Restriction" in the screenshot below)
User-defined dimension 2 (UDD2): the UDD2(s) returned that meet your overall filter criteria from your Data to be Allocated filters.
User-defined dimension 3 (UDD3): the UDD3(s) returned that meet your overall filter criteria from your Data to be Allocated filters.
Amount: the amount for activity or ending balance attributable to the row-level combination of GL account and dimensions displayed.

Allocation Driver: the right side of the tool displays your Allocation Driver data combinations. Columns P through AB will include the following details, where applicable based on your environment and filter selections.
GL Account(s): the GL account(s) returned that meet your overall filter criteria from your Allocation Driver filters.
Location: the Location(s) returned that meet your overall filter criteria from your Allocation Driver filters.
Department: the Department(s) returned that meet your overall filter criteria from your Allocation Driver filters.
Project: the Project(s) returned that meet your overall filter criteria from your Allocation Driver filters.
Customer: the Customer(s) returned that meet your overall filter criteria from your Allocation Driver filters.
Vendor: the Vendor(s) returned that meet your overall filter criteria from your Allocation Driver filters.
Employee: the Employee(s) returned that meet your overall filter criteria from your Allocation Driver filters.
Item: the Item(s) returned that meet your overall filter criteria from your Allocation Driver filters.
Class: the Class(es) returned that meet your overall filter criteria from your Allocation Driver filters.
User-defined dimension 1 (UDD1): the UDD1(s) returned that meet your overall filter criteria from your Allocation Driver filters. (This is reflected as "Restriction" in the screenshot below)
User-defined dimension 2 (UDD2): the UDD2(s) returned that meet your overall filter criteria from your Allocation Driver filters.
User-defined dimension 3 (UDD3): the UDD3(s) returned that meet your overall filter criteria from your Allocation Driver filters.
Amount: the amount for activity or ending balance attributable to the row-level combination of GL account and dimensions displayed.

Dimensions appearing on this output depends on selections from the 1.Allocation Setup tab.
To ensure data accuracy, a given dimension will always appear in this output if: (1) a filter is applied to the dimension, (2) the dimension's allocation option is set to 'Allocate', or (3) the dimension's allocation option is set to 'No change.'
Said differently, a dimension will not appear in this output if its allocation option is set to 'Leave blank' (or the user makes no selection) and no filter is applied to the dimension.
This tab uses Velixo's auto-hide zero columns feature to hide columns related to dimension filters not relevant for your environment or selections.
Structure - Source Splits tab
The Source Splits tab is a supporting tab which serves as fully transparent documentation of the distribution of your Data to be Allocated across all relevant dimensions. Data is computed on this tab for any dimensions with an allocation option set to either 'Allocate' or 'No change' on the 1.Allocation Setup tab.
This tab passes its distribution ratios to the Driver Splits tab for any dimensions with an allocation option set to 'No change' on the 1.Allocation Setup tab.
This tab and the Driver Splits tab use the same layout for consistent presentation and analysis of supporting information.
Each dimension is presented with the following information (metrics):
Detailed Distribution Information (hidden/collapsed in column group - see grouping above column CO)
GL Account: the GL account from each row of the data to be allocated range
Dimension: the ID of the relevant dimension from each row of the data to be allocated range
Amount: the amount from each row of the data to be allocated range
Percentage: each row's percentage of the total amount, yielding a detailed row-level distribution
Summarized Distribution Figures
Dimension ID: a unique list of dimension IDs that appear in the detailed distribution information section
Amount: a sum of the amounts associated with each unique dimension ID
Percentage: each unique dimension ID's percentage of the total amount, yielding the distribution of your data to be allocated
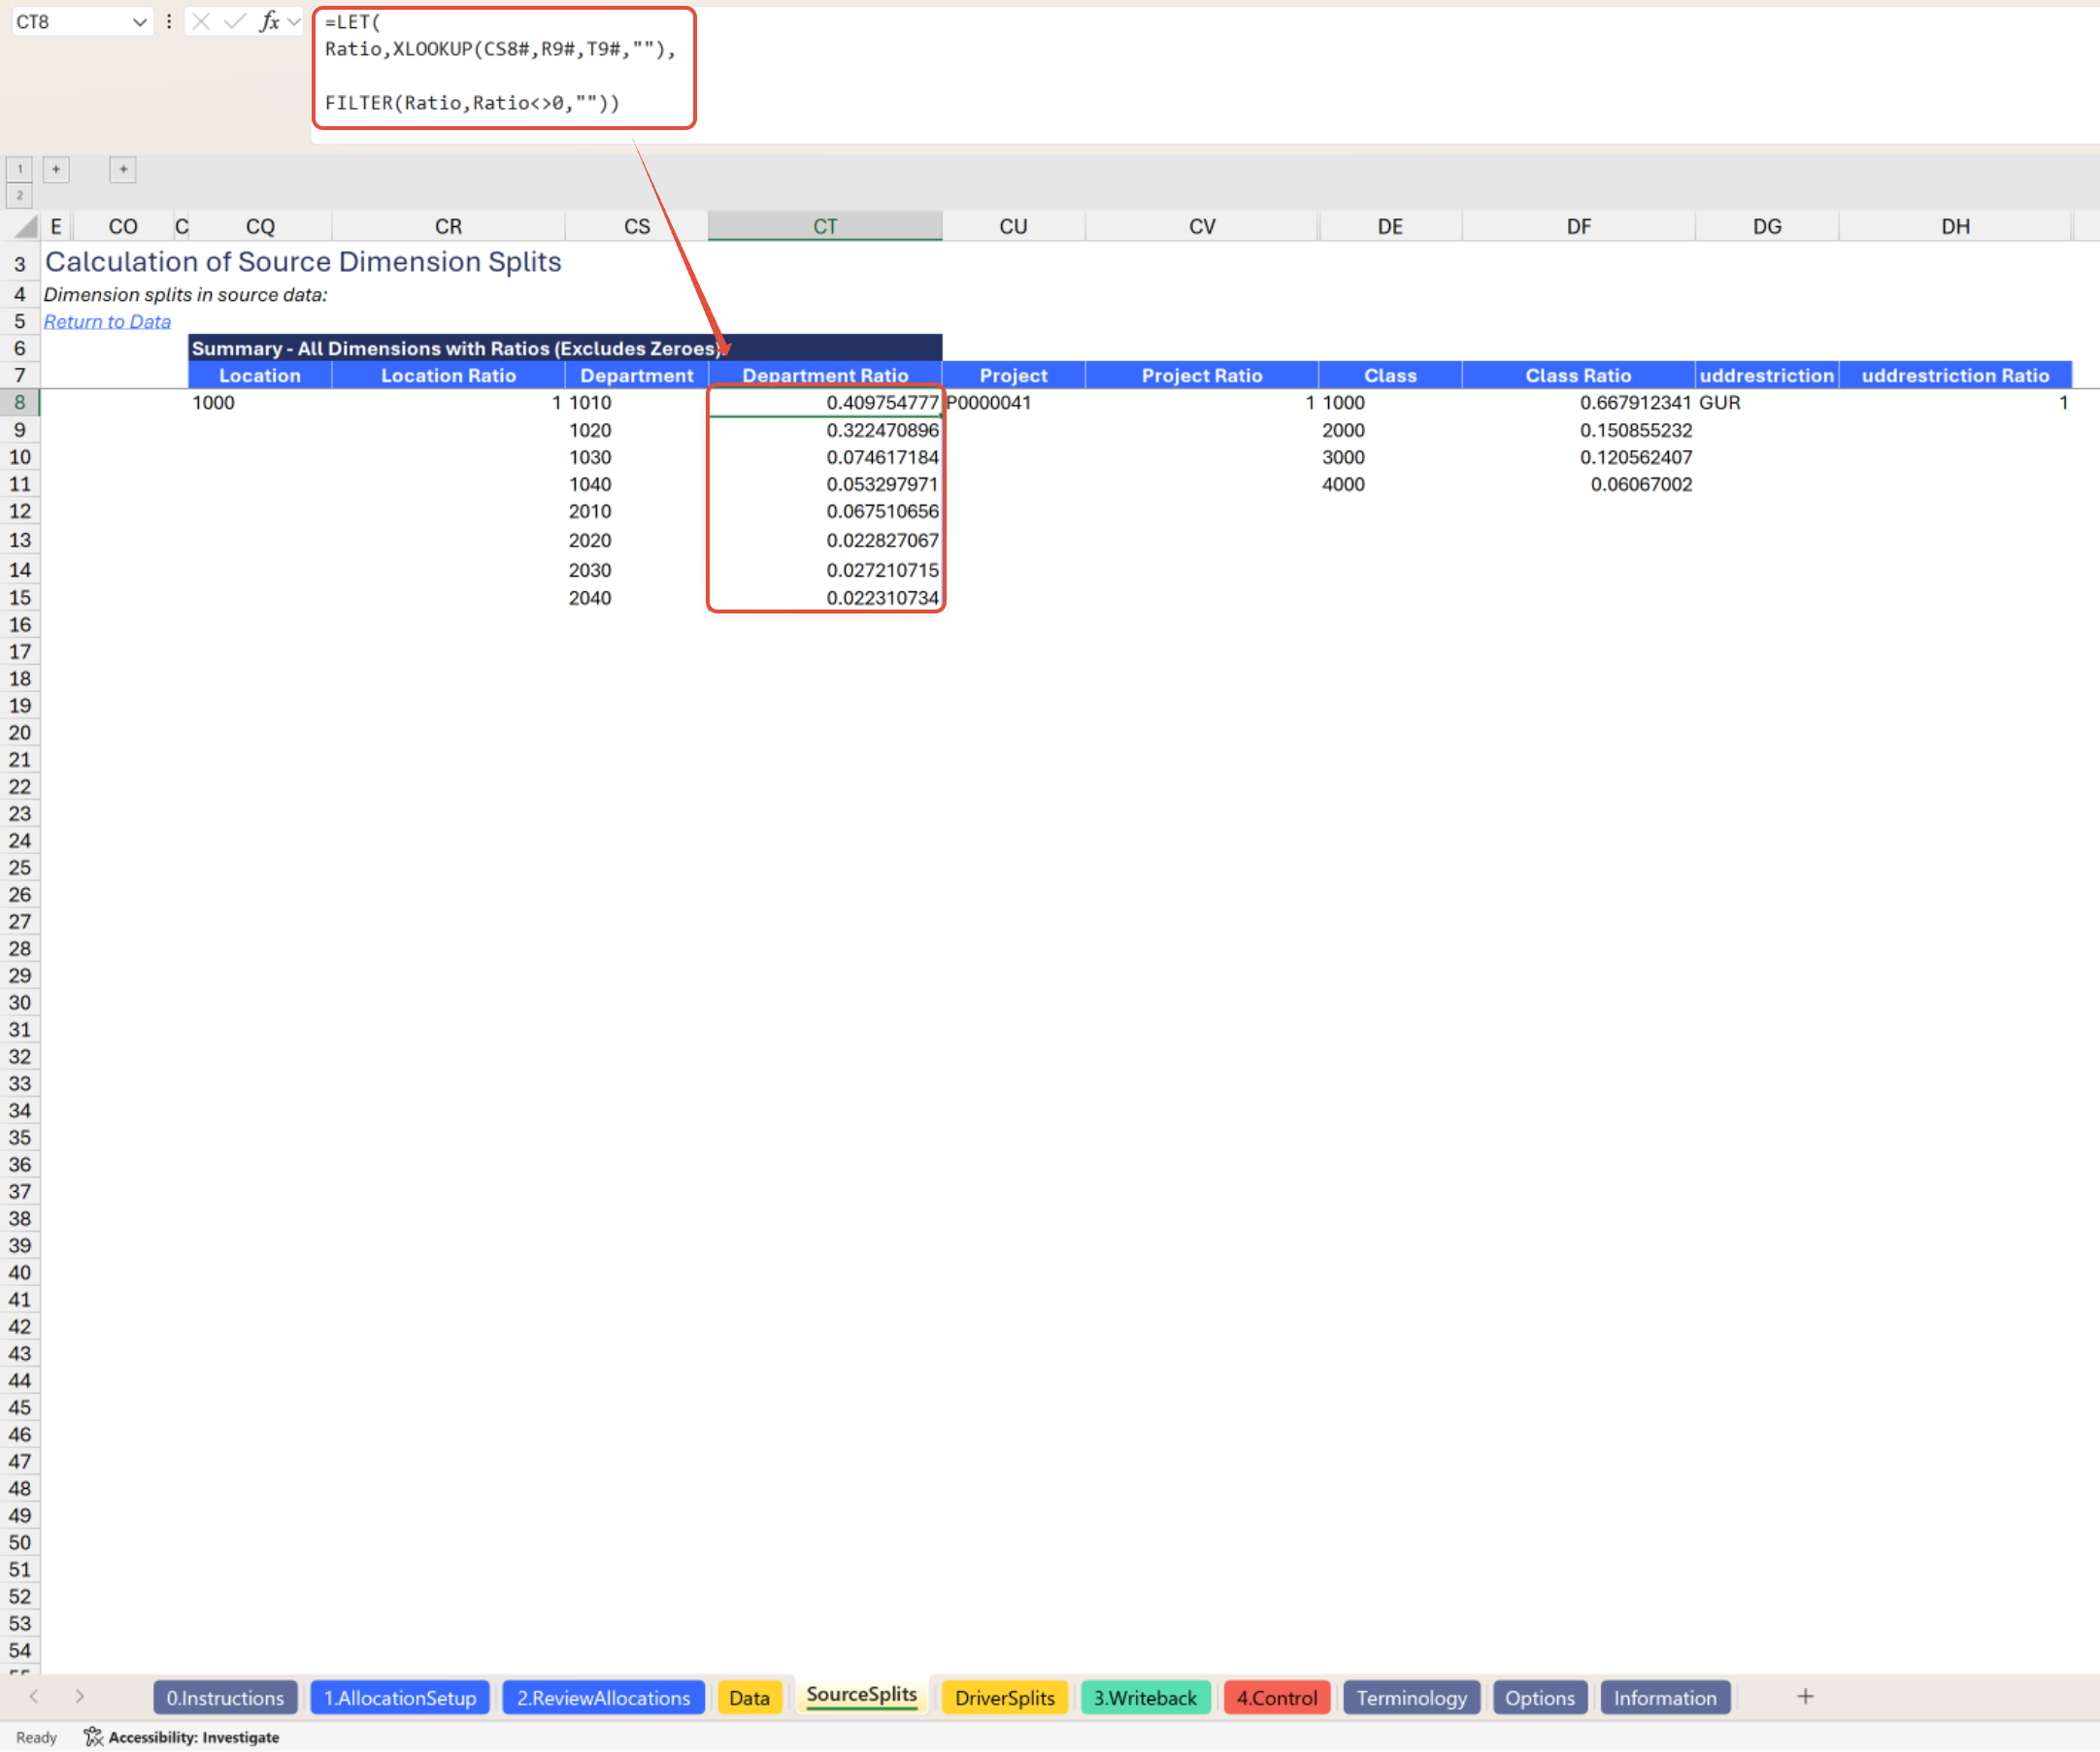
At the right end of the report tab (beginning in column CP) is a summary stacking all dimensions and their distribution ratios into a single array for easy insight (this array is also referenced elsewhere within the tool). By default, this summary information is the only visible information. All detailed information is collapsed in a column grouping (above column CO), which users are free to expand if they wish to see the details.
For each dimension that has non-zero figures, the following summarized columns (metrics) appear:
Dimension: the Sage Intacct native name for the dimension, followed by the list of unique dimension IDs from the summarized distribution figures
Dimension ratio: each unique dimension's ratio distribution of the total amount from the summarized distribution figures

This tab uses Velixo's auto-hide zero columns feature to hide columns related to dimension filters not relevant for your environment or selections.
Structure - Driver Splits tab
The Driver Splits tab serves as fully transparent and centralized documentation of which ratios are being used to distribute your data across all relevant dimensions. Data is computed on this tab for any dimensions set to either 'Allocate' or 'No change' on the Allocation tab. Information comes from either the Data to be Allocated range or the Driver range depending on your selection for the dimension's allocation option.
If a dimension's allocation option on the 1.Allocation Setup tab is set to 'Allocate', then the distribution is computed and passed to the allocation function based on driver data. If it is set to 'No change', then the distribution is inherited and passed to the allocation function from the computations already performed on the Source Splits tab.
This tab and the Source Splits tab use the same layout for consistent presentation and analysis of supporting information.
Each dimension is presented with the following information (metrics):
Detailed Distribution Information (hidden/collapsed in column group - see grouping above column CO)
GL Account: the GL account from each row of the appropriate data range
Dimension: the ID of the relevant dimension from each row of the appropriate data range
Amount: the amount from each row of the appropriate data range
Percentage: each row's percentage of the total amount, yielding a detailed row-level distribution
Summarized Distribution Figures
Dimension ID: a unique list of dimension IDs that appear in the detailed distribution information section
Amount: a sum of the amounts associated with each unique dimension ID
Percentage: each unique dimension ID's percentage of the total amount, yielding the distribution that will be applied to allocate your data
At the right end of the report tab (beginning in column CP) is a summary stacking all dimensions and their distribution ratios into a single array for easy insight (this array is also referenced elsewhere within the tool). By default, this summary information is the only visible information. All detailed information is collapsed in a column grouping (above column CO), which users are free to expand if they wish to see the details.
For each dimension that has non-zero figures, the following columns (metrics) appear:
Dimension: the Sage Intacct native name for the dimension, followed by the list of unique dimension IDs from the summarized distribution figures
Dimension ratio: each unique dimension's ratio distribution of the total amount from the summarized distribution figures.

This tab uses Velixo's auto-hide zero columns feature to hide columns related to dimension filters not relevant for your environment or selections.
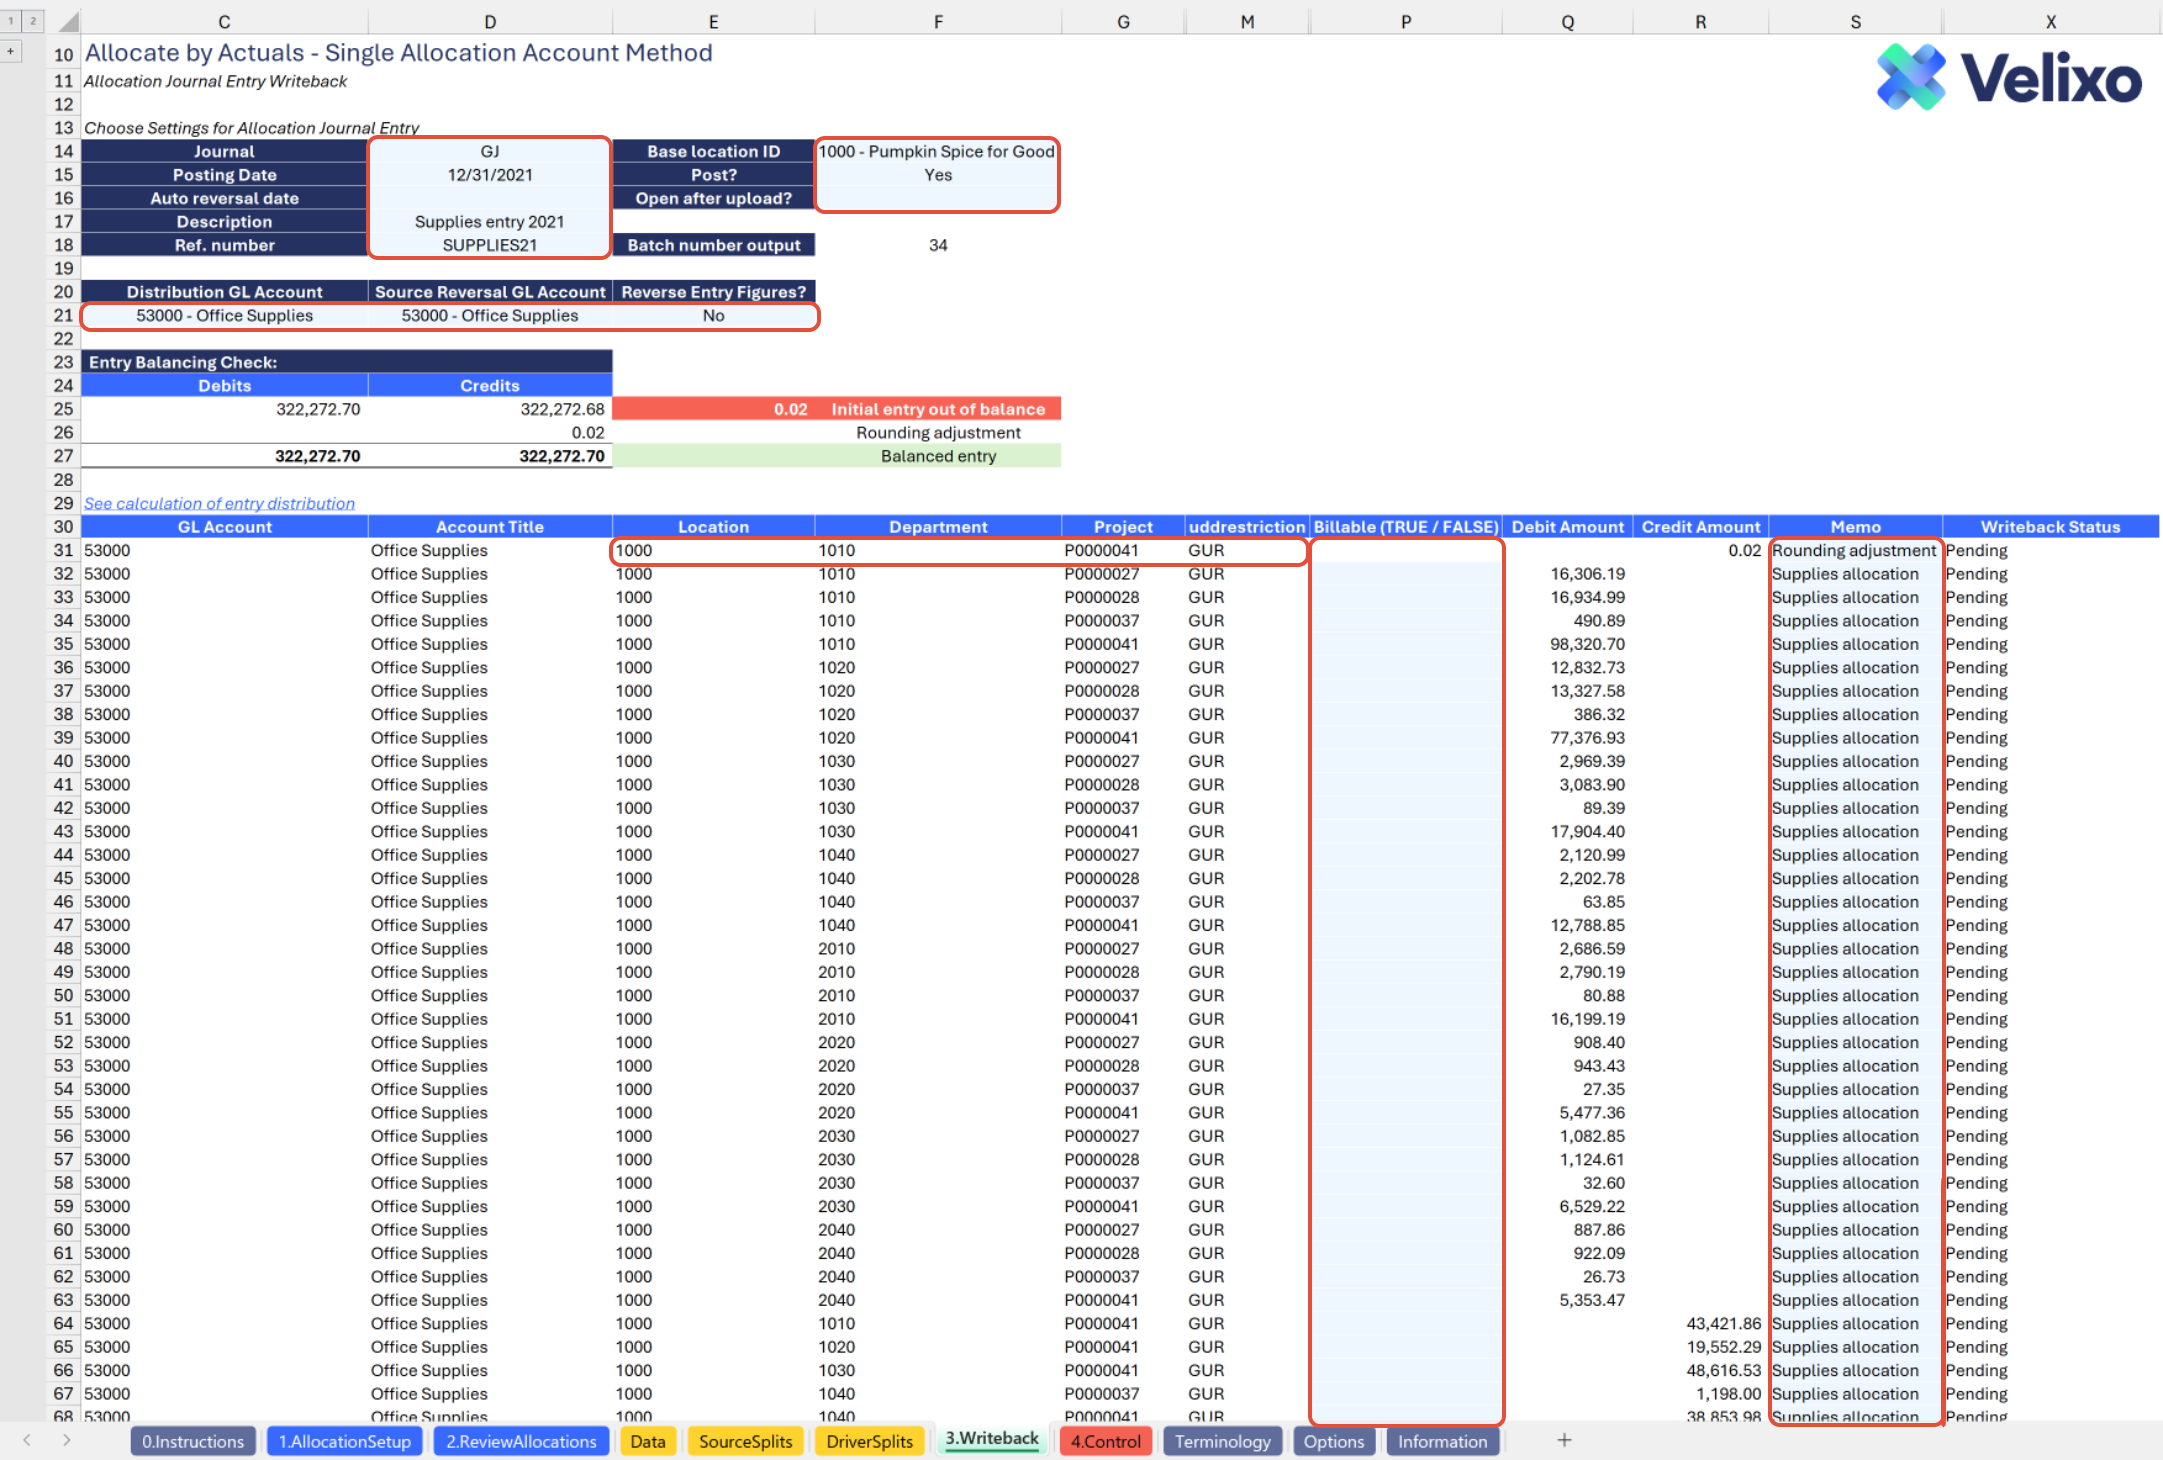
Structure - 3.Writeback tab
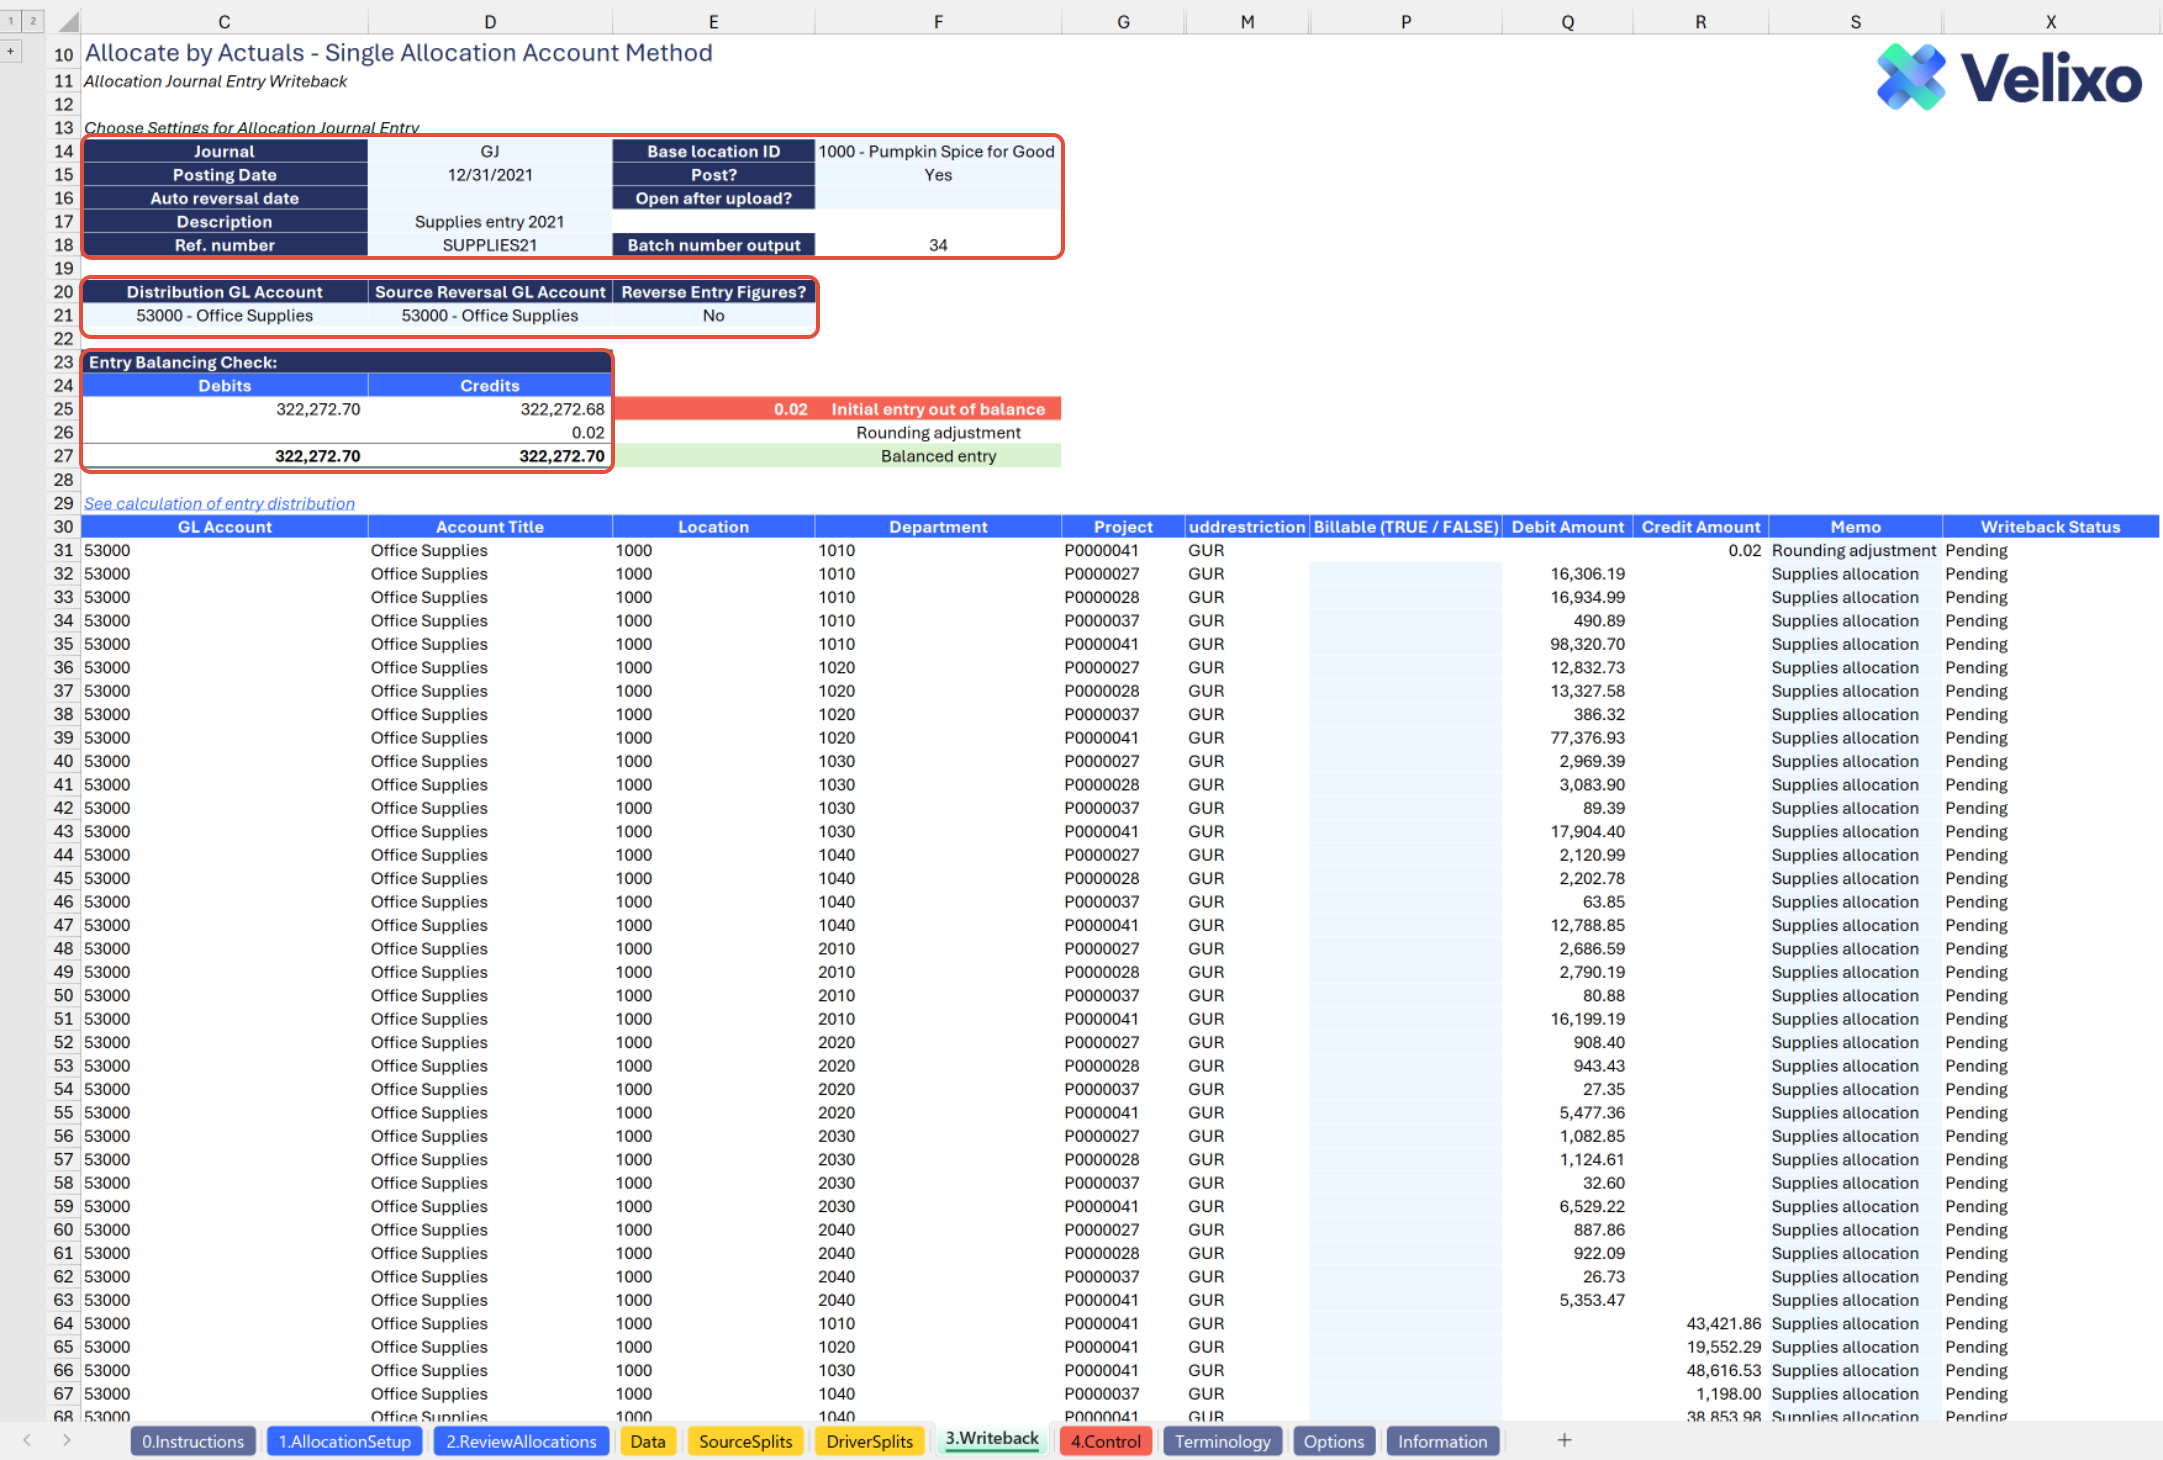
The 3.Writeback tab contains the allocation journal entry to be sent to Sage Intacct using Velixo's journal entry writeback capability. While the tab retains a familiar journal entry layout look and feel, Velixo has structured it dynamically to eliminate nearly all effort that would traditionally be required of an end user. The structure of this tab is as follows,
Allocation Entry Header/Writeback Options (cells C13:F17)
Journal: the ID of the journal you want to use for writing back your allocation journal entry
Posting Date: the GL posting date to use for the journal entry
Auto reversal date: the date (if any) on which the journal entry should reverse)
Description: the header-level description for the journal entry
Ref. number: the reference number for the journal entry
Base location ID: the "source entity ID" (used if this journal entry should trigger automatic inter-entity transactions in Sage Intacct). Contains a drop down list of all Locations/Entities from your Sage Intacct environment.
Post?: indicates if the entry should post immediately when sent to Sage Intacct. If not set to Yes, the entry will be sent to Sage Intacct in Draft status.
Open after upload?: indicates if a Sage Intacct browser window should open, taking you to the entry, after Velixo uploads to Sage Intacct
Batch number output: a field auto-populated by Velixo with the journal transaction number when a journal writeback occurs
Entry GL Account Selections (cells C19:E20)
Distribution GL Account / Source Reversal GL Account: Validation lists containing the chart of accounts from your Sage Intacct environment, used to select which GL account to use as the distribution GL and reversal of source data GL, respectively, for your journal entry
Reverse Entry Figures?: a Yes/No validation list that lets the user "flip" the entry if desired. Useful for on-the-fly reversals or any other use case in which one might want to invert their journal entry's debits and credits.
Entry Balancing Check (cells C22:D26)
A range of cells that checks the allocation entry total debits against total credits and returns a rounding adjustment if the entry does not balance (which is automatically added as a line at the top of your entry)
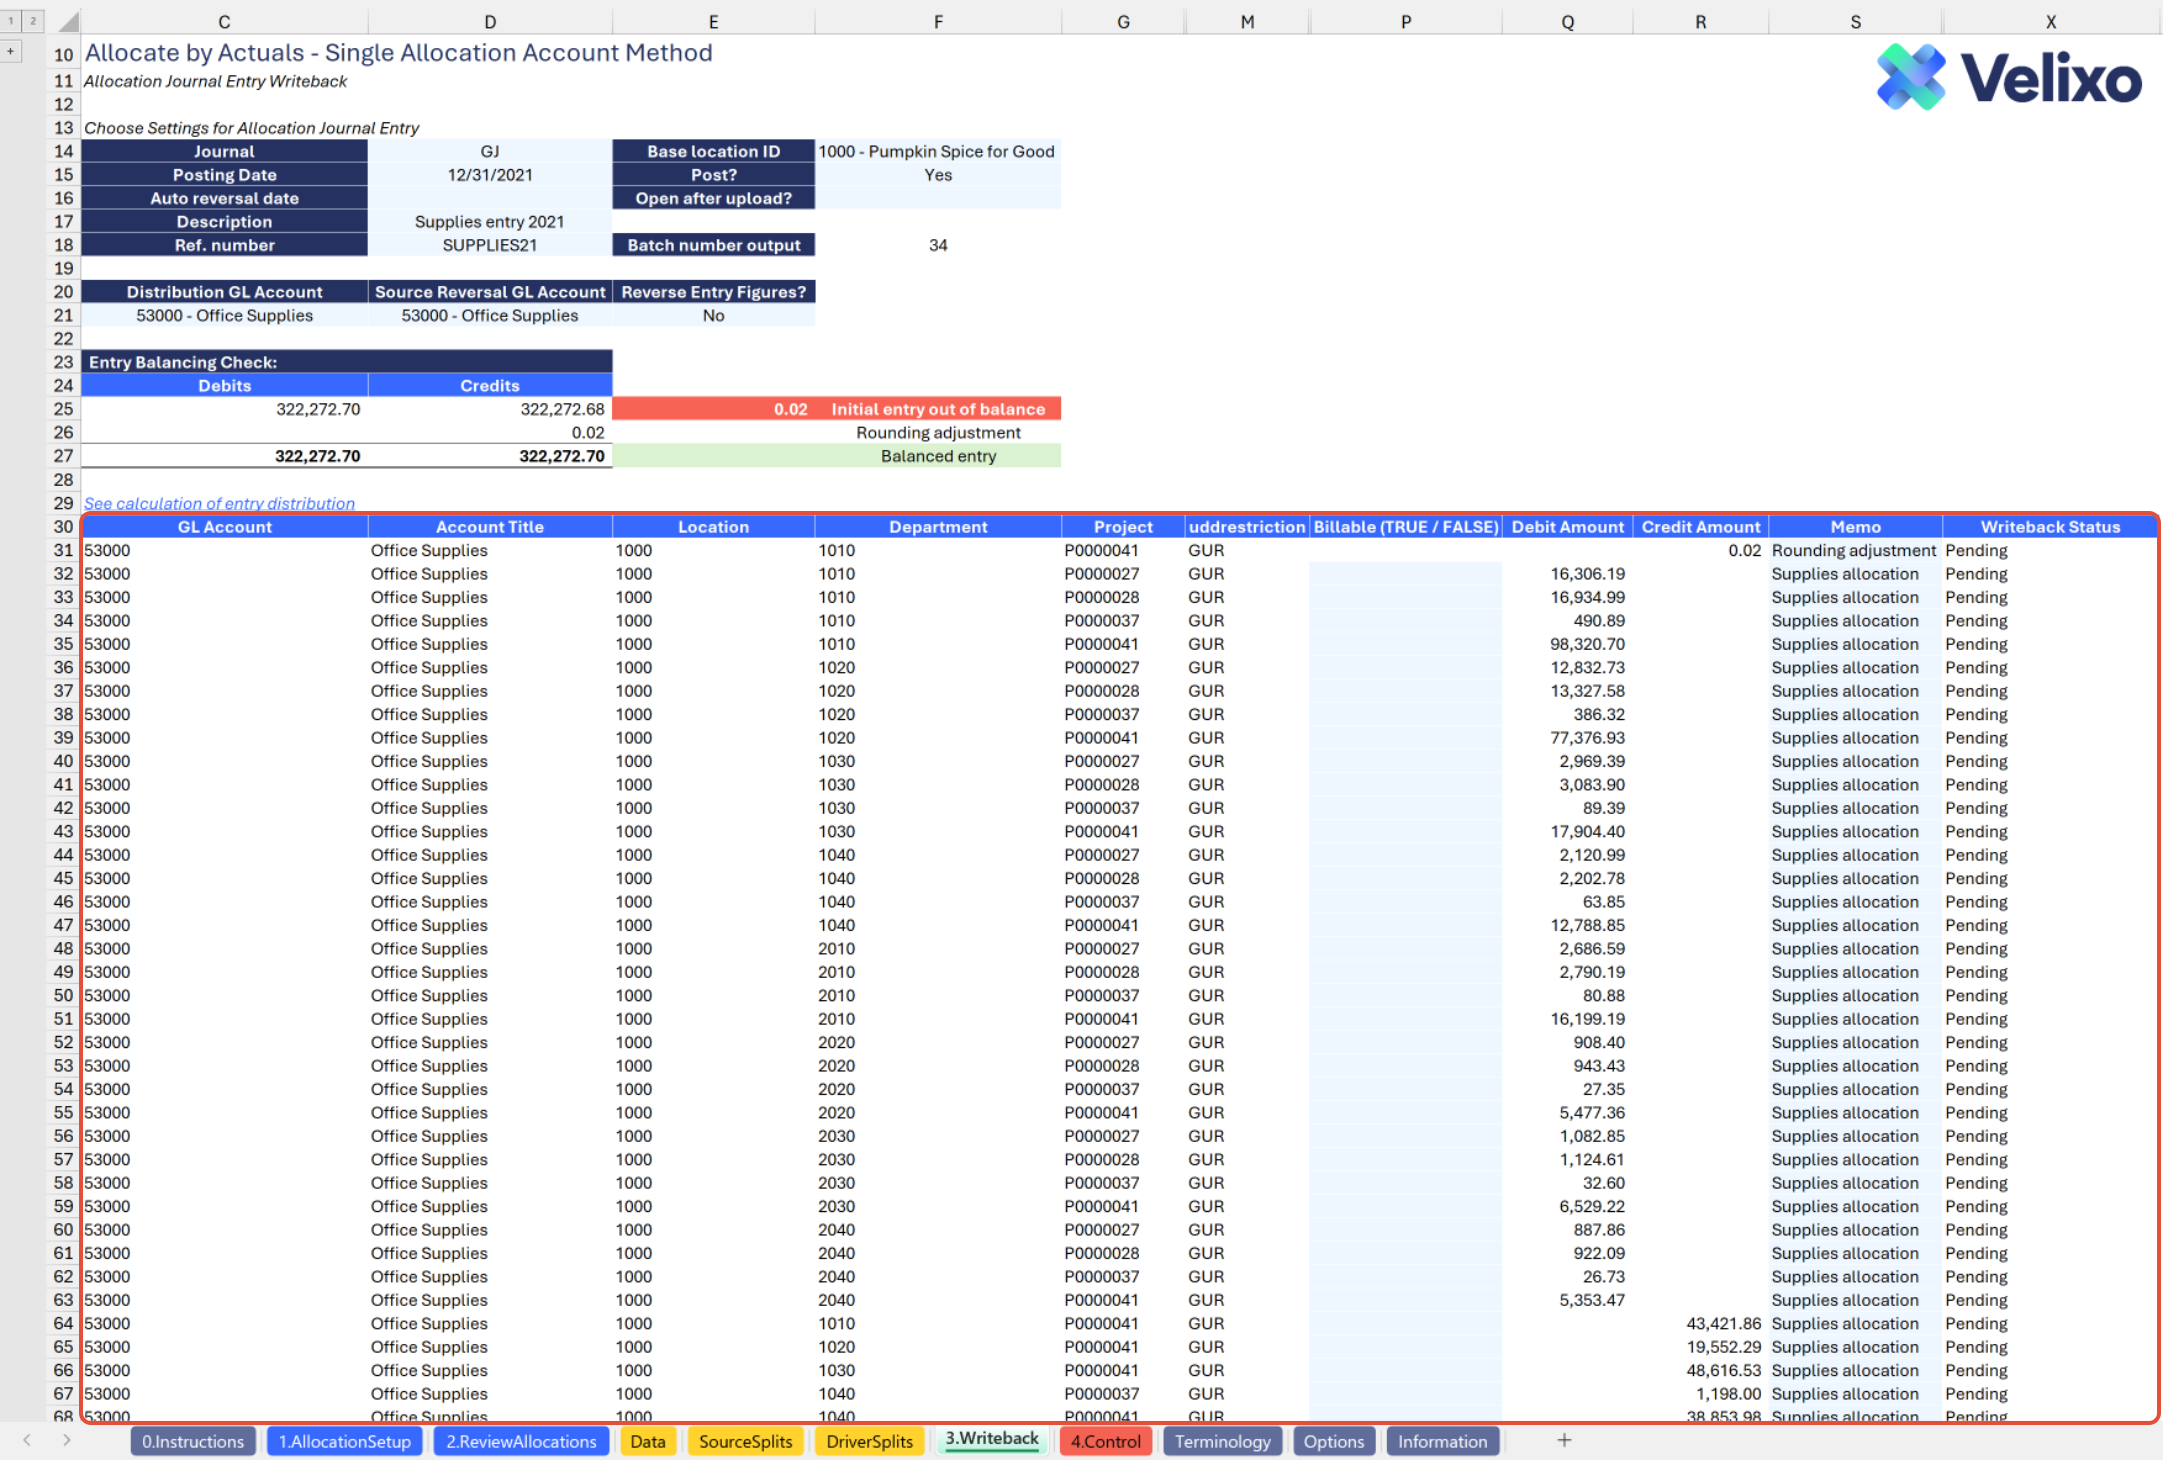
Allocation Entry Lines (headers in cells C29:X29 - dimension columns are shown if included in your entry. This section always uses Sage Intacct's native terminology for the dimension, as required for journal writeback):
GL Account: the line-level GL account to be debited or credited in the allocation journal entry.
Location: the line-level Location ID to be debited or credited in the allocation journal entry.
Department: the line-level Department ID to be debited or credited in the allocation journal entry.
Project: the line-level Project ID to be debited or credited in the allocation journal entry.
Customer: the line-level Customer ID to be debited or credited in the allocation journal entry.
Vendor: the line-level Vendor ID to be debited or credited in the allocation journal entry.
Employee: the line-level Employee ID to be debited or credited in the allocation journal entry.
Item: the line-level Item ID to be debited or credited in the allocation journal entry.
Class: the line-level Class ID to be debited or credited in the allocation journal entry.
User-defined dimension 1: the line-level user-defined dimension to be debited or credited in the allocation journal entry. (In the below screenshot, uddrestriction is an example of a user defined dimension).
User-defined dimension 2: the line-level user-defined dimension to be debited or credited in the allocation journal entry.
User-defined dimension 3: the line-level user-defined dimension to be debited or credited in the allocation journal entry.
Billable (TRUE / FALSE): user input; TRUE means this line should be flagged as billable, while left blank or FALSE means the line will not be flagged as billable. **
Debit Amount: the line-level debit amount for the allocation journal entry.
Credit Amount: the line level credit amount for the allocation journal entry.
Memo: user input; the line-level memo for the allocation journal entry.
Writeback Status: this will be the reference status when uploading GL journal entries to Sage Intacct:
Pending: the Writeback process has not started yet, and the figures are not yet uploaded to the ERP.
Line uploaded: the journal entry was successfully uploaded to the ERP.
Failed: the writeback process failed and further template modification might be required.
The billable option is relevant only to organizations subscribed to/using this functionality in Sage Intacct. If you are unsure whether this functionality applies to you, discuss with your Sage Intacct implementer.
User Guide
Using the Allocation tool
Now that we've covered the tool overview, let's dive into a step-by-step guide on effectively utilizing the tool.
Set the Connection Name on the Options Sheet: crucial for all processes, set the Connection Name on the Options sheet by updating cell C4. Ensure it matches the name used during Velixo application login.

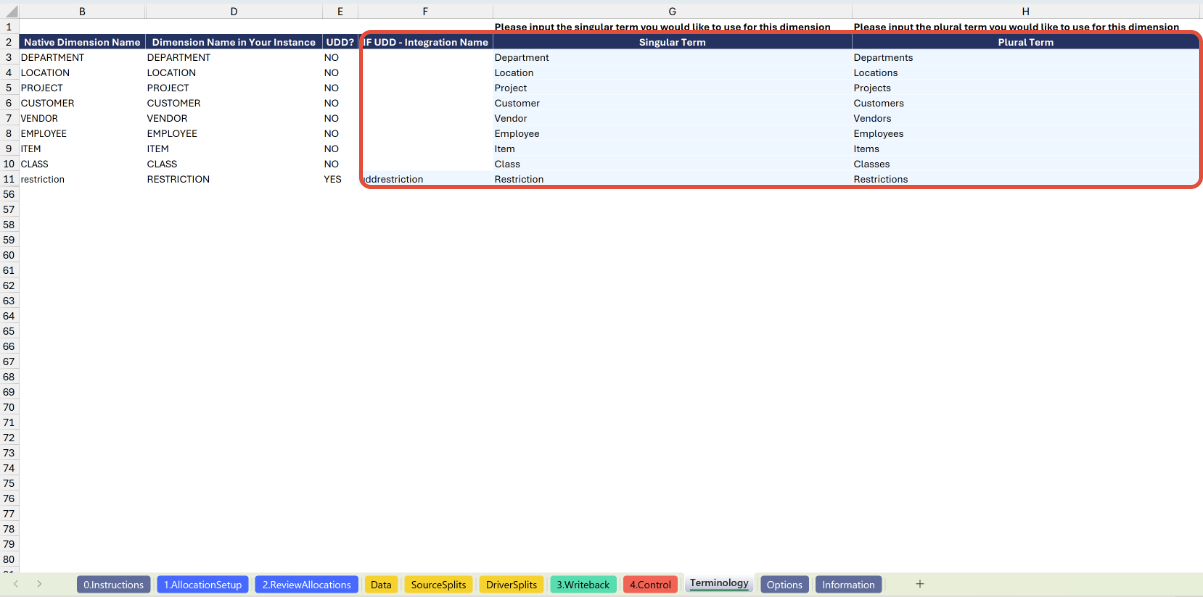
Update the Terminology Sheet: the Terminology tab lists your organization's Sage Intacct dimensions along with the dimension's native name and its name in your Sage Intacct instance. You can use this tab to further customize the names you would like to use for some or all of your Sage Intacct dimensions throughout the template. To do so, simply input your desired name in the light blue cells for Singular Term and Plural Term for the dimension. The changes will immediately and automatically persist in all relevant places throughout the template.
If your organization leverages user-defined dimensions (UDDs), you must also input the exact integration name for each UDD to ensure seamless use of the dimension throughout the template. Note that the integration name and the Object (record) name are not always the same; check with your Sage Intacct implementer if you are unsure. A user with the appropriate permissions can find the UDD's integration name in Sage Intacct by going to Platform Services > All > Objects and locating the UDD in the Objects list.

Example of finding the integration name for a user-defined dimension (UDD).
The billable option is relevant only to organizations subscribed to/using this functionality in Sage Intacct. If you are unsure whether this functionality applies to you, discuss with your Sage Intacct implementer.
Update the Options Sheet: as the foundation for filters on the other tabs, keep the Options sheet up to date. It should always and automatically capture the latest dimensions and structures from your Sage Intacct instance; however, you can also customize it.
If you organization uses special reporting books, you can choose to enable or disable the use of those books in your template. This applies to the following book types available in Sage Intacct, with Yes/No selections to enable or disable their use in cells D7 through D11:
GAAP
Cash (when using Cash and Accrual accounting)
Tax
User Defined Books
Consolidation Books (when using Sage Intacct Global or Domestic Consolidations)

Select Dimensions' Allocation Option: after updating the Terminology and Options sheets, you're ready to use the tool!
The 0.Instructions tab of the tool gives you the general workflow to use for success. Full details on how to use the tool follow in this article.

Select the desired allocation option for each dimension used in your Sage Intacct instance on the 1.Allocation Setuptab.
Dimensions set to 'Allocate' will be reallocated based on the calculated distribution split
Dimensions set to 'No change' will retain the same distribution split pre-allocation and post-allocation
Dimensions set to 'Leave blank' (or for which you make no selection) will be omitted from the allocation journal entry

Filter Data to be Allocated: select desired filters for the data you intend to allocate:
From Date
To Date
Books
Data Type
GL Account(s)
Dimensions
To give full visibility into the data that meets your filter criteria, dimensions will always appear in your output unless your desired allocation behavior for that dimension is set to either Leave blank, or you put nothing in the Allocation option for that dimension. The default output for a dimension is all dimension values. Apply a filter to change the default. Dimensions are only used to calculate allocations when you set their desired allocation behavior to either No change or Allocate.
Filter Allocation Driver: select desired filters for your allocation drivers:
From Date
To Date
Books
Data Type
GL Account(s)
Dimensions

To give full visibility into the data that meets your filter criteria and prevent errors in calculation execution, dimensions will always appear in your output unless your desired allocation behavior for that dimension is set to either Leave blank, or you put nothing in the Allocation option for that dimension. The default output for a dimension is all dimension values. Apply a filter to change the default. Dimensions are only used to calculate allocations when you set their desired allocation behavior to either No change or Allocate.
Automatic Report Update: selecting/modifying any filter as mentioned above will automatically update the tool's output. Begin analyzing the output with the latest data.

Validation and analysis:
The validation and analysis capabilities for this tool are built in a highly automated fashion to minimize user effort. Unless otherwise noted in this documentation, the tabs 2.Review Allocations, Data, Source Splits, and Driver Splits require no user manipulation by default, and are intended solely for review and audit evidence purposes.
On the 2.Review Allocations tab, review details of the Cartesian product calculated to produce your allocation, and leverage the Pivot Table available to summarize your data on-the-fly and analyze the prospective impact of your allocation entry.
The user is free to edit this Pivot Table as desired (add/move/remove fields, apply filters, etc.) using Excel's standard Pivot Table functionality. Auto-refresh of Pivot Table data is not enabled by default, but the user is free to enable this option in their own Excel sheet based on preference. If you are not using auto-refresh, be sure to refresh the Pivot Table data when you make changes or otherwise refresh your worksheet data via Velixo.


Tip for assessing allocation accuracy after journal writeback
When you have completed your entry writeback and data refresh, the percentage breakout in your data to be allocated should reflect the percentages that you saw before the writeback in the pivot's other info source columns.
If you used the same GL account on the distribution and source reversal side of your allocation entry, you are likely to see the same percentage breakouts across the pivot table. If one or both of these statements is true, this further validates the accuracy of your allocation based on the parameters you selected.
Use Velixo drilldown on any amount figures in your Data to be Allocated or Allocation Driver sections on the Data tab to review further details.

Review the Source Splits tab to understand how each dimension is proportionally distributed within your Data to be Allocated (source) pool.

Review the Driver Splitstab to understand which ratios will ultimately be used to perform allocation of your Data to be Allocated across dimensions. Recall that:
Any dimensions set to an Allocation Option of 'Allocate' will use the dimension's distribution ratios per the Driver data.
Any dimensions set to an Allocation Option of 'No change' will use the dimension's distribution ratios per the Data to be Allocated (source) data.
Any dimensions set to an Allocation Option of 'Leave blank' (or for which no selection was made) will not be present in the allocation entry, and therefore will not show a ratio calculation.

Ensure accuracy by verifying balances in the Control sheet. Confirm that the differences for each total are zero.
Variances investigation: if discrepancies arise between data extracted at the account and dimension detail vs. account code levels, conduct a thorough investigation to resolve any differences.
Set the Allocation Entry fields: on the 3.Writeback tab, complete the necessary fields so your journal entry is ready for writeback:
Journal
Posting Date
Auto reversal date (if auto-reversing the entry)
Description
Ref. number
Base location ID (if needed/desired)
Post?
Open after upload?
Distribution GL Account
Source Reversal GL Account
Reverse Entry Figures?
Based on Sage Intacct requirements, you must complete the Base location ID field if your allocation entry does not balance by Entity. You must also have the appropriate inter-entity account mapping configuration set up in your Sage Intacct instance to allow for generation of inter-entity transactions. Consult with your Sage Intacct implementer for further information.
Distribute Rounding Adjustment: substantially all ERP systems accept journal entries with numbers containing a maximum of two decimal points. The nature of an allocation process almost always results in figures that extend beyond a neat two decimal point result. Consequently, unless your distribution resulted in perfectly round numbers, your allocations will generally have an immaterial rounding adjustment, and that adjustment will be automatically presented on row 31. The user should complete the dimension fields on row 31 to assign their desired dimension IDs for the rounding amount.
Conditional formatting in red will flag any dimensions not completed on the rounding row. Enter null for a dimension to leave it blank in the rounding amount distribution.
If you populate a dimension on the rounding adjustment row where the dimension's Allocation Option is set to 'Leave blank' or no selection was made, yellow conditional formatting will alert you, as this can distort the Pivot Table summary on the 2.Review Allocations tab. Clear the dimension from the cell to remove the formatting.
Complete Optional Line Level Details:
If your organization leverages Sage Intacct's Grant Tracking & Billing module and you would like to flag any allocation lines as billable/qualified expense (whichever terminology you have adopted internally), complete column P as appropriate, with TRUE for Billable and FALSE (or left blank) otherwise.
Enter a memo for any line(s) you would like in column S.
While you can perform journal entry writeback immediately after finishing the 1.Allocation Setup tab, we recommend reviewing and/or saving the remaining report tabs (possibly leveraging Velixo's Distribution Tools) to preserve the details of your allocation support and verify you have no further changes to make to your Allocation tab selections. Depending on your Sage Intacct configuration, it may not be possible to report on data before and after an allocation entry after you have performed writeback without reversing or deleting the allocation entry.
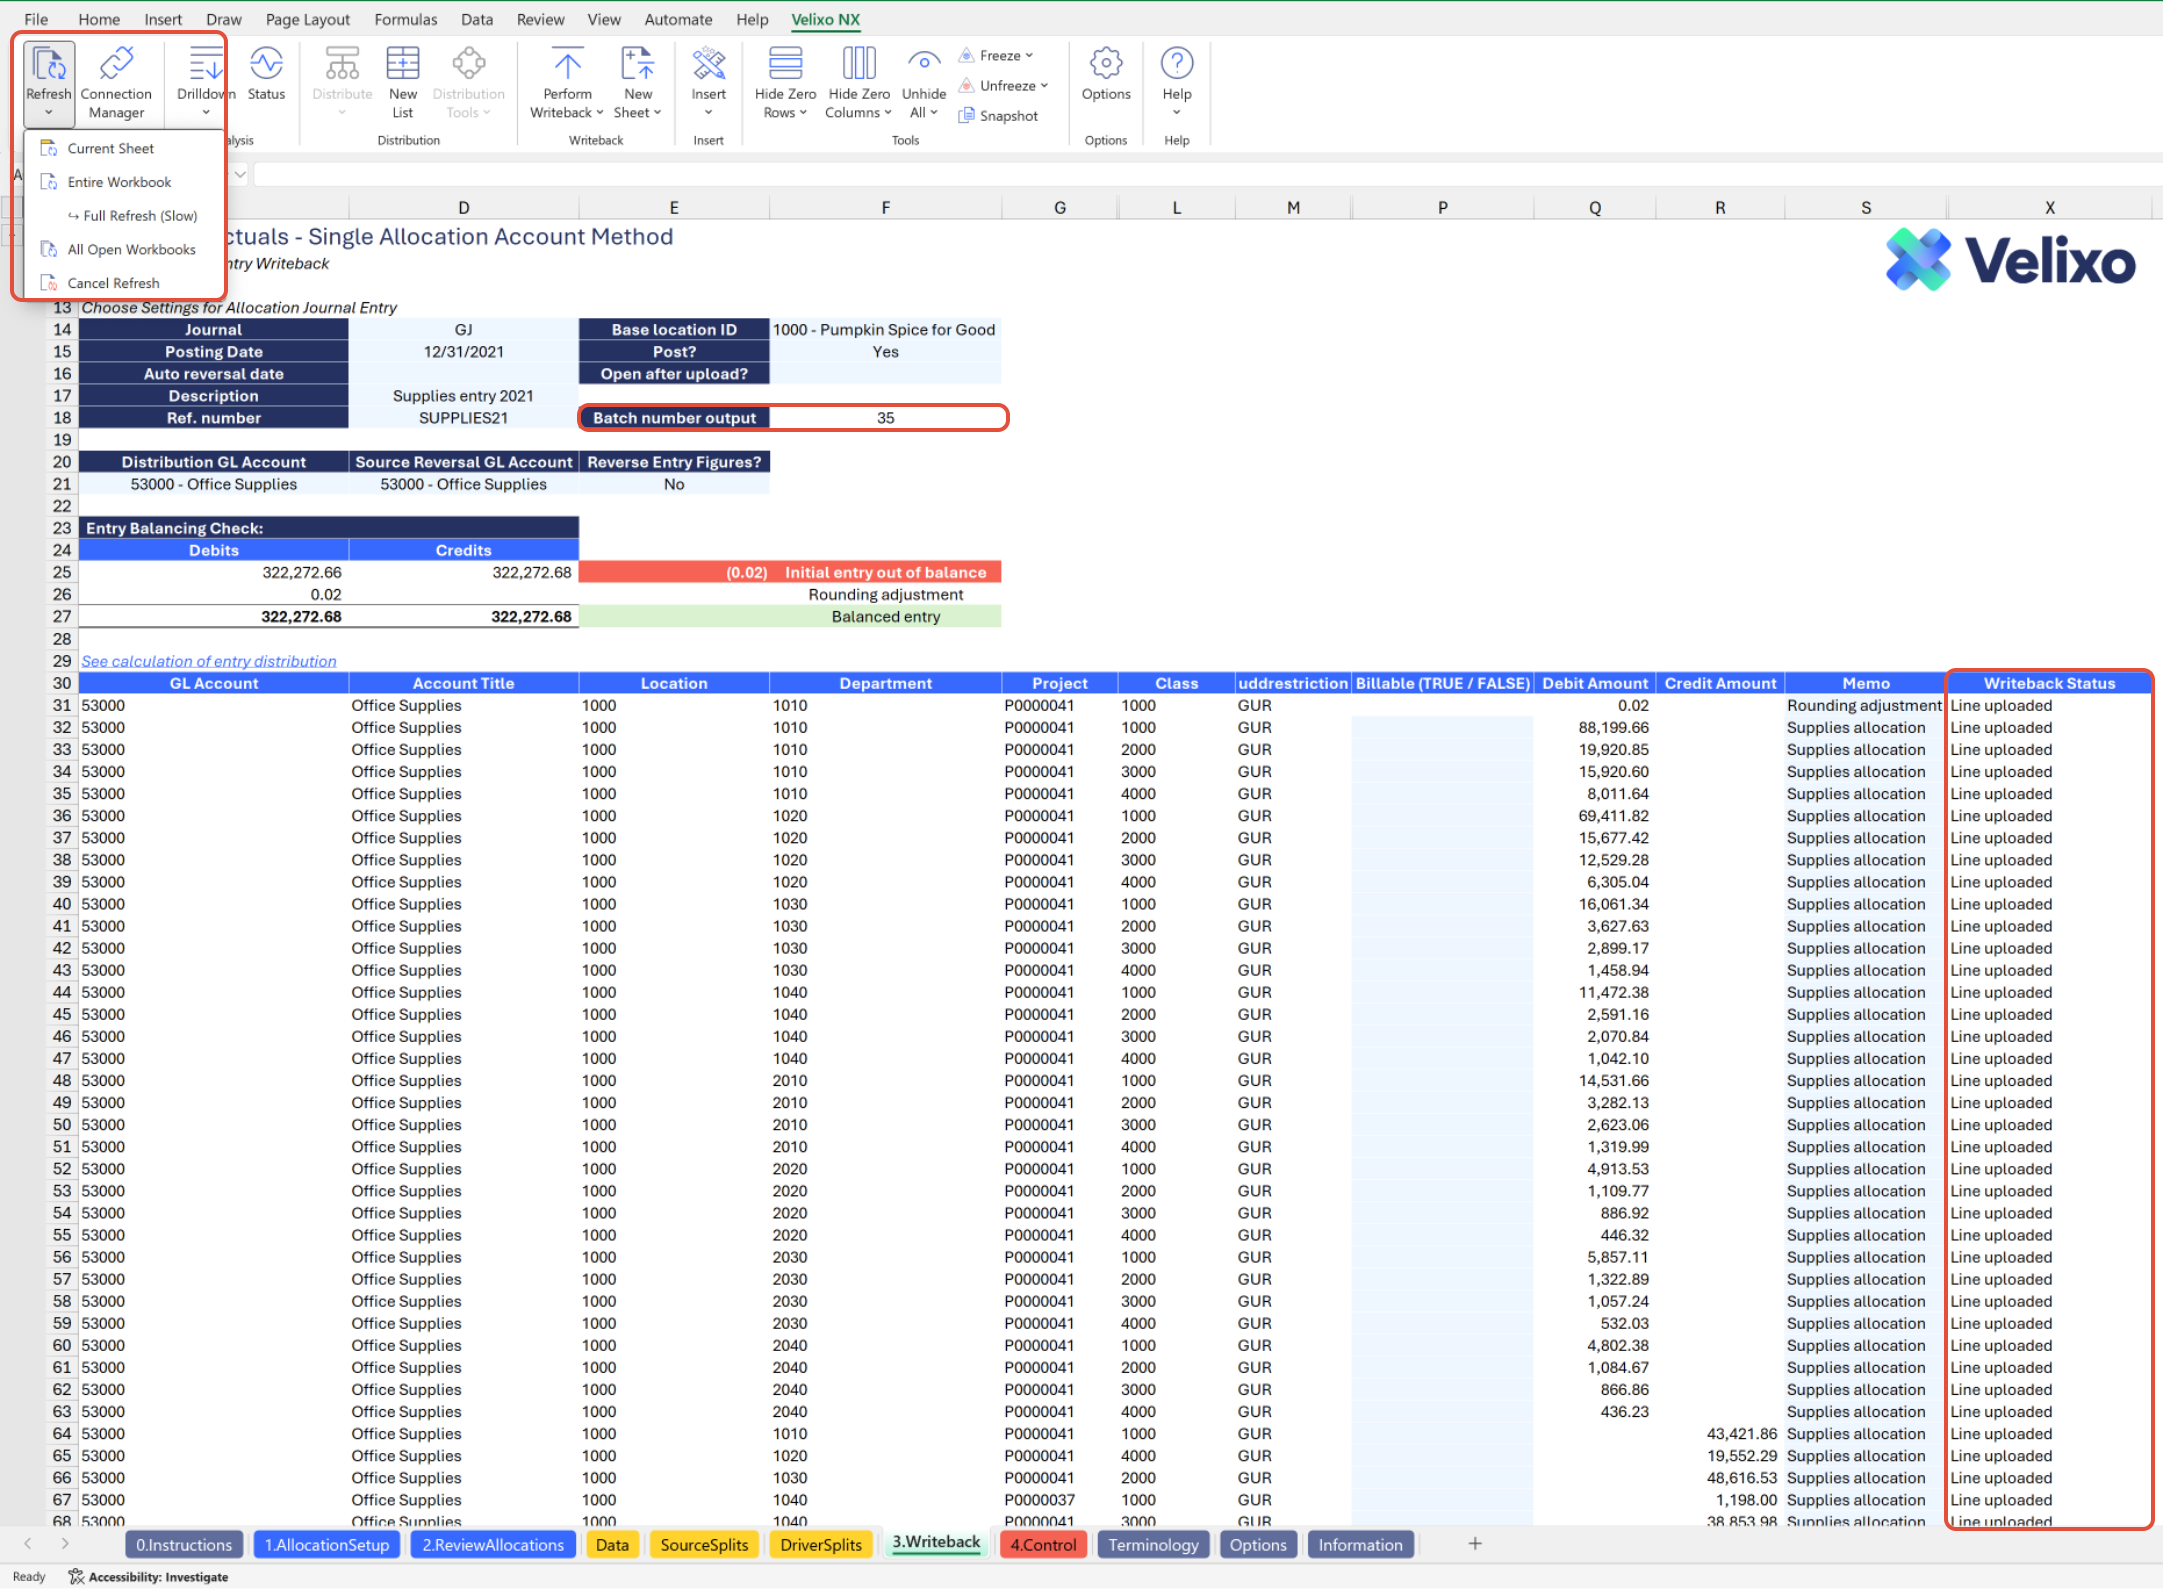
Journal Writeback: it is strongly recommended that you perform journal writeback after reviewing all report tabs and saving these details to preserve documentation of your allocation support.
When you are satisfied with your allocation, click the Perform Writeback button in the Velixo NX ribbon, then select Current Sheet.

This process may take several seconds; you can review the status of the operation in the Velixo Status pane.
If you selected "Open after upload" as Yes, a Sage Intacct browser window will open with your entry upon successful writeback (you may have to log in if you are not logged in already). If you set "Post" to No, you can review and post the entry. Otherwise, the entry will already be posted.

The journal batch number is automatically updated in your worksheet, reflecting the batch number sent to Sage Intacct, and the upload status is reflected.
Once you've posted any entries from the writeback process, selecting Refresh > Current Sheet (or Refresh > Entire Workbook, depending on your need) will immediately update your numbers.

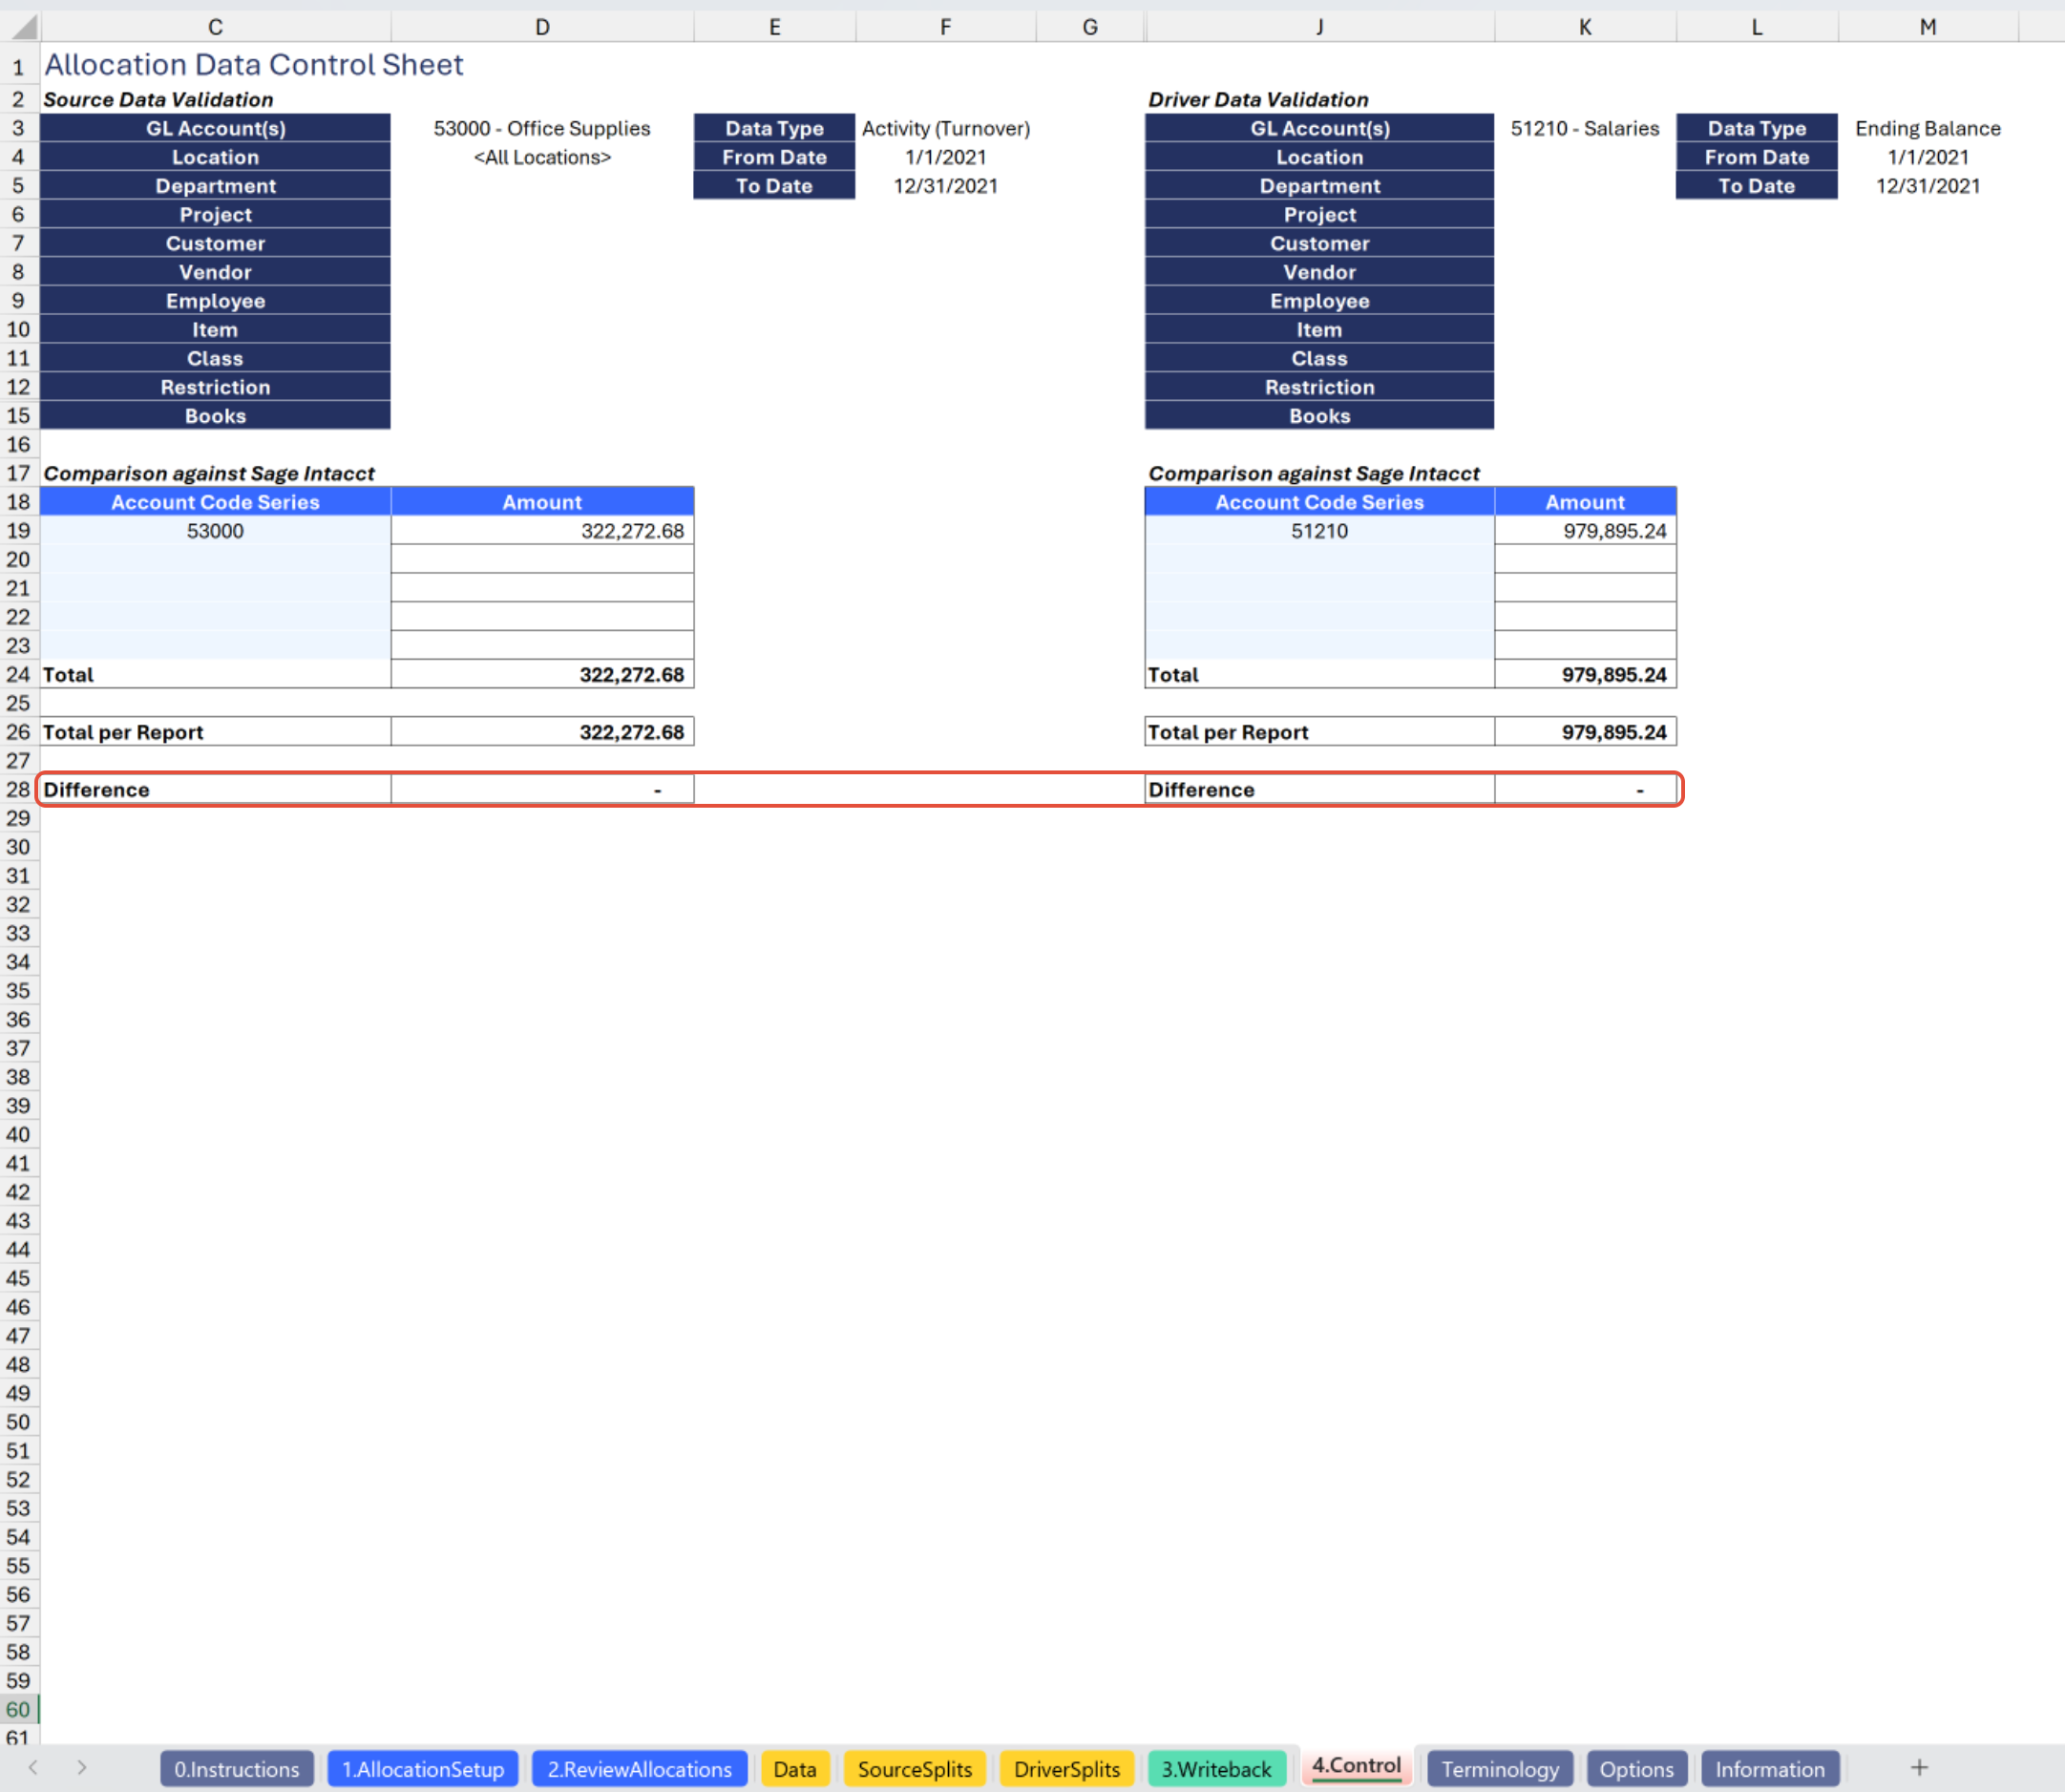
Using the Control report
Committed to upholding data integrity across the tool and Sage Intacct, the Control sheet serves as a supplementary component to the primary Allocation tab. Its purpose is to validate the data extracted by Velixo, which is expanded by combinations of GL account and dimensions, by cross-referencing it with the extracted balances at the account code level.
Given that the totals of all Data to be Allocated and Allocation Driver information should allocate, respectively, to the totals for their account codes, the Control sheet ensures the absence of discrepancies in the data you are using to perform your allocations. The verification process enhances the integrity and accuracy of the overall allocation tool.
The Control sheet contains a set of columns for validation of both the Data to be Allocated and the Allocation Driver, and is divided into three sections:
Account Code Series Total Check: extracting data at the account code level (with other relevant filters automatically populated using your selections from the Allocation tab) guarantees accurate capture and reconciliation of the relevant GL account(s) you are using in your allocation. Input the GL account code(s) to check here. Use Velixo range expressions as needed.
Total per Report: displays the total from the Allocation tab for reconciliation with the Account Code Series section.
Difference: highlights reconciliation differences between the Account Code Series and the Allocation tab, flagged with conditional formatting for investigation.

If any discrepancies are displayed, it could be caused by missing GL accounts in your Account Code Series or any user customizations.
To troubleshoot further, you could redownload or reconnect the tool to your instance, verify that the tool does not return any error, and perform data validations by comparing this tool with Sage Intacct's out-of-the-box reports. If you believe the tool contains an error, please report it to Velixo Support.
Understanding the Report Formula
Velixo created the template using a combination of Excel functions and Velixo functions. The report is designed to be highly automated, provide real-time visibility as the user is building an allocation, and deliver ready-made audit evidence and calculation support - all with virtually no technical work required by the end user. There should be no reason a user needs to modify this tool's formulas (aside from possibly copying) unless they are customizing the template.
Many functions in this tool are standard Excel functions which perform lookups and computations after Velixo functions have obtained the necessary information. With Velixo empowering you to use your live Sage Intacct data as an anchor, the power and flexibility of Excel is a serviceable engine for performing and providing evidence of your allocations.
This section will highlight key formulas used in the creation of the tool. If you need further assistance with template formulas, contact Velixo support.
2. Review Allocations Tab Formulas
The formulas on this tab are standard Excel formulas. This tab uses a Cartesian product to create an appropriate allocation distribution that will achieve the user's desired dimension behaviors. This tab involves the use of advanced Excel functions such as LAMBDA. As the outputs of this tool are fully automated, you should not need to interact with the formulas unless you intend to customize the template. Illustration is provided purely for further information/context to explain in plain language what some of the key functions achieve. Contact Velixo support if you need assistance.
The outcomes of the formulas on this tab are as follows:
Include dimensions in the calculation only if their behavior is set to No change or Allocate.
Ensure all combinations of dimensions are properly accounted for.
Ensure the appropriate amount is assigned to each dimension when results are aggregated.
Example:
Build a column for the dimension and its IDs if relevant:

Assign a dimension weight header if relevant:

Get dimension ID's distribution ratio if relevant:

Cartesian product - for each row, compute the product of all dimensions' distribution ratios:

Allocation amount - compute row-level Cartesian product as a proportion of the total, multiply by the total amount to be allocated, yielding the correct distribution for the row-level combination of dimensions:

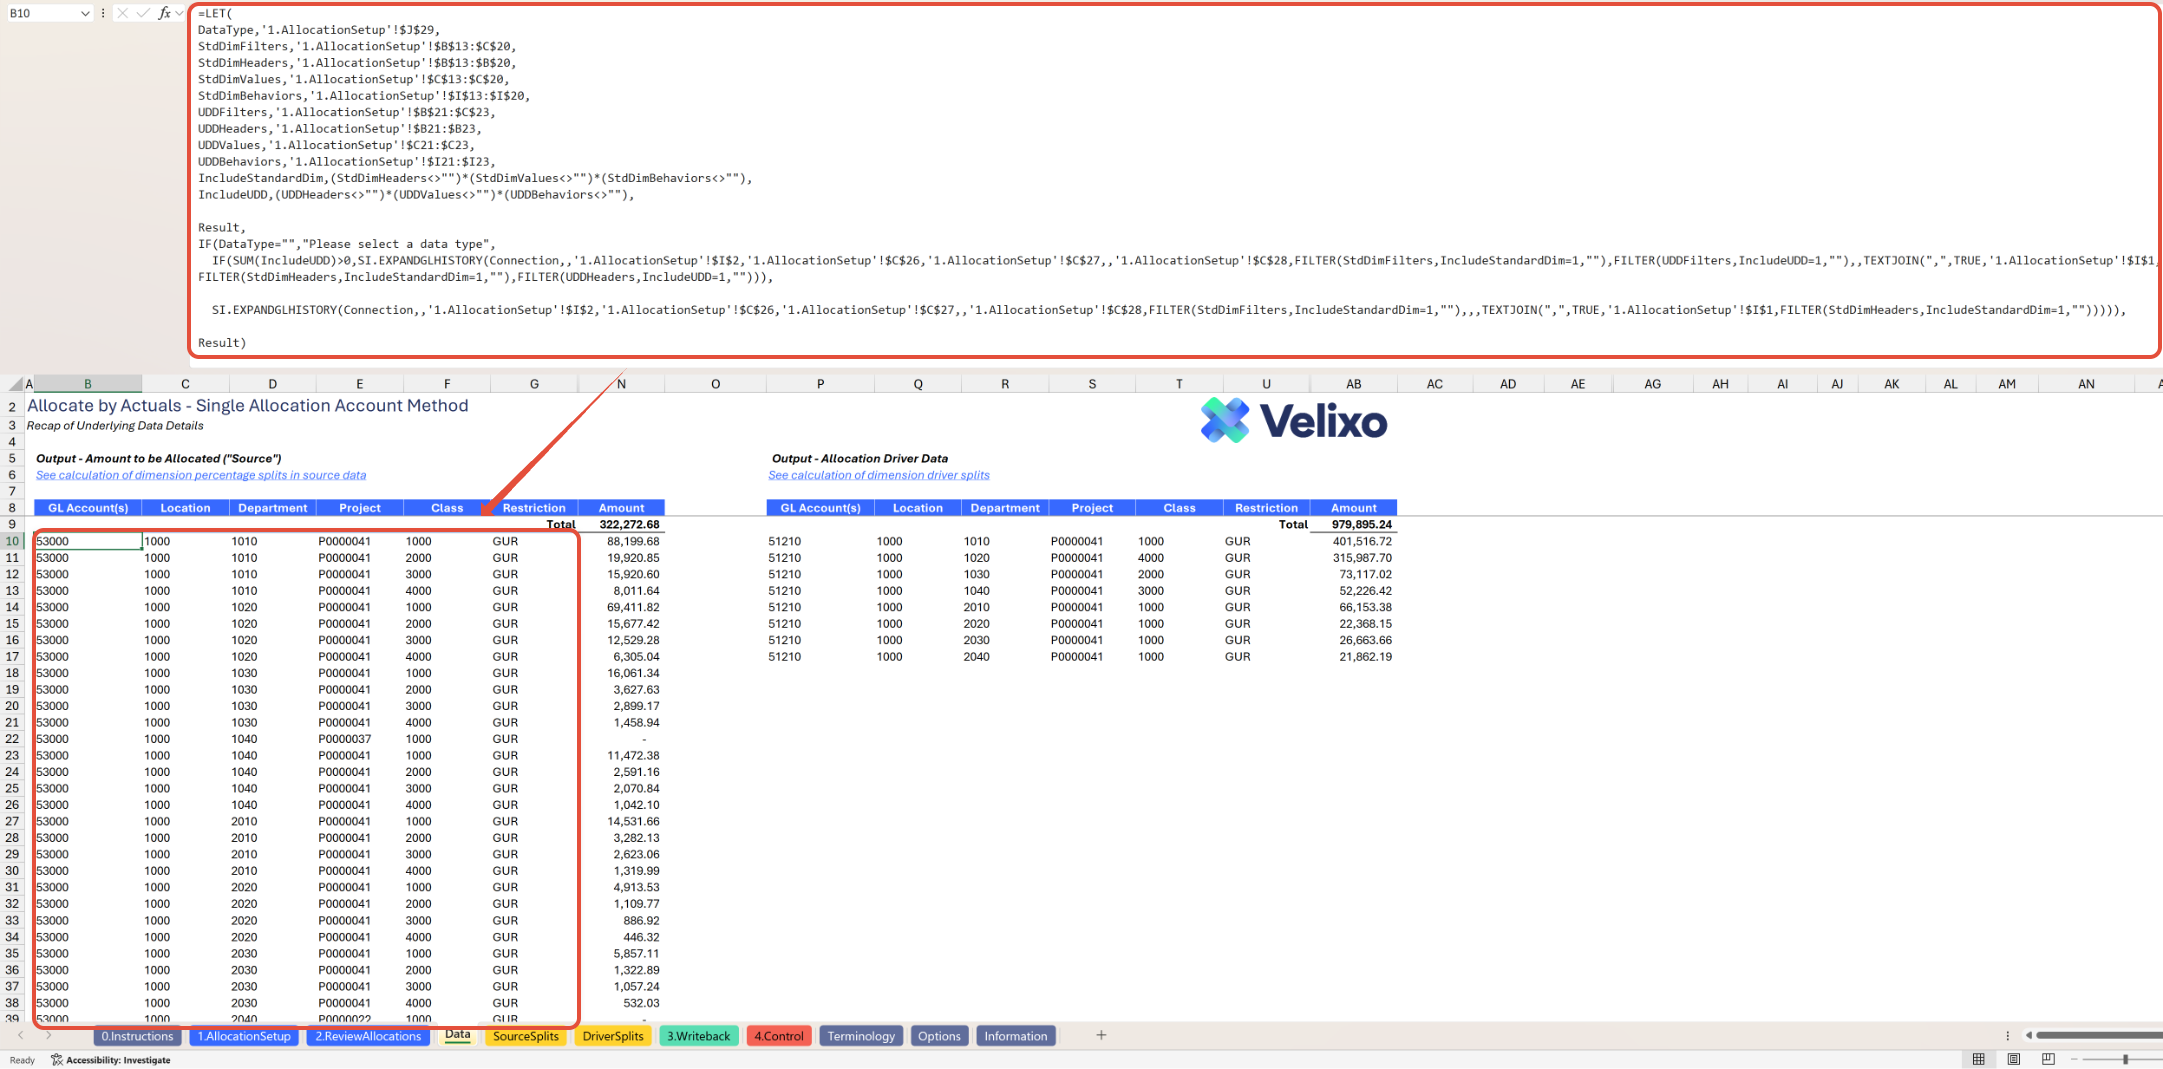
Data Tab Formulas
Within the Data tab, the following primary formula types are used:
GL Account and Dimension Detail expansion - used for Data to be Allocated and Allocation Driver:
In cells B10 and P10, the Velixo function SI.EXPANDGLHISTORYis used to extract all combinations of GL accounts and dimensions that meet the user's selections. The formula returns a dynamic array as a result.
To ensure flawless execution of the function, IF statements are used to (1) confirm an Activity type is selected, and prompt the user to select one if not, and (2) return the function with the UserDefinedDimensions argument skipped to prevent potential errors associated with a blank UDD argument in the function.
To enhance clarity and readability, a LET statement is used to clearly define key variables used in the formula.
Data to Allocate and Allocation Driver Amounts:
In cells N10 and AB10, Velixo has leveraged financial functions to extract the appropriate balances from Sage Intacct. These formulas return dynamic arrays as results.
To ensure flawless execution of the functions, IF statements are used to (1) confirm an Activity type is selected, and prompt the user to select one if not, and (2) return the appropriate Velixo function. If the user has chosen a Data Type of Activity (Turnover), this formula will use Velixo's SI.TURNOVER function to retrieve activity (turnover) for the filter results; otherwise, the formula uses Velixo's SI.CLOSINGBALANCE function to retrieve the closing balance(s) for the filter results.

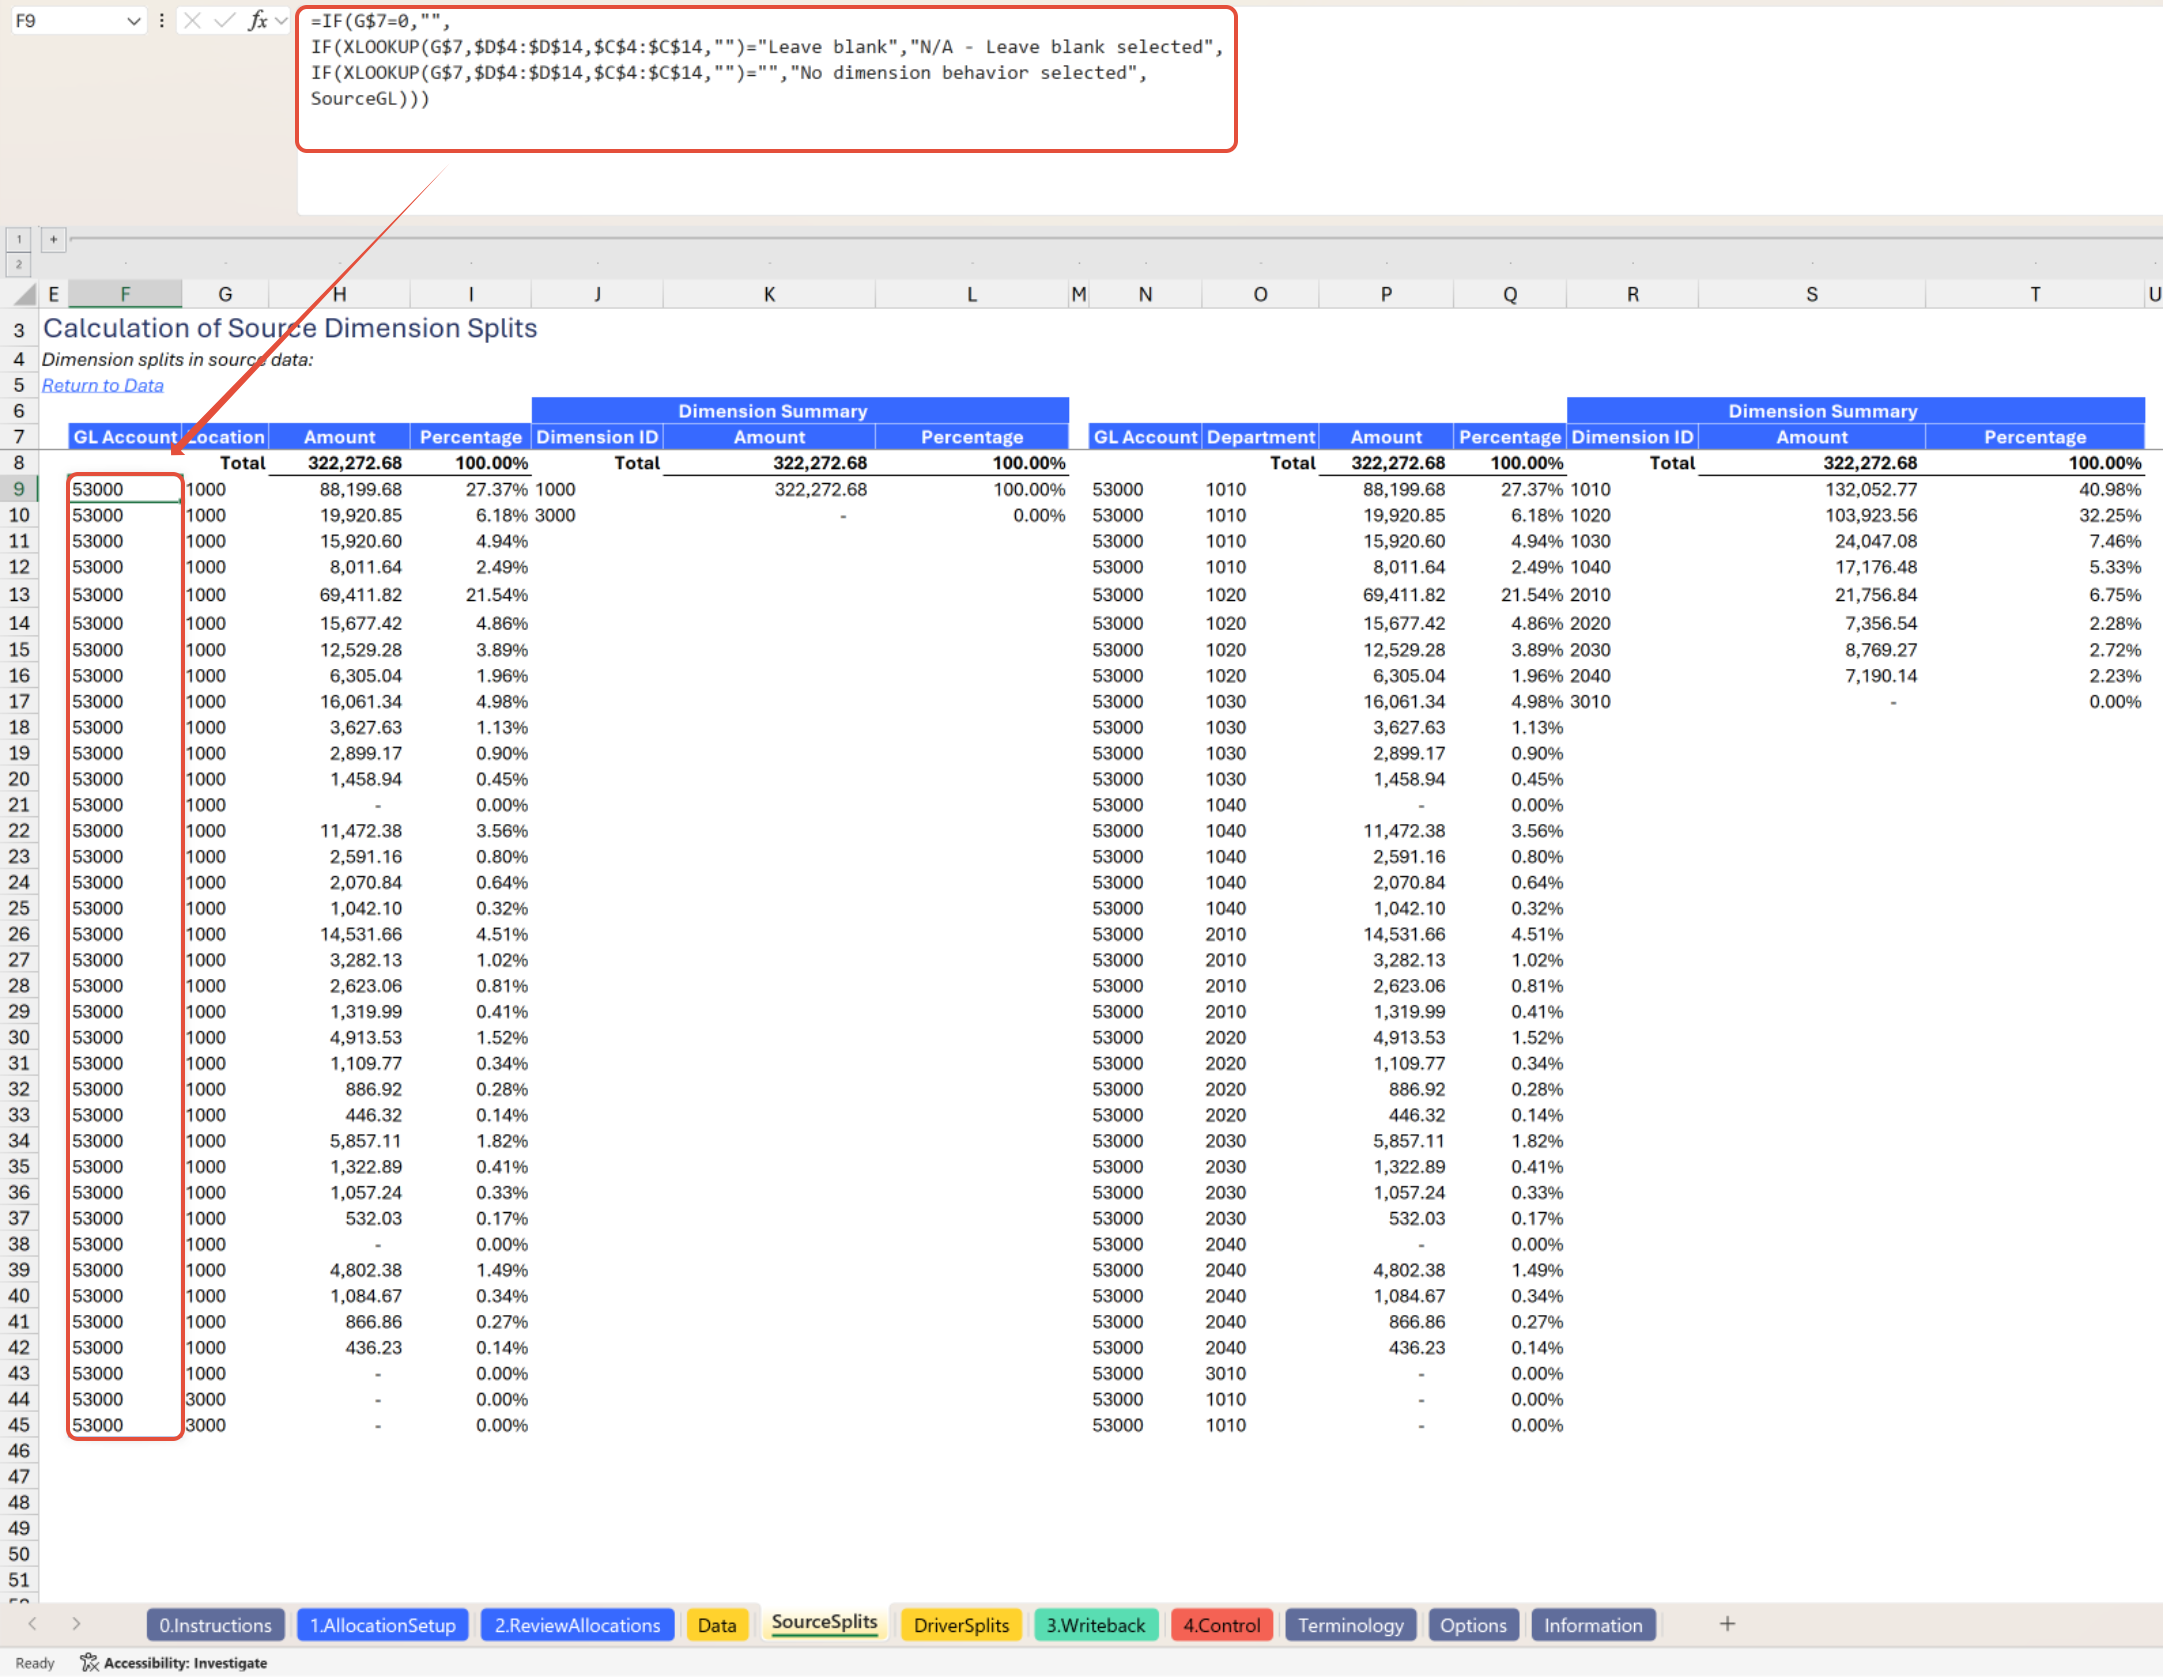
Source Splits Tab Formulas
The Source Splits tab references and performs calculations on the Data to be Allocated from the Data tab. All formulas used on this tab are standard Excel functions. This tab serves to document the ratio (percentage) distribution of the data amount for each relevant dimension. The outcomes of the formulas on this tab are as follows:
For any dimensions where allocation behavior is set to Allocate or No change:
Return detailed list of GL accounts, dimension values, and amounts for each row present in the Data to be Allocated.
For each dimension, create a summary of total amounts and percentage ratios per unique dimension ID.
Example of detailed split ratio documentation for a dimension (in collapsed column groupings by default):
If the dimension is applicable, retrieve all the Source GL rows from the source data (data to be allocated)
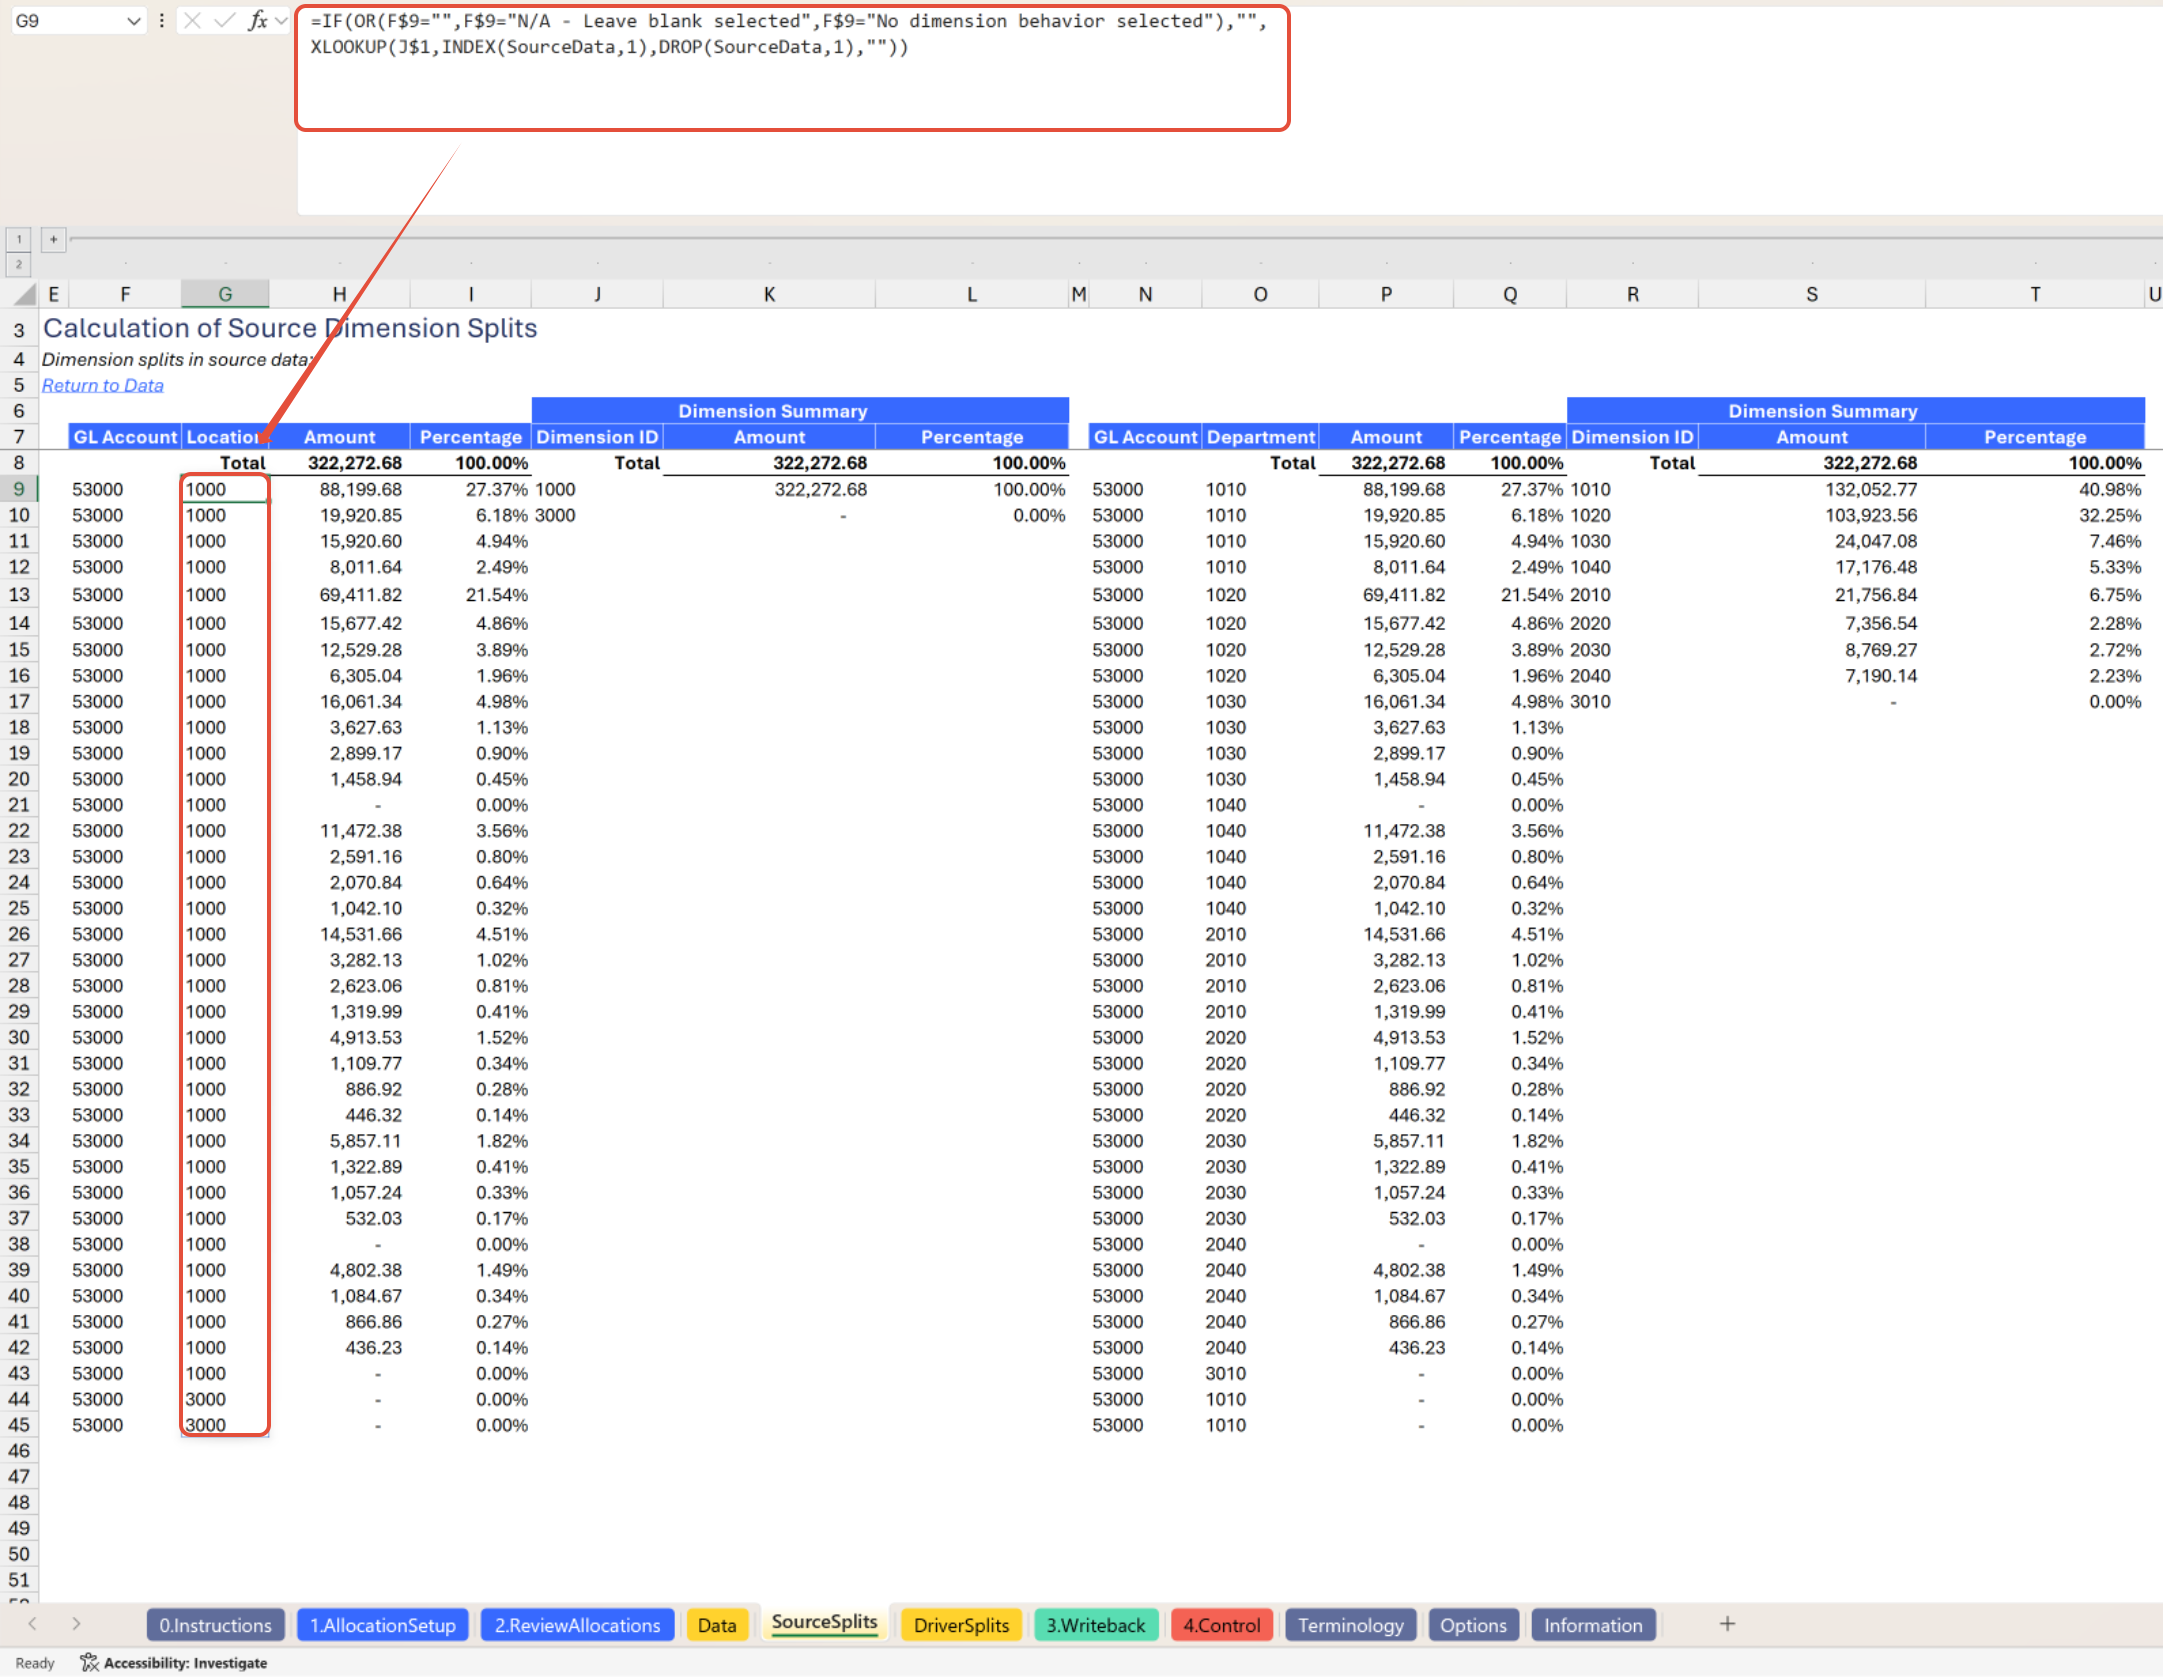
If the dimension is applicable, retrieve all the dimension ID rows from the source data (data to be allocated)
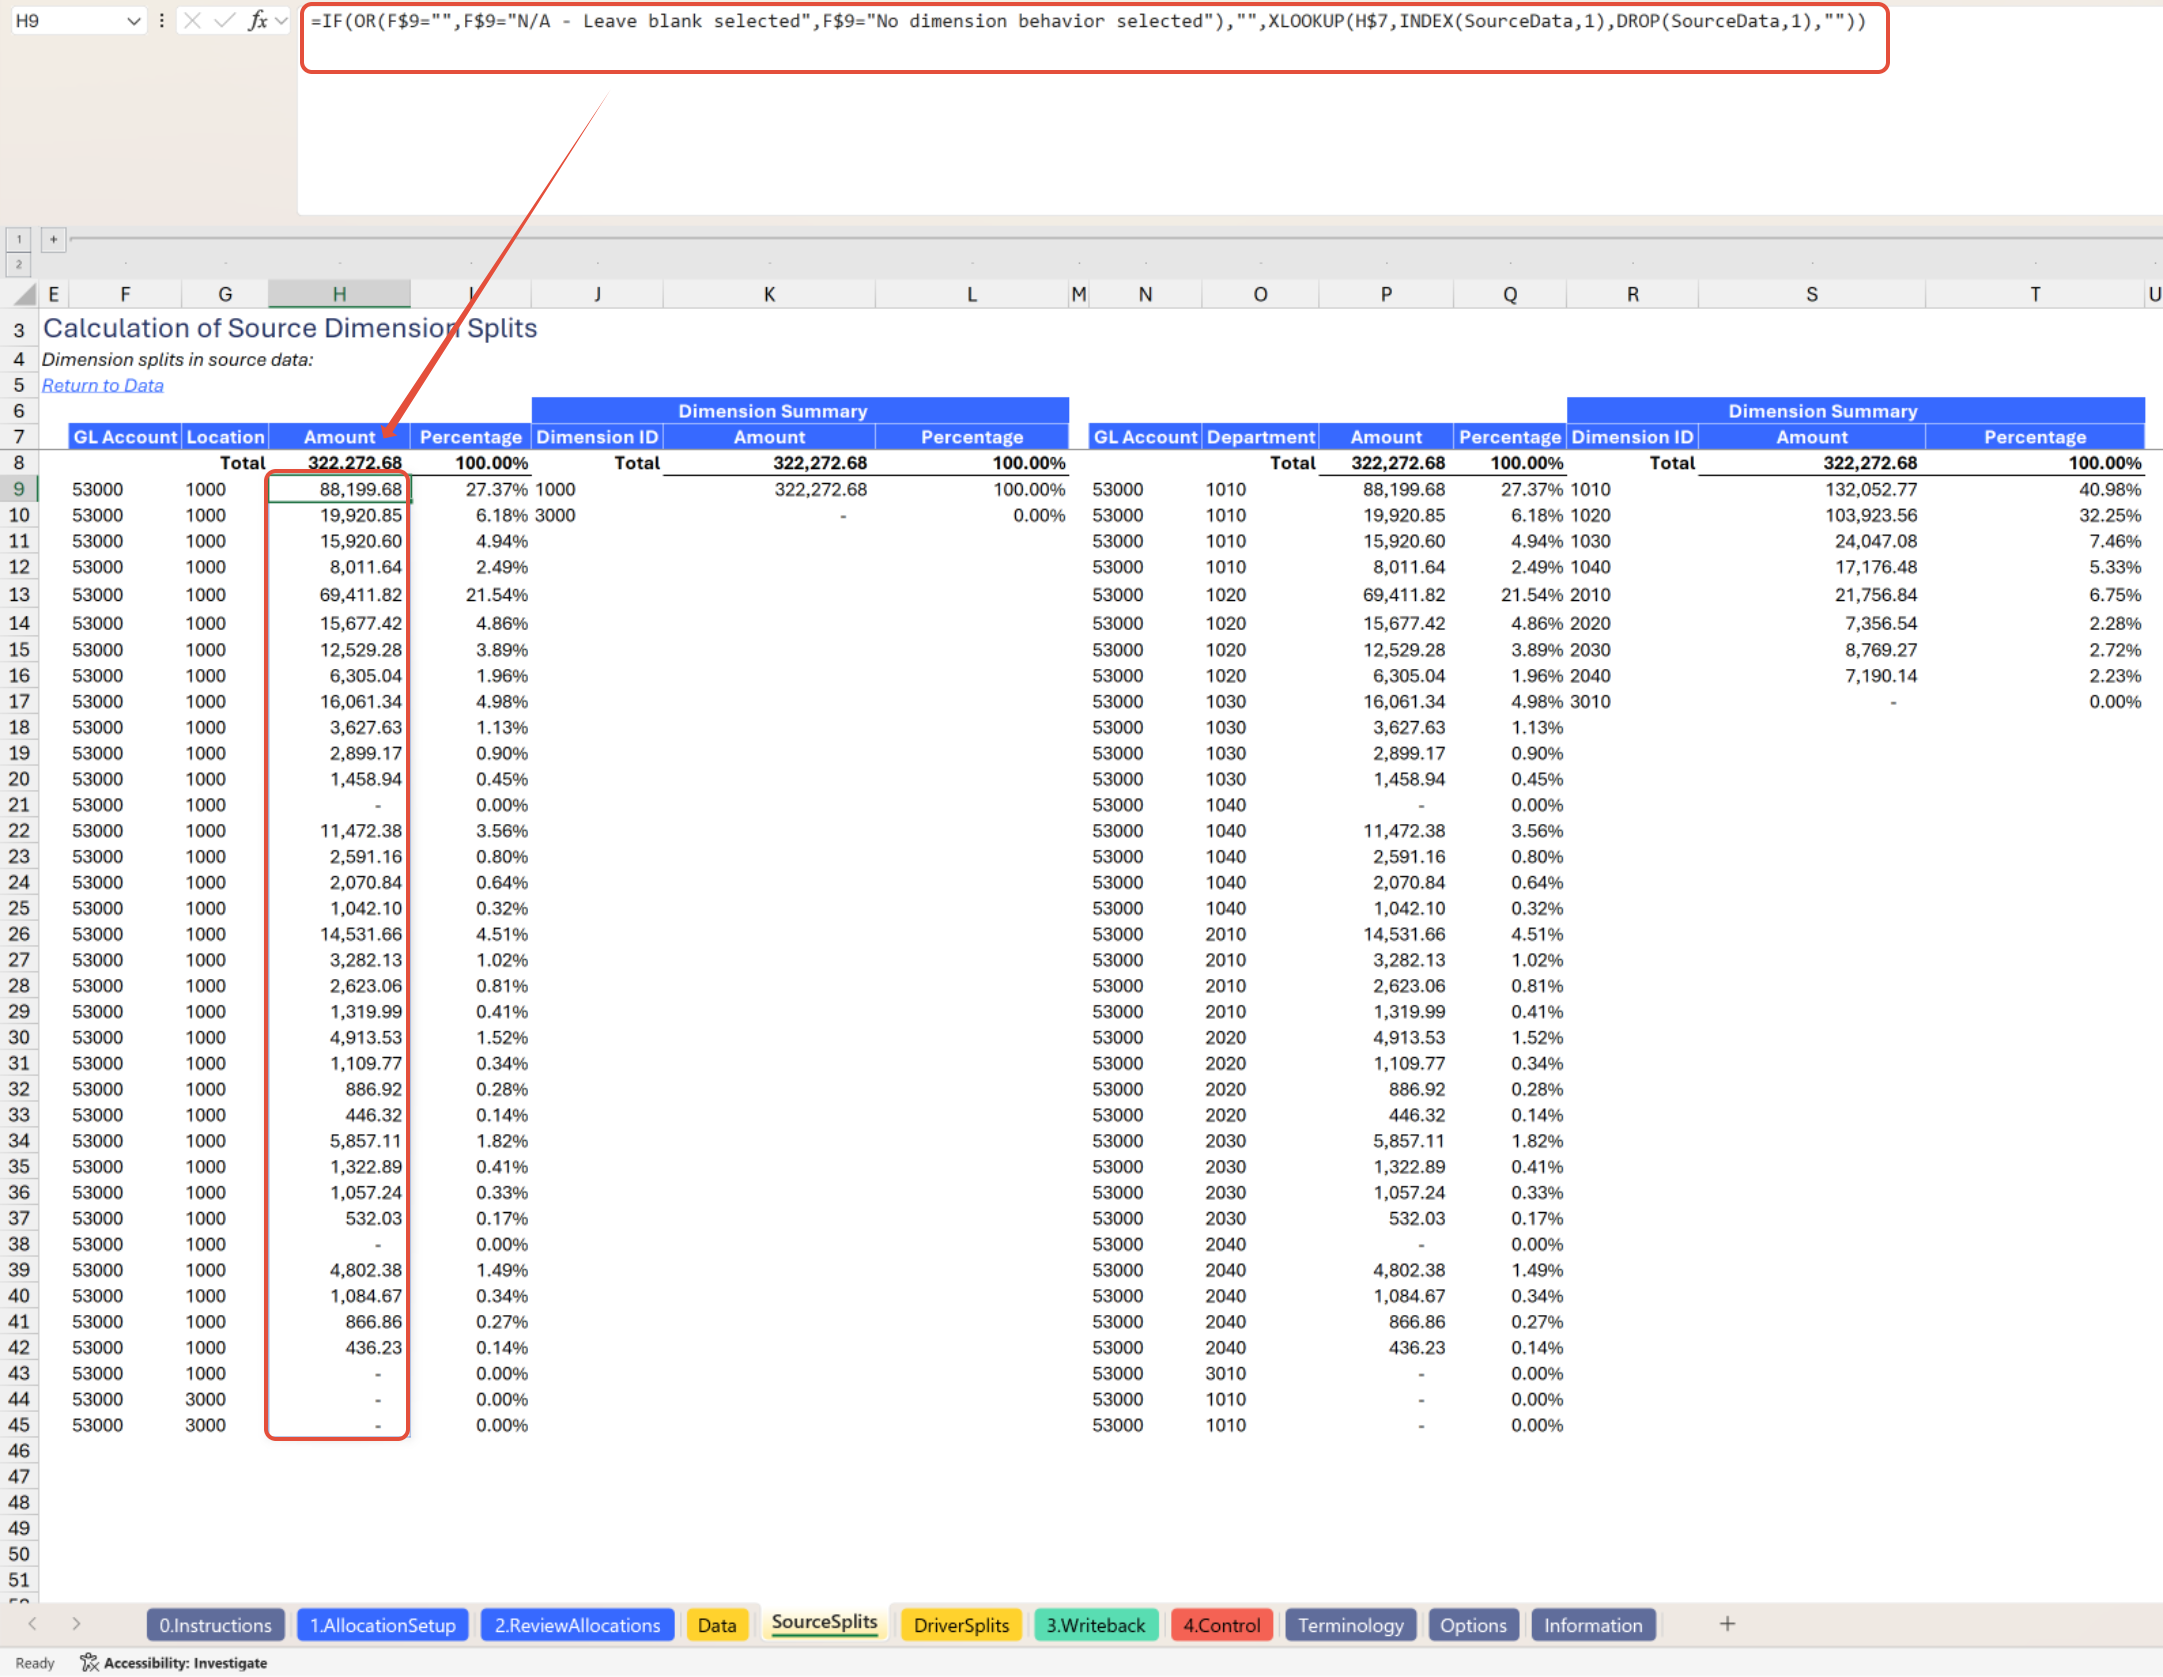
If the dimension is applicable, retrieve all the row amounts from the source data (data to be allocated)
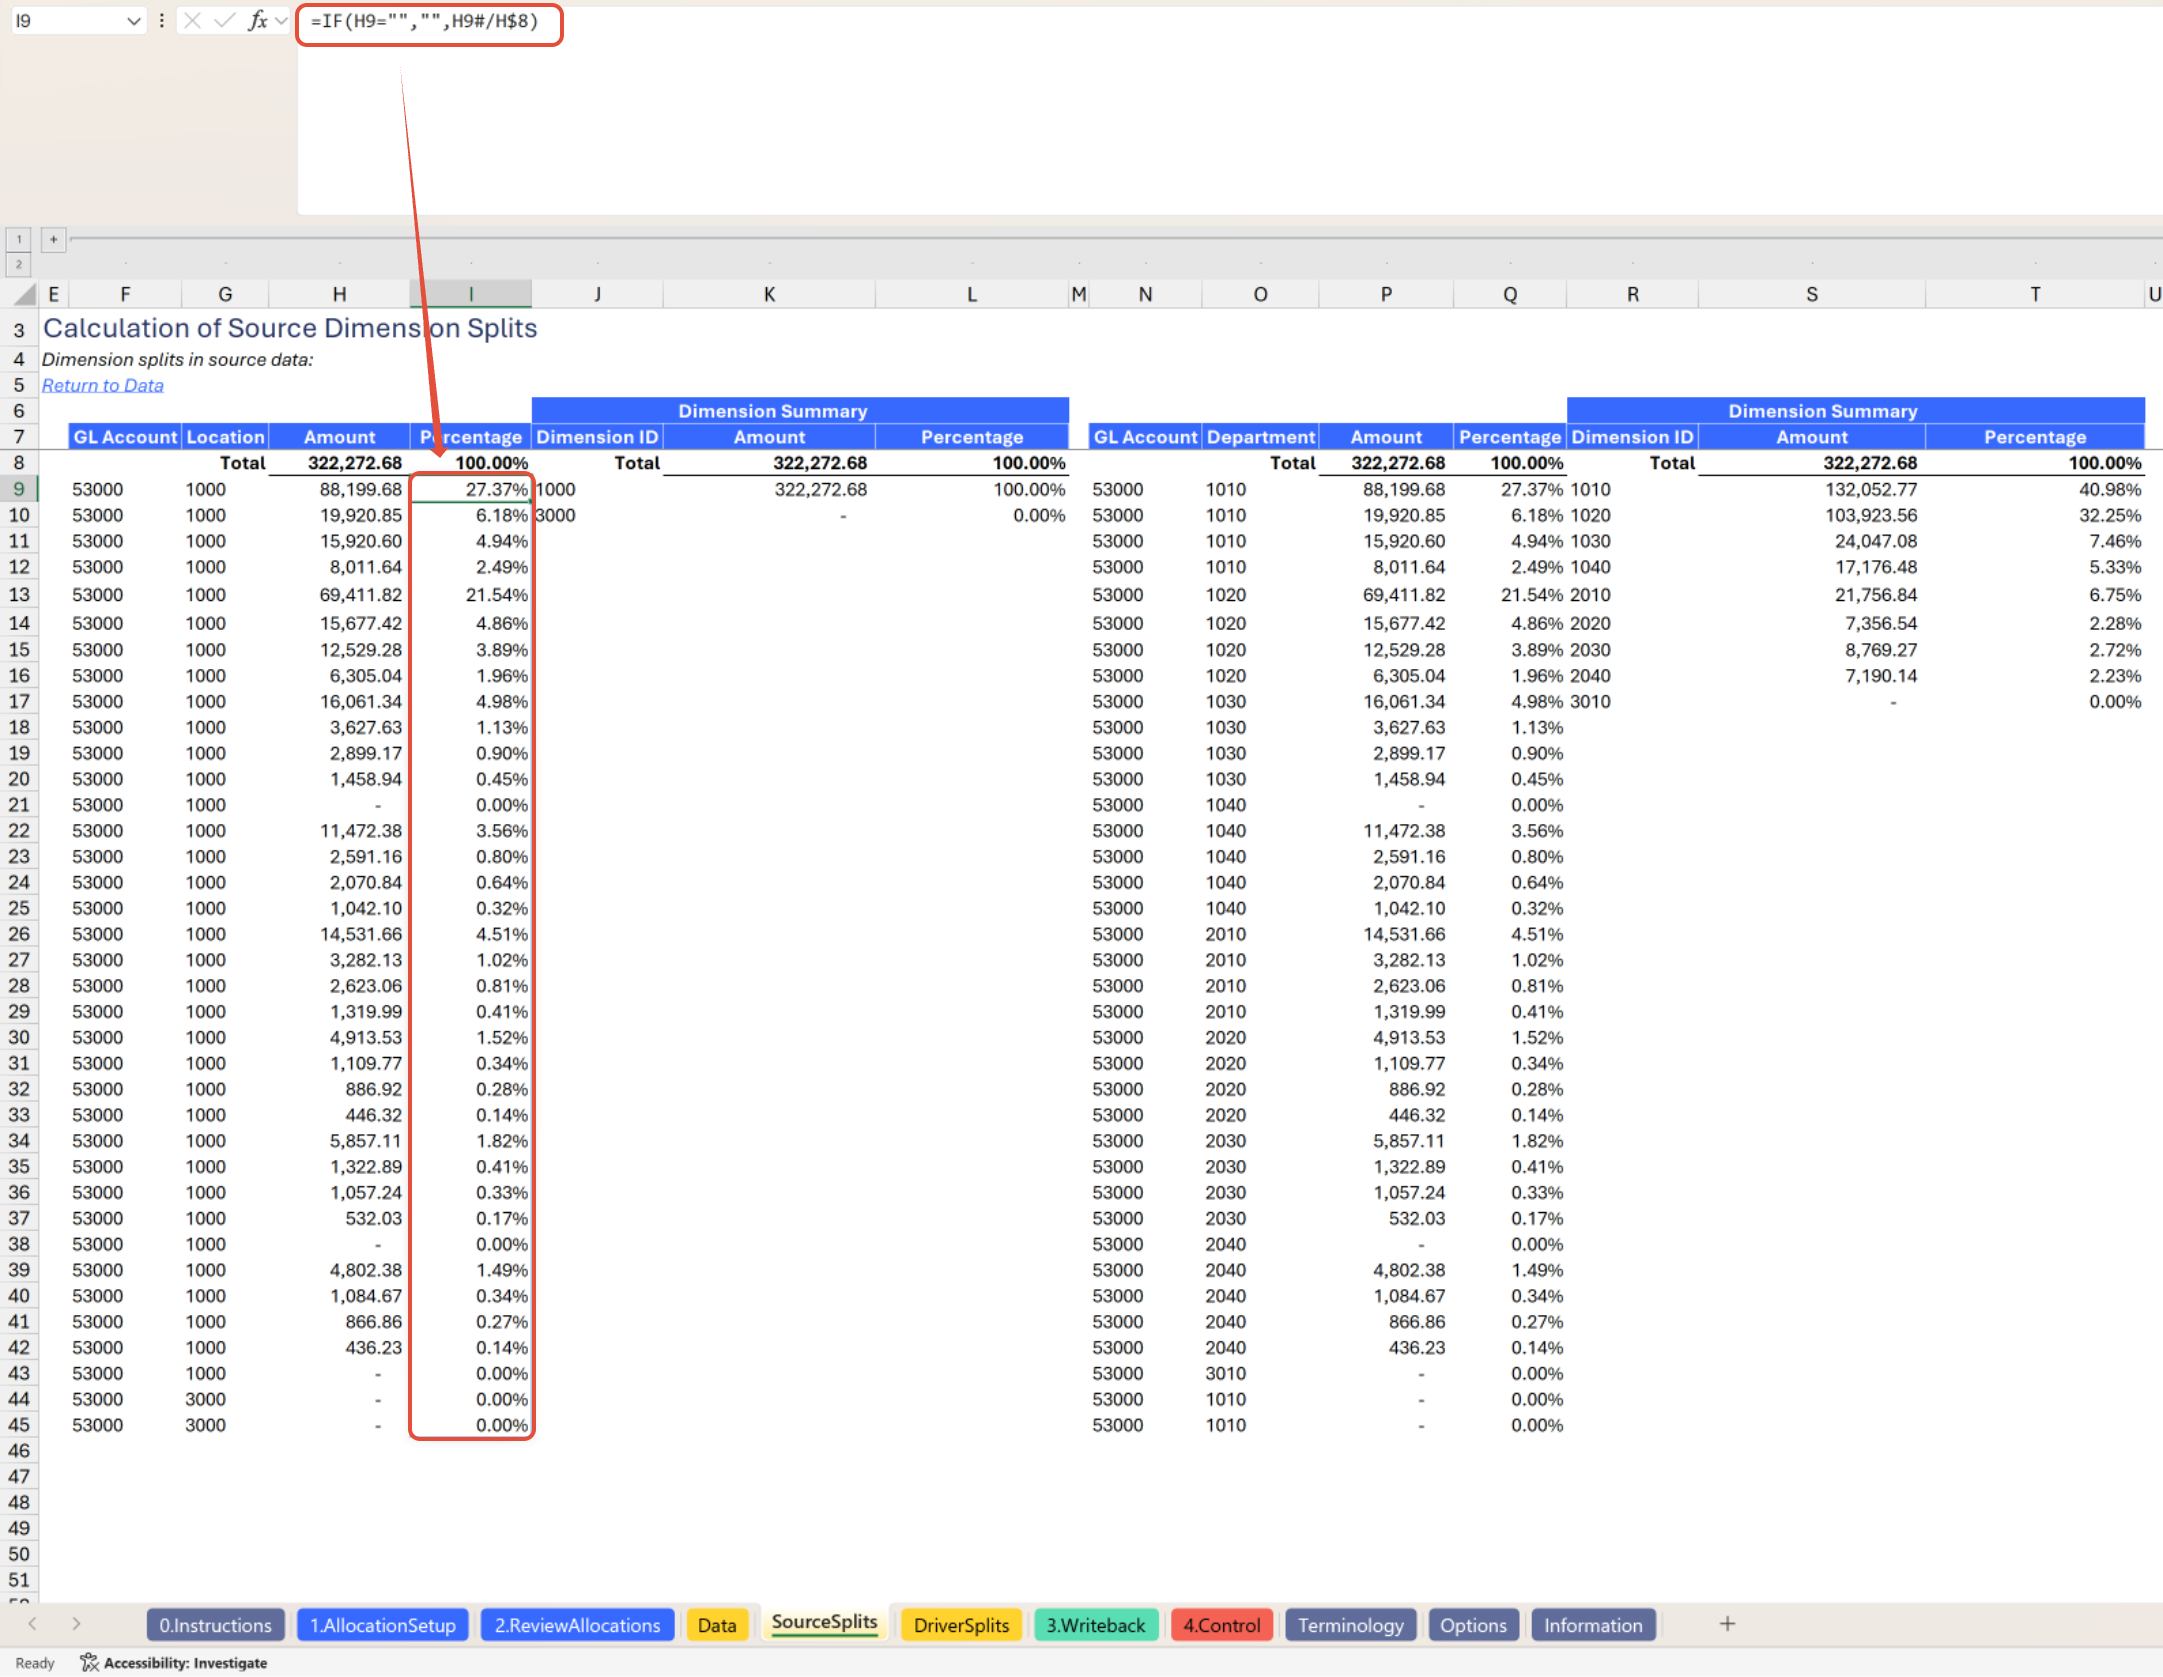
Compute each row's percentage of the total
List the unique dimension IDs that appear in the detail
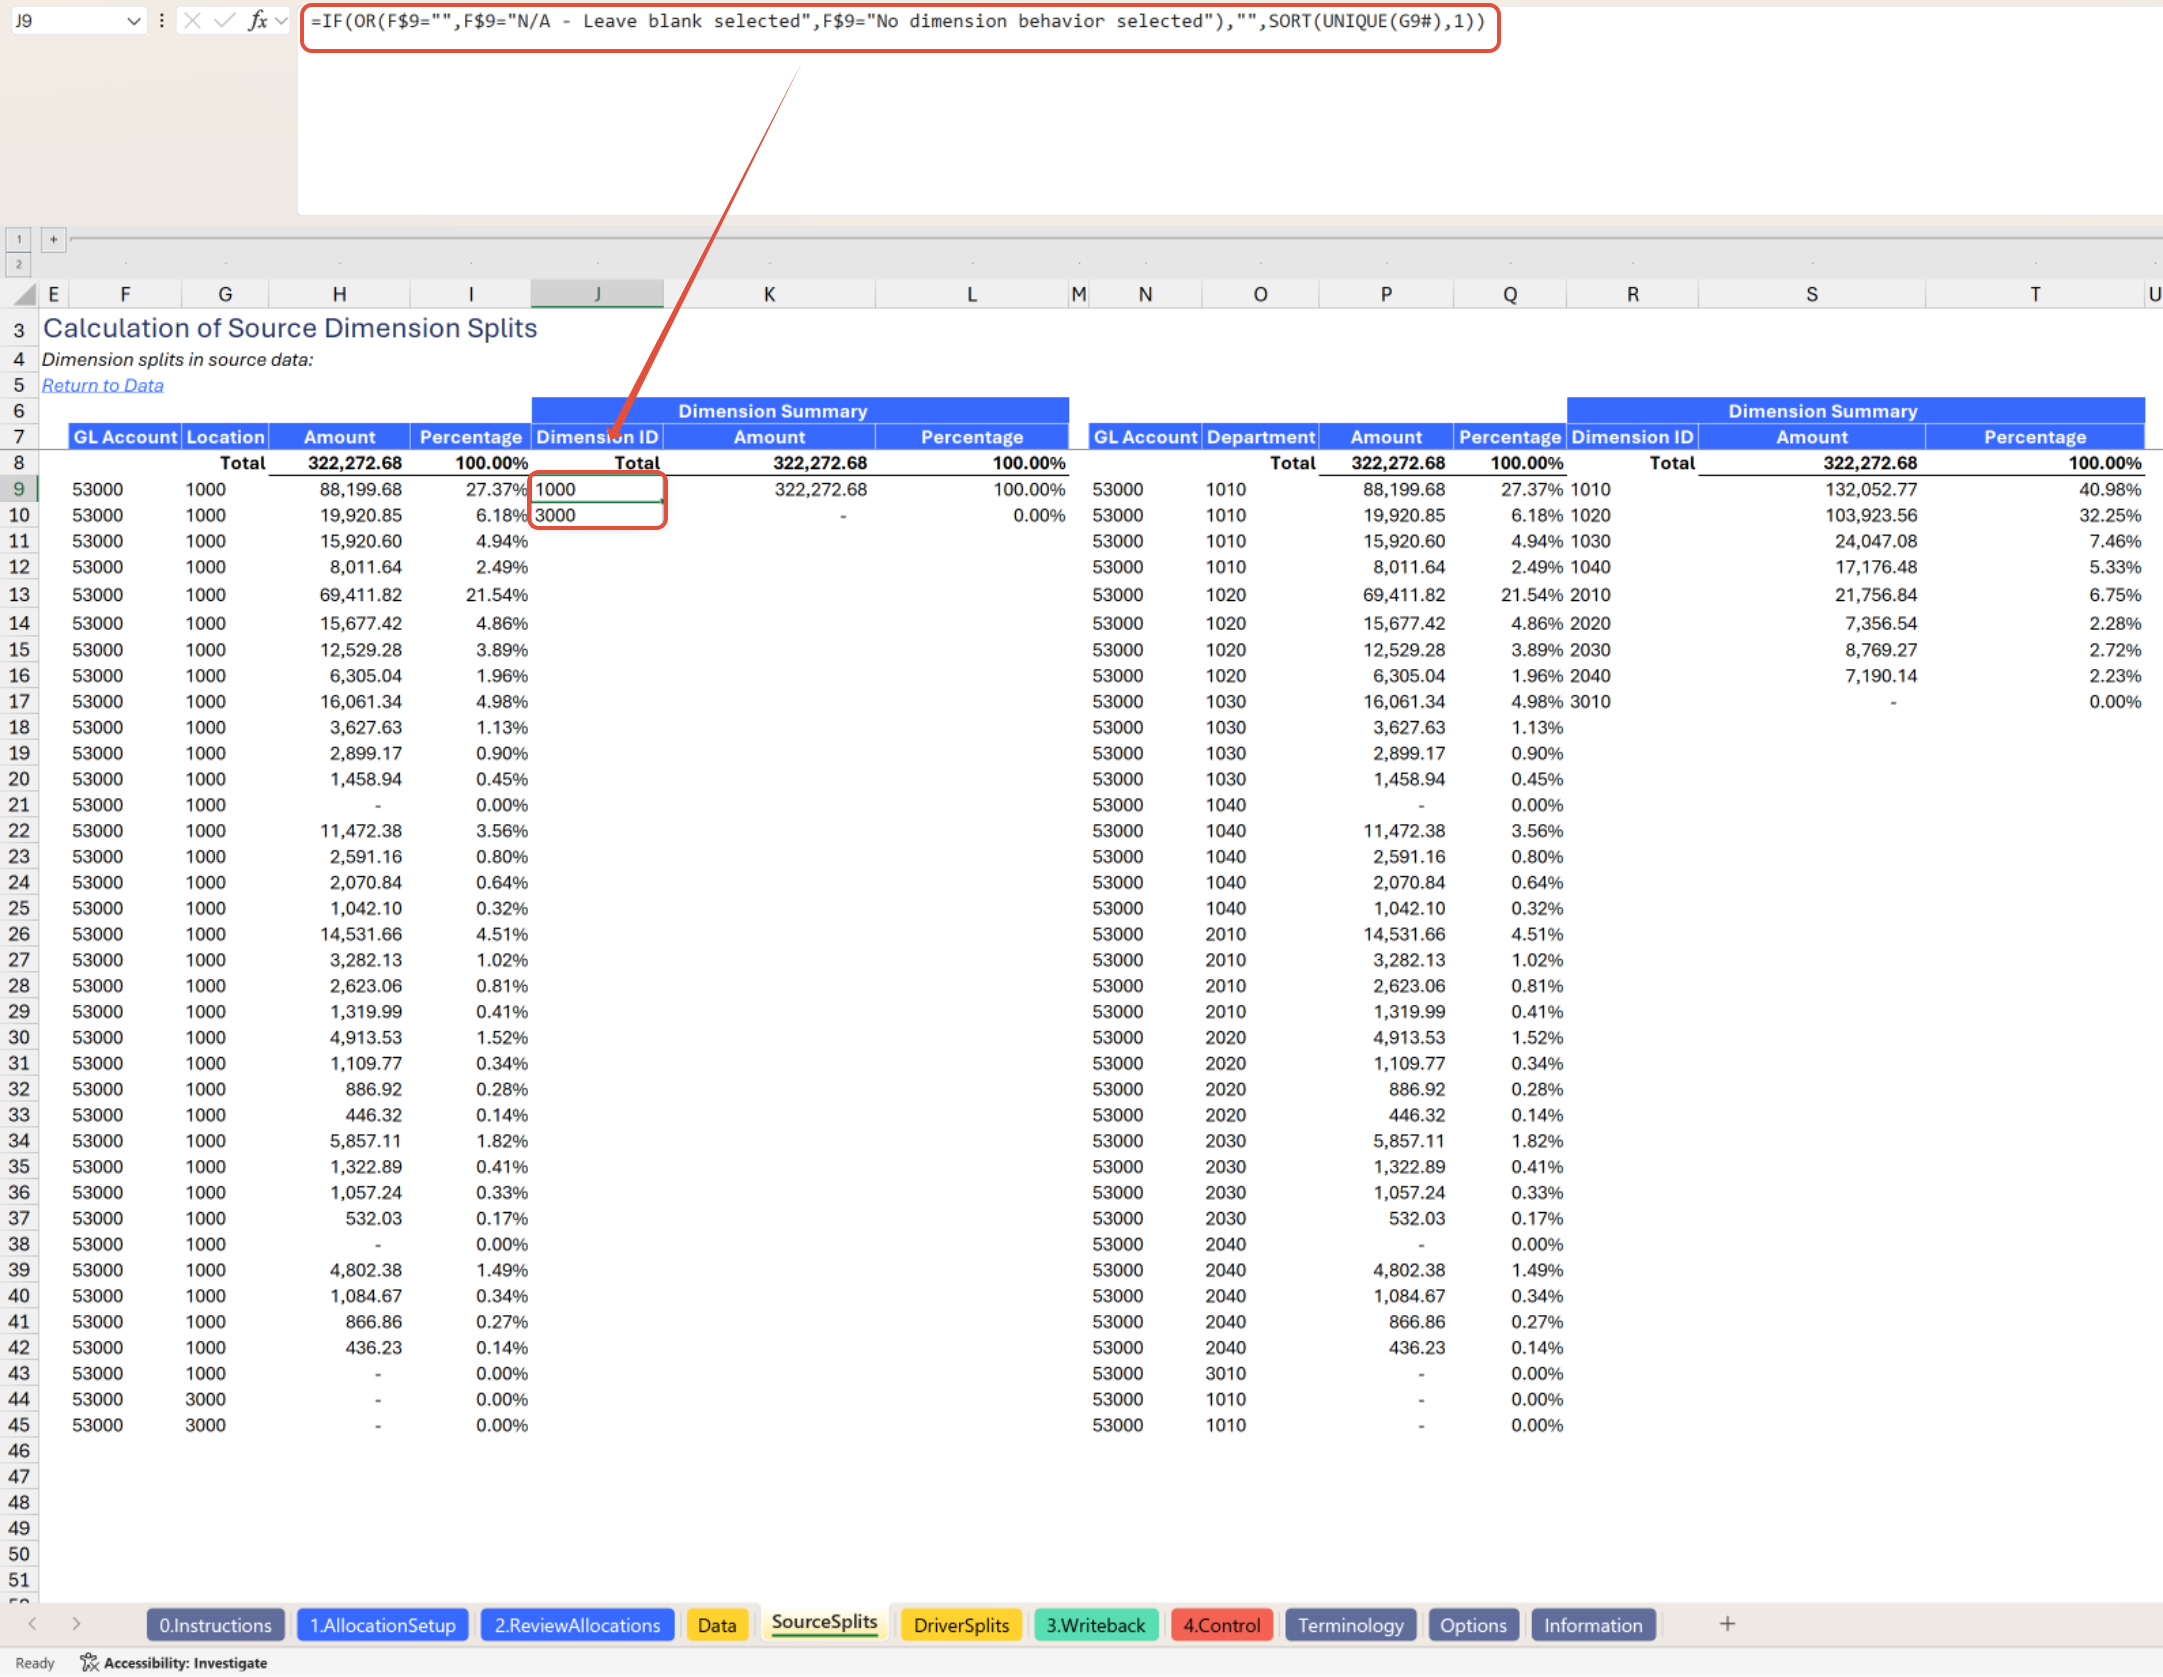
Sum the amounts by unique dimension ID
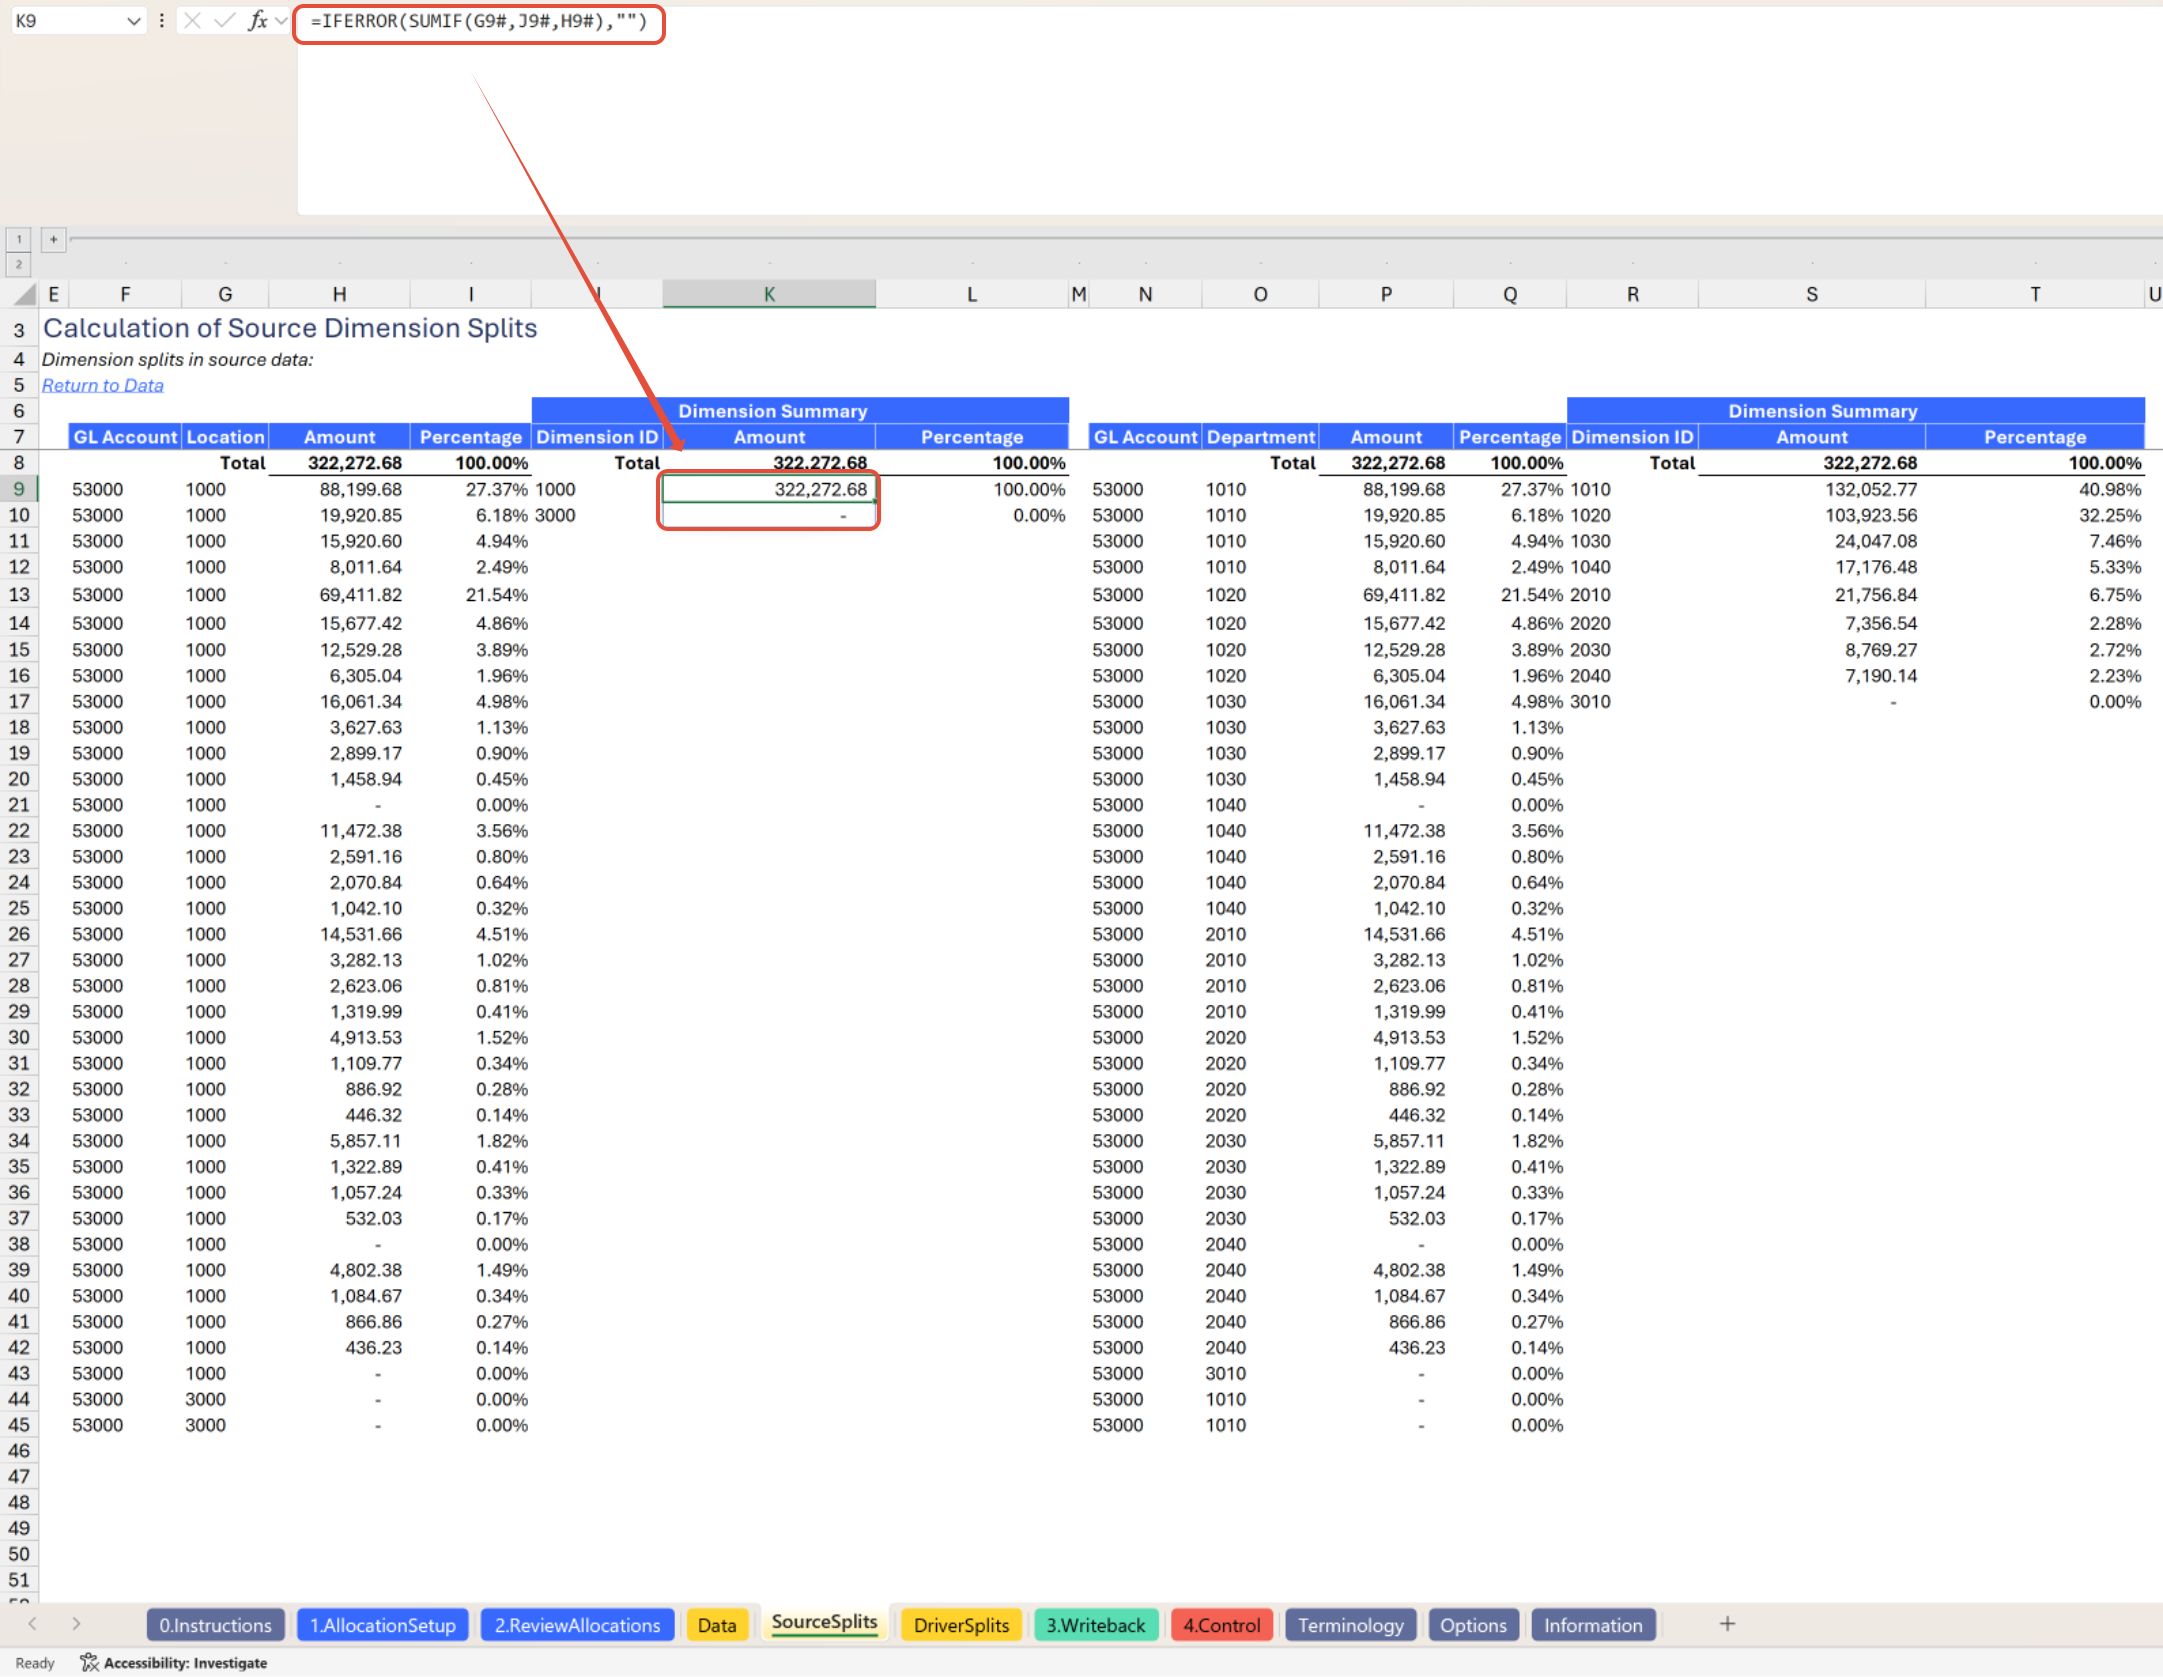
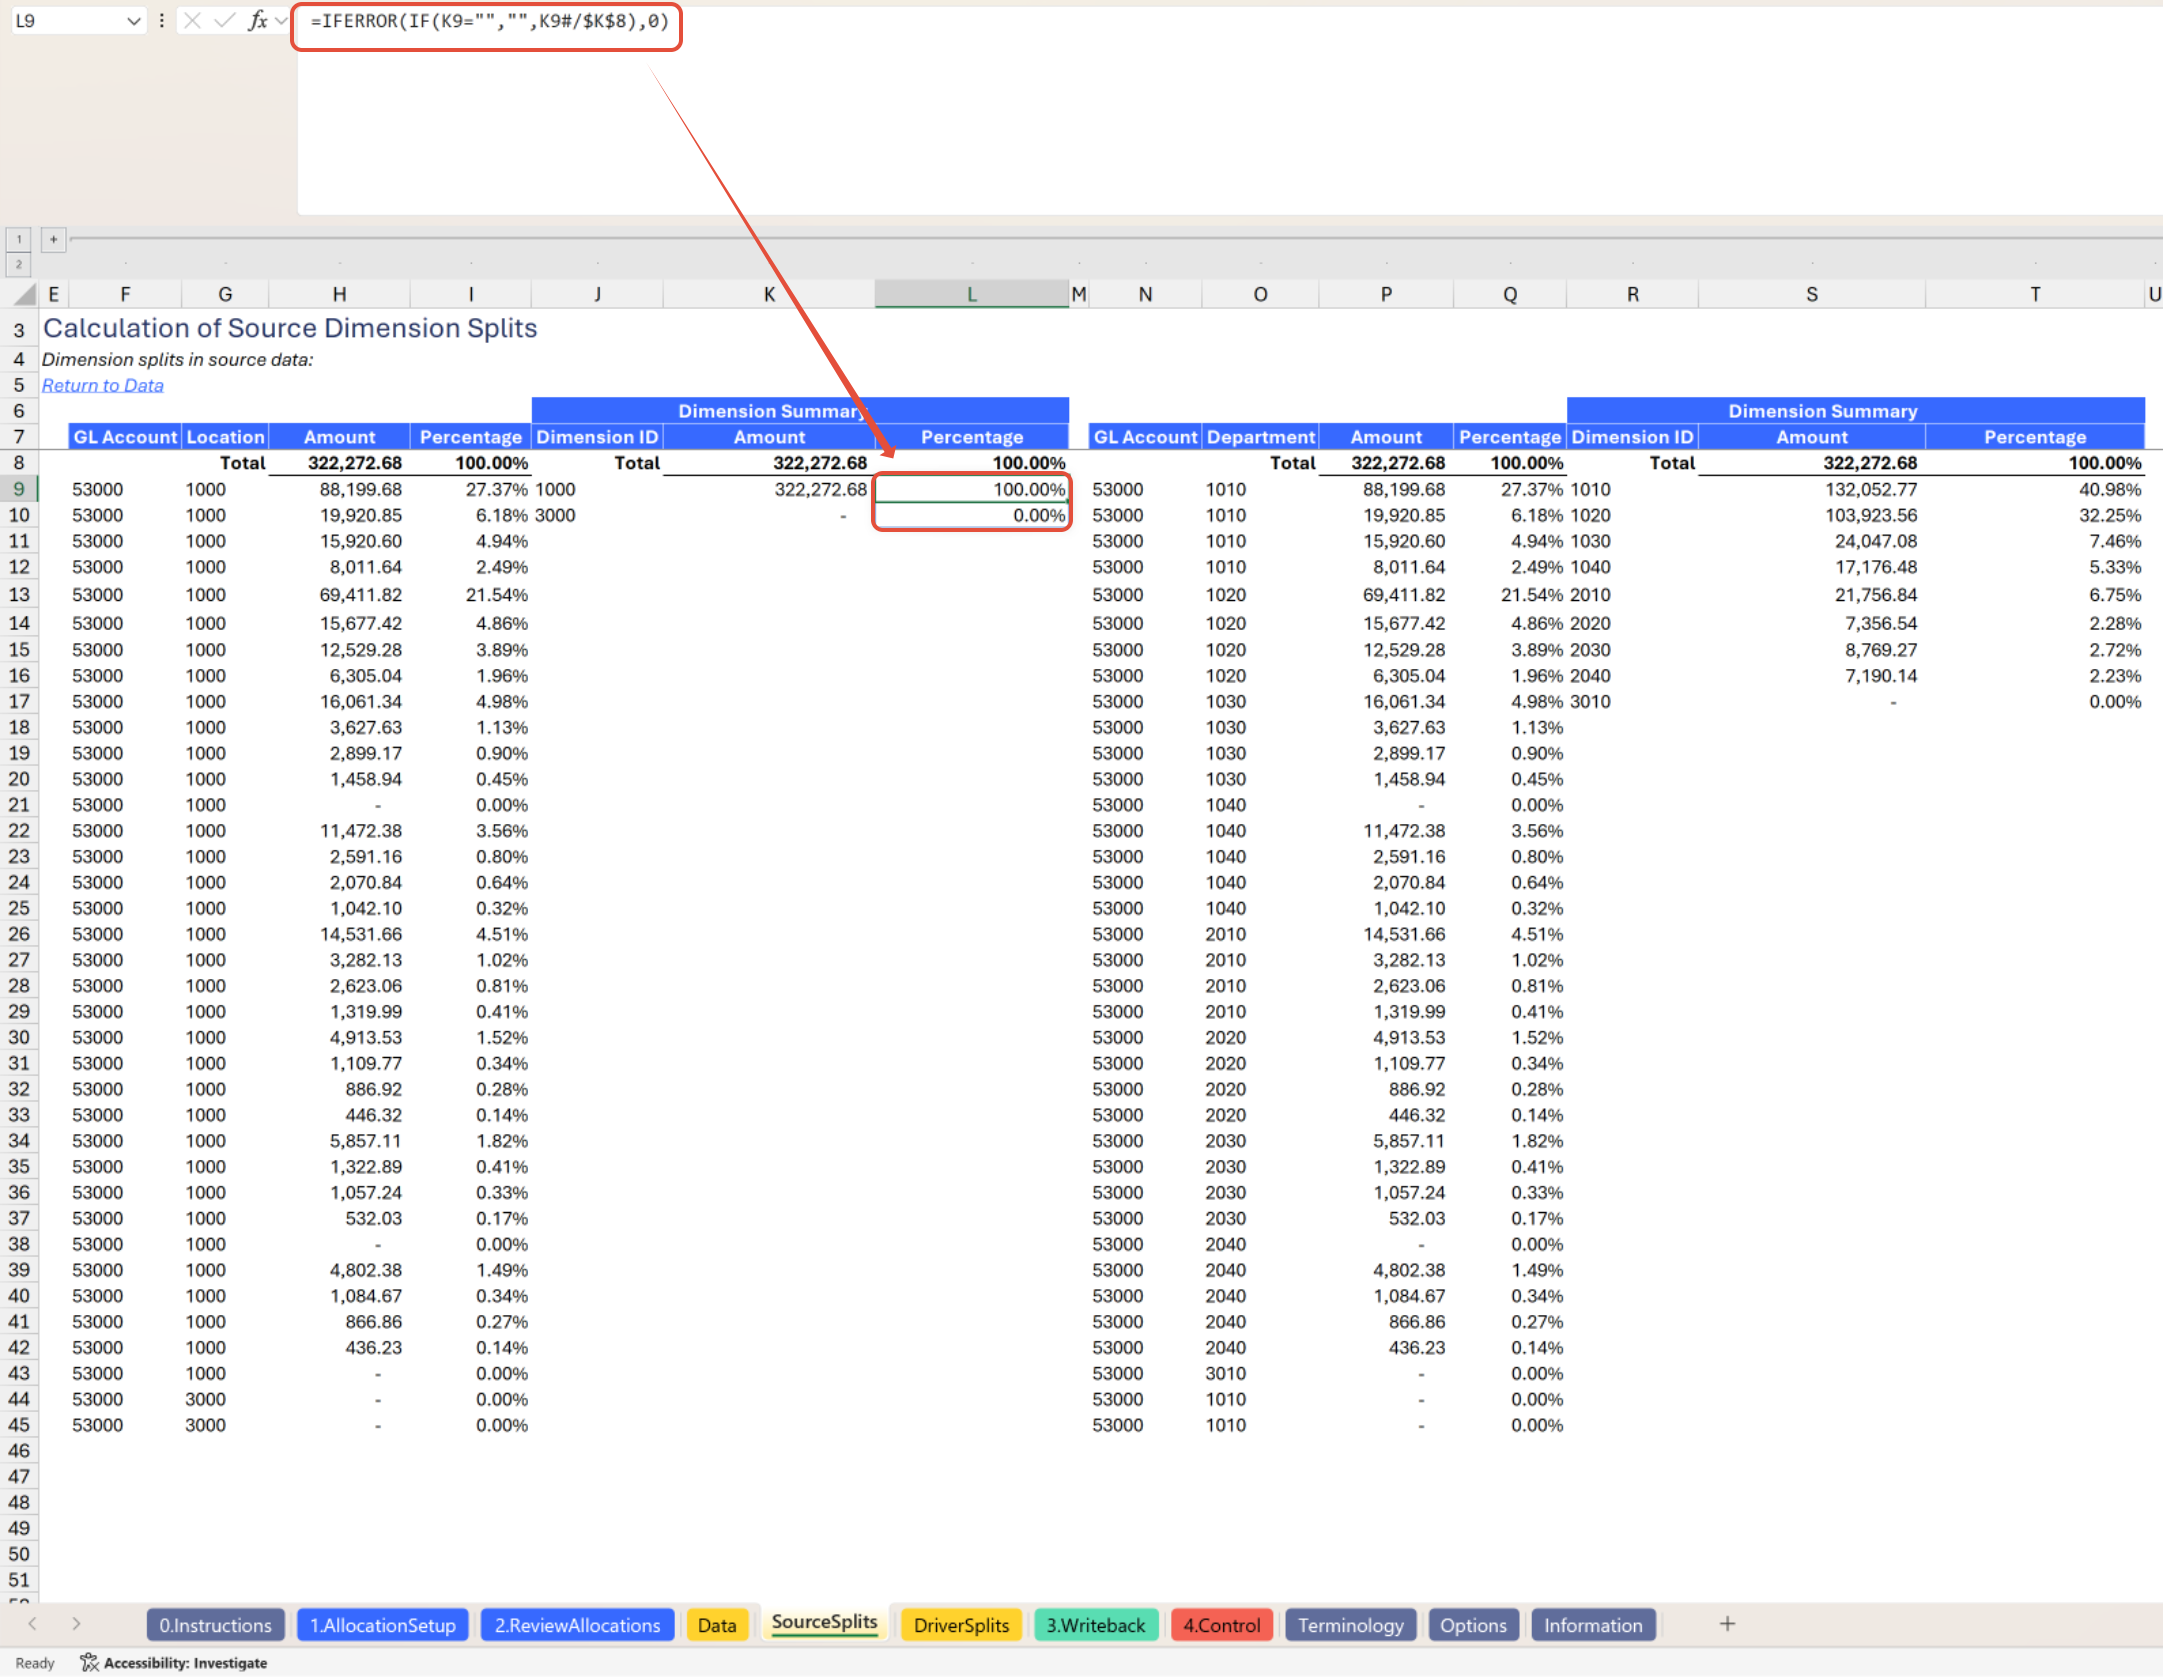
Determine each unique dimension ID's distribution percentage of the total source data (data to be allocated) amount
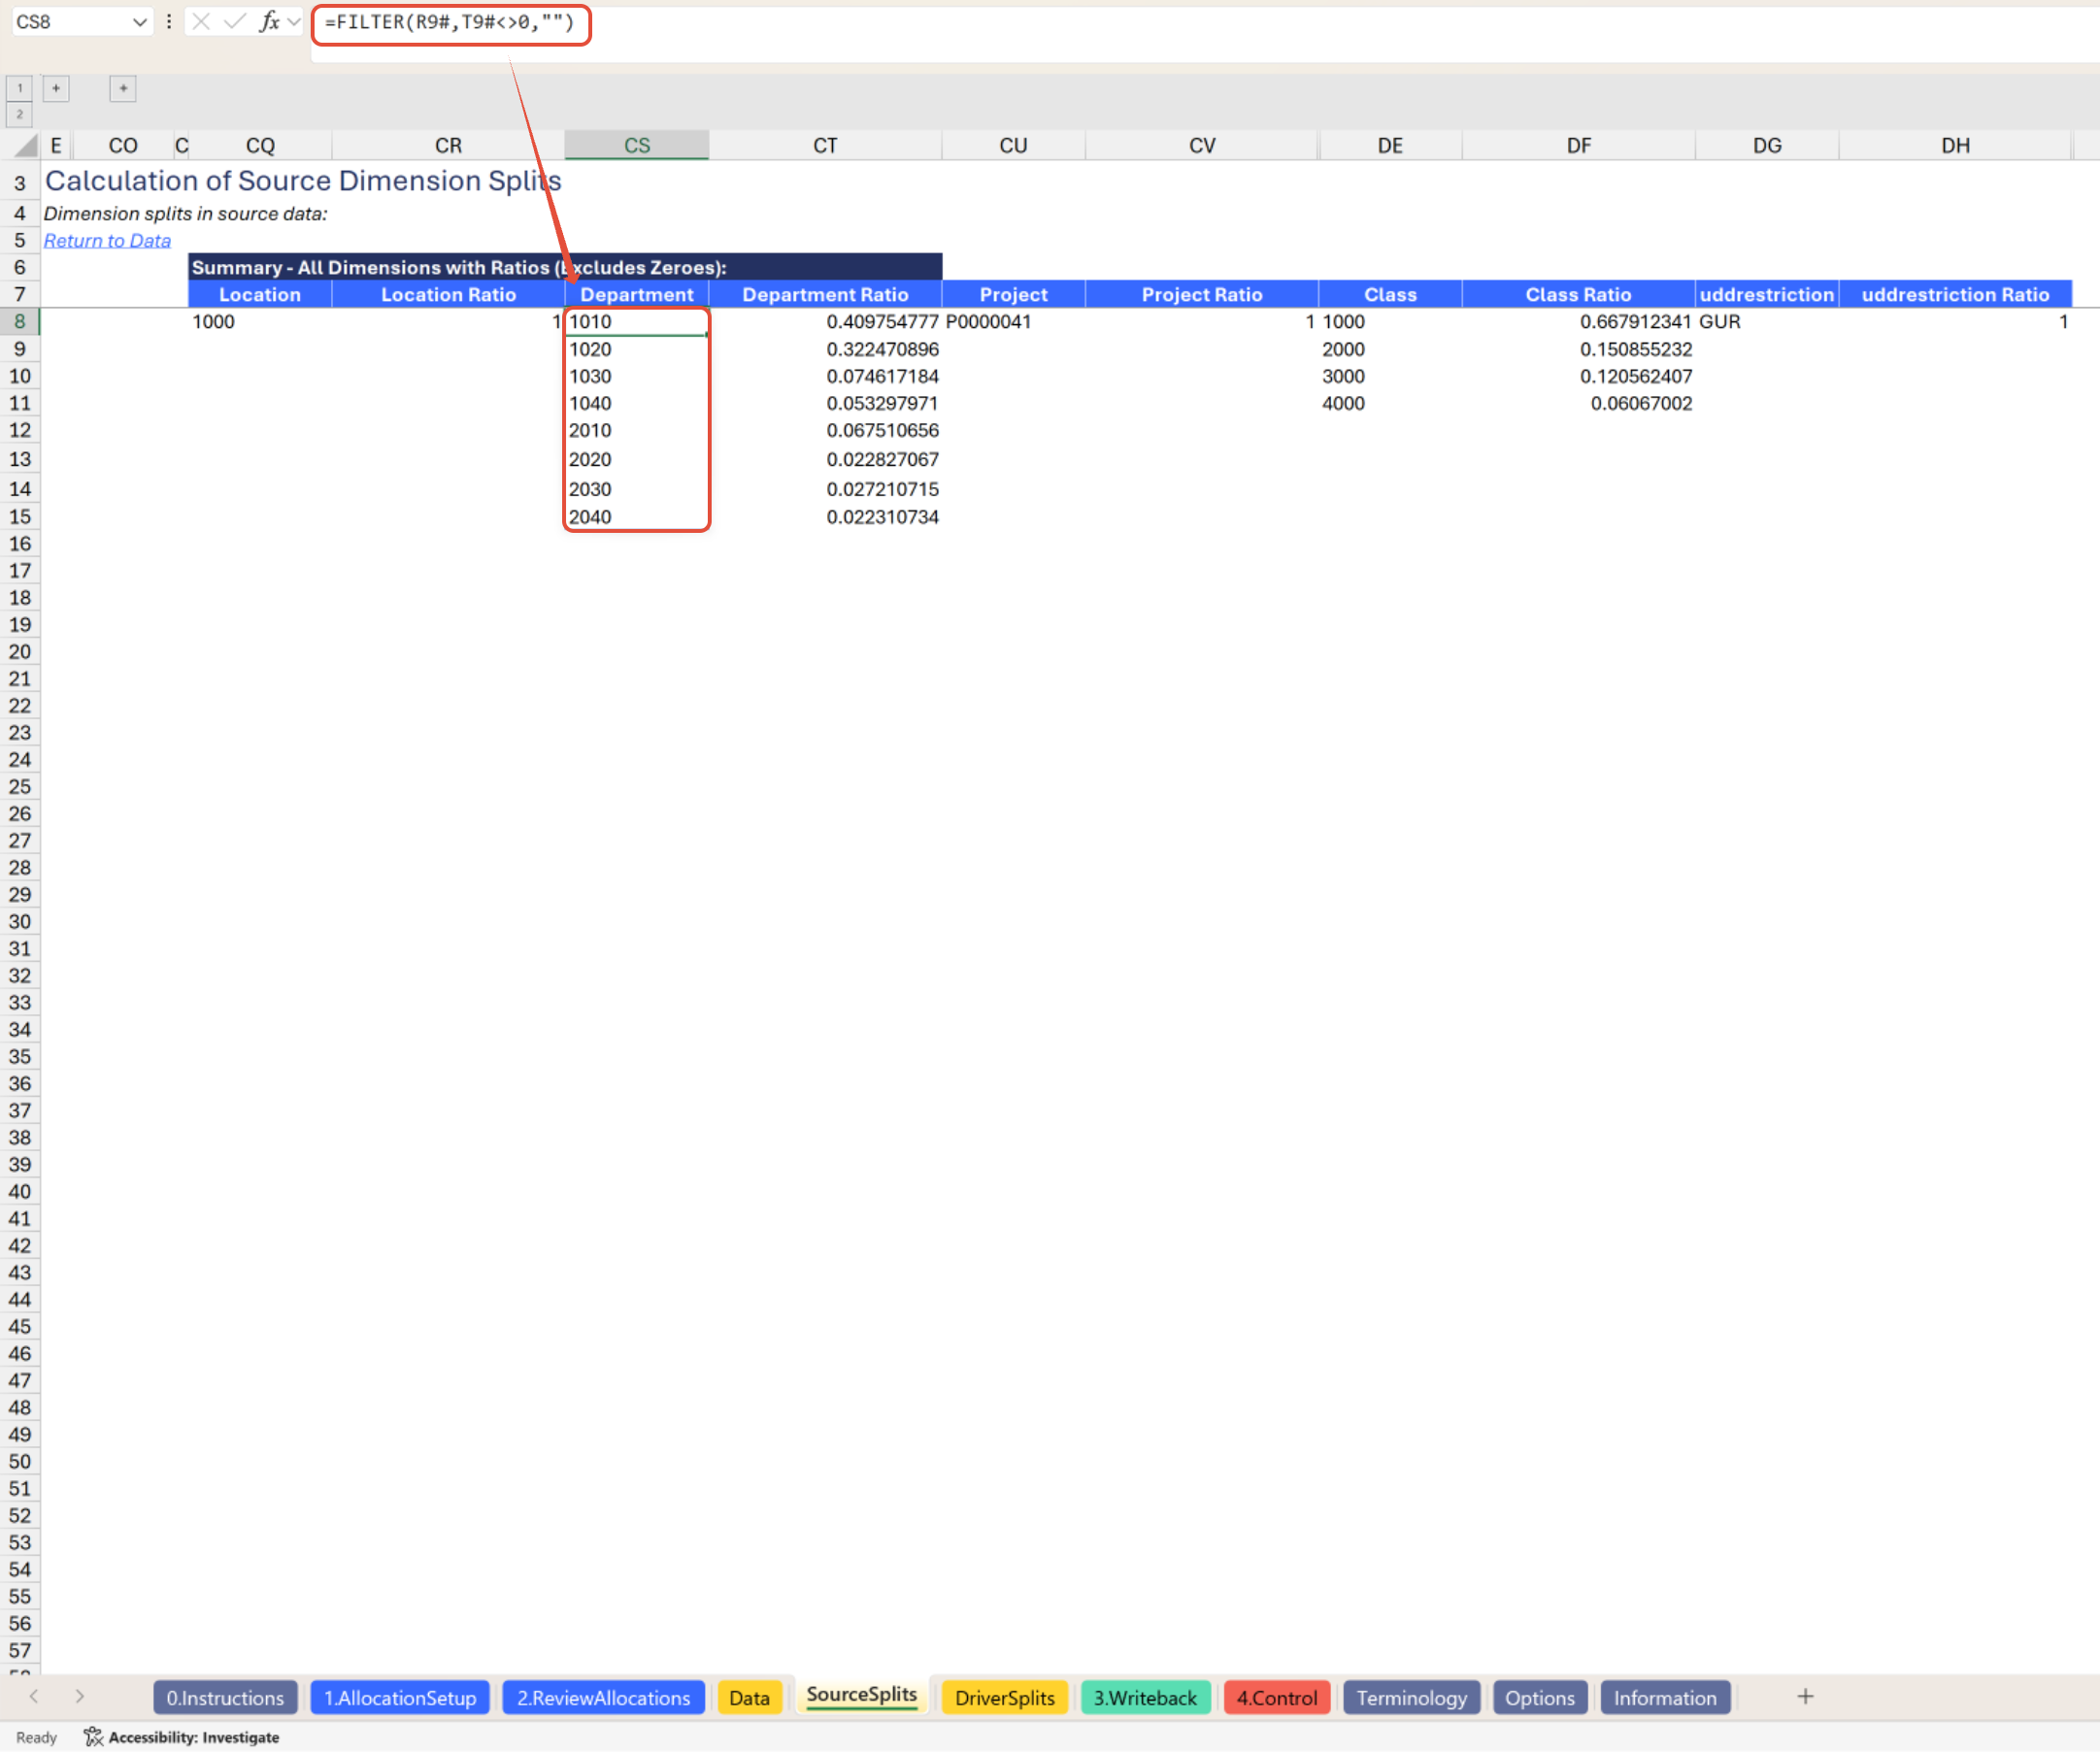
The tab aggregates all dimension summaries into a single output for ease of review. This is the only output visible by default, and its formulas simply reference the detail.
Example:
Driver Splits Tab Formulas
Like the Source Splits tab, all formulas used on this tab are standard Excel formulas. This tab serves to document the ratios (percentages) used to derive your allocation entry. The outcomes of the formulas on this tab are as follows:
For any dimension with allocation behavior set to No change, retrieve the dimension's results as listed on the Source Splits tab.
For any dimension with allocation behavior set to Allocate, return a detailed list of GL accounts, dimensions, and amounts for each row present in the Allocation Driver.
For each dimension, create a summary of total amounts and percentage ratios per unique dimension ID.
As the formulas in the Driver Splits tab are very similar to the Source Splits tab formulas, and in the interest of finding some opportunity for brevity in an already lengthy document, no screenshots will follow for this tab.
3.Writeback Tab Formulas
Within the 3.Writeback tab, the following primary formula types are used:
Allocation Entry Dimensions Determination
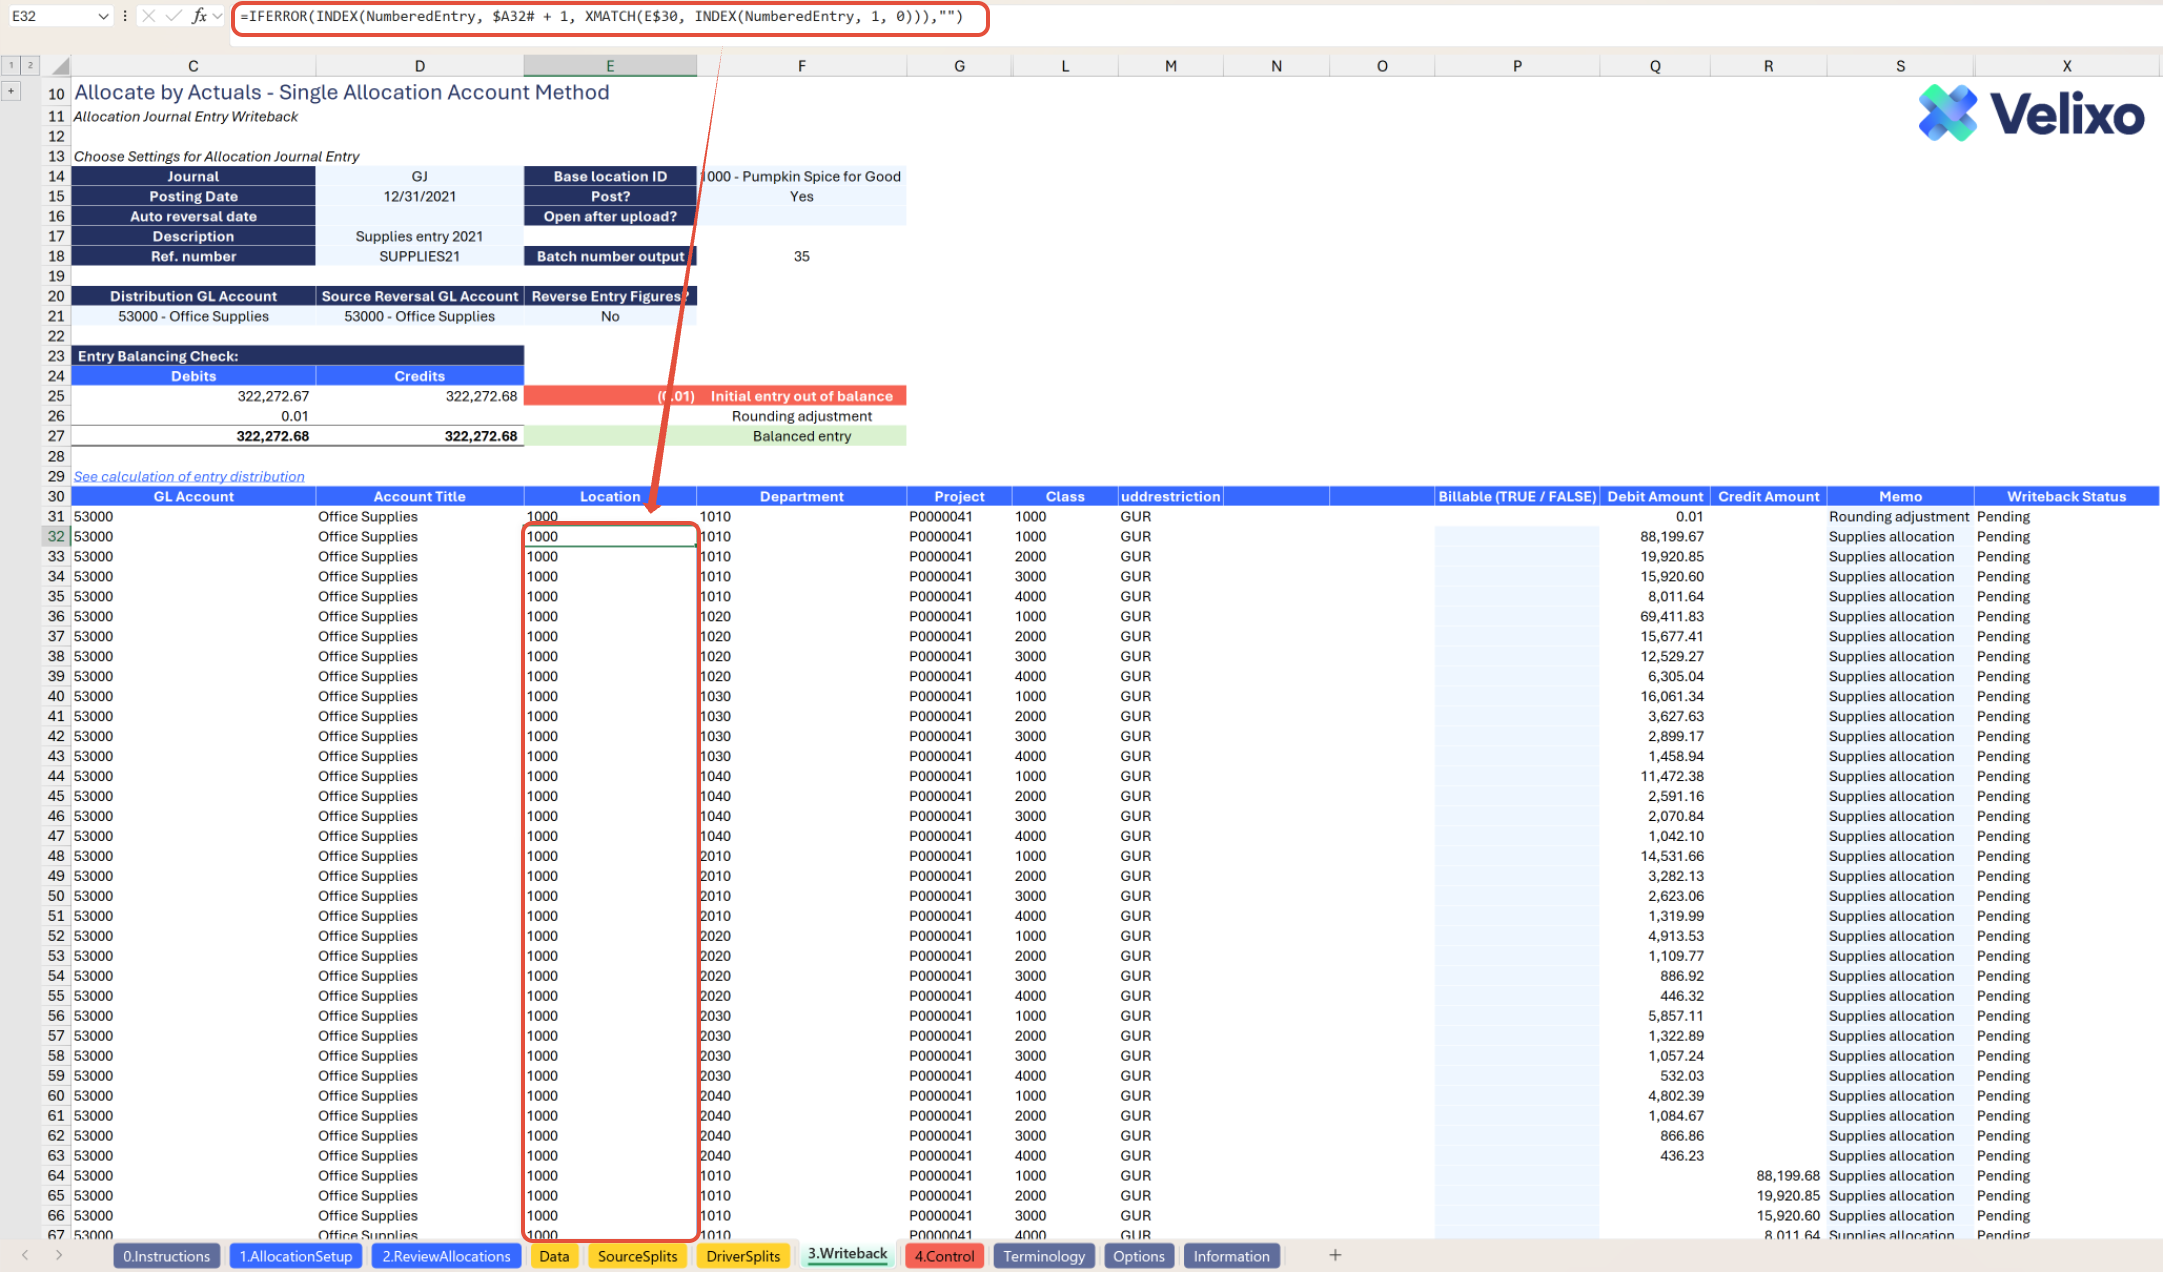
In Columns E through O Velixo used standard Excel formulas to determine the dimension values needed on the allocation journal entry line levels. Generally, these formulas leverage functions such as INDEX and XMATCH to reference a rounded version of the calculations documented on the 2. Review Allocations tab (a named range called NumberedEntry) and return the proper rows for the column, if any. The end result is that, for all dimensions where the behavior for allocation is set to either Allocate or No change, the appropriate values for that dimension will be returned.
To avoid unnecessary entry lines, the logic used here omits cases where both the Debit Amount and Credit Amount are zero.
To ensure flawless execution, the function is wrapped in an IFERROR statement that returns blank if an error occurs.
Allocation Journal Entry Writeback
In Column X, Velixo used the SI.WRITEBACKJOURNALfunction to prepare journal entry data for writeback to your Sage Intacct instance. The function references data from the row-level details to send information to Sage Intacct upon writeback execution.
To ensure flawless performance of the function, IF statements are included to assess which SI.WRITEBACKJOURNAL arguments to include based on the dimension content of your entry row. This formula will:
(1) Skip writeback for the line if the line has no debit or credit amount
(2) Use a version of the SI.WRITEBACKJOURNAL function that skips the UserDefinedDimensions argument if there are no UDDs to write back on the journal entry line
(3) Use a version of the SI.WRITEBACKJOURNAL function that skips the Dimensions argument if there are no standard dimensions to write back on the journal entry line
(4) Use a version of the SI.WRITEBACKJOURNAL function that includes both the Dimensions and UserDefinedDimensions arguments in substantially all other cases.
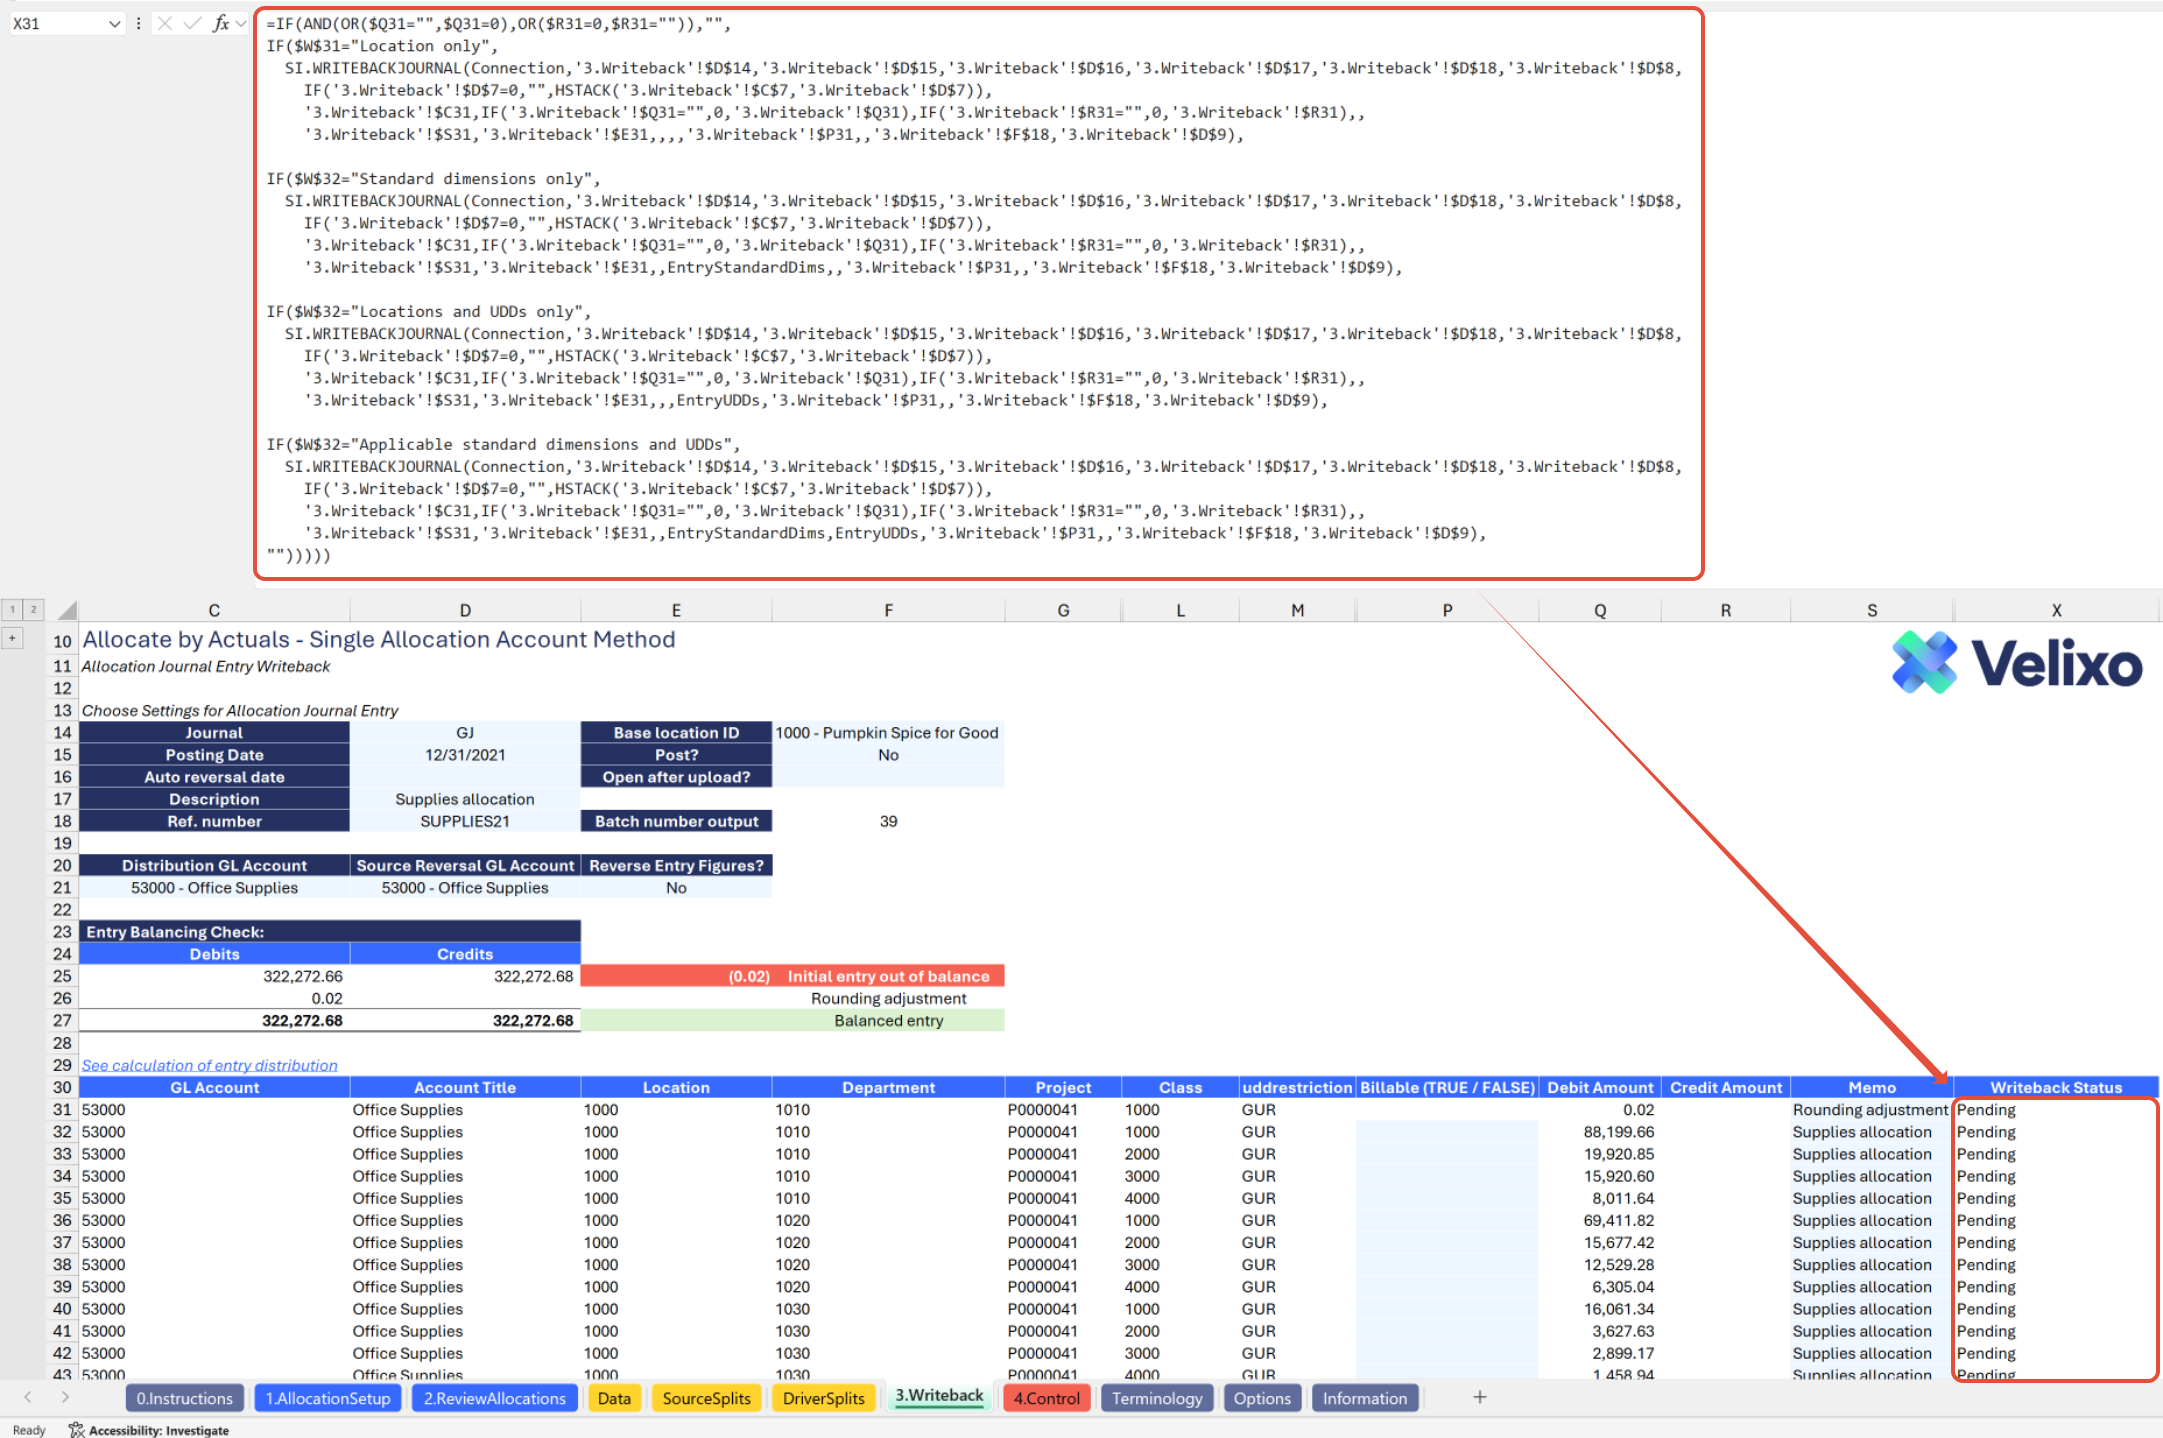
The writeback formula is prefilled on the through row 1599. If you have a longer allocation journal entry to write back, simply copy/drag the formula down from the cell above as needed.
Customizing the Template
Reviewing the Options sheet
The Options tab comprises Sage Intacct dimensions, and other attributes and structures used in the tool. The information updates in real-time with Velixo app refresh, facilitating immediate integration of newly added ERP data into the tool as filters. Due to the volume of information potentially available, this information is organized into collapsed groupings for a less overwhelming, easier user experience.
This includes:
Connection Name
Accounting Settings
Standard Dimensions (Location, Department, Project, Customer, Vendor, Employee, Item, Class)
User Defined Dimensions (Prebuilt to account for up to three UDDs, though you can customize for as many as you like if you have more)
Books
GL Accounts
Account Groups
Reporting Periods
Finally, a Template-Specific Lists/Filters section contains helpful reference for formulas/ranges used by other operations in the sheet (these should not be edited unless you intend to customize the template).
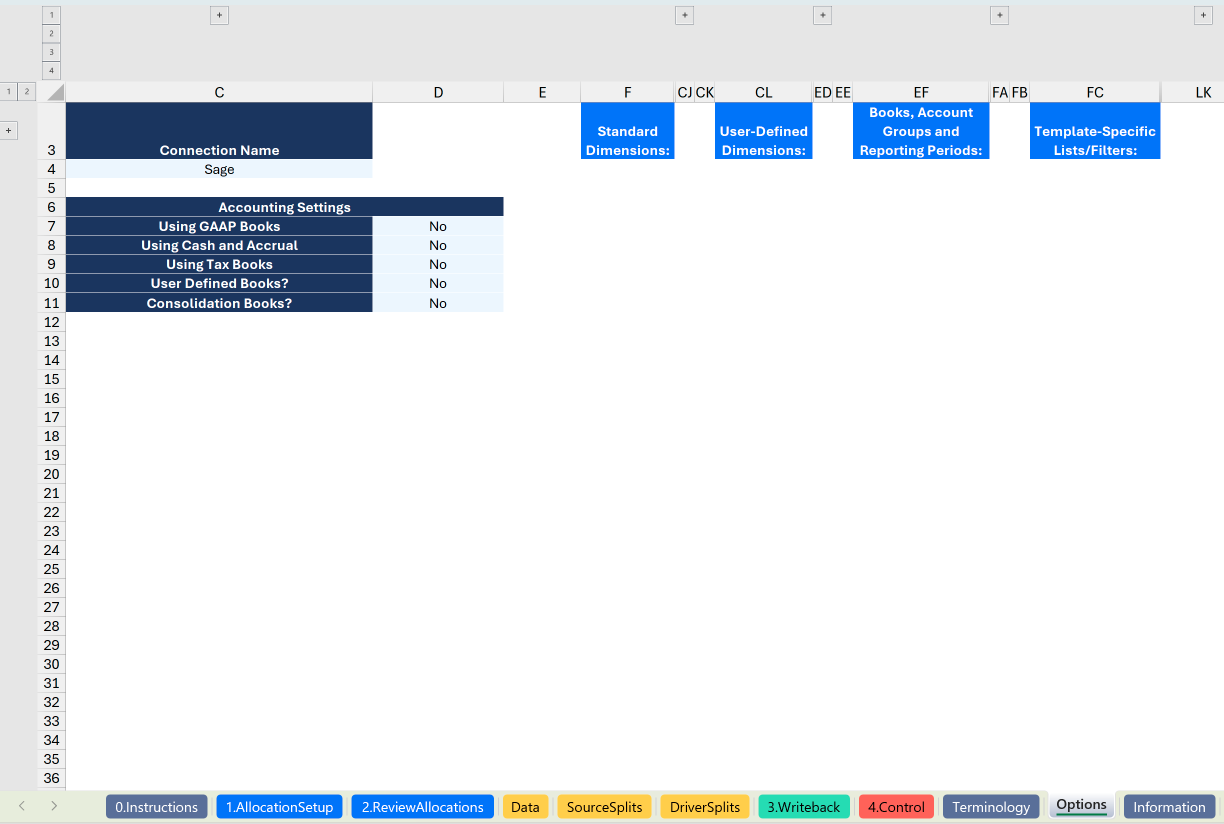
The Connection Name is subject to variation depending on the user input provided through the Velixo login portal. For convenience, users may add the connection name used on cell C4. This cell has been designated as a named range (Connection), ensuring its automatic application to all formulas throughout the sheet.

Users can also customize their dimensions by adding their preferred custom values, using a list and ranges as described in this article. The ability to define custom values for grouping is prebuilt into this template for standard dimensions, user defined dimensions, and books.
To do so:
Expand the column group for your desired dimension (eg., Location or Department).
Then, simply input the desired values in the Group formula and Custom group name columns, highlighted in blue for quick identification.

Adding Rows or Columns
If you choose to add rows or columns to this tool, we recommend that you do so only outside the range of the existing tool structure. This is because most functions in this tool are built leveraging Excel's dynamic array formula. Adding data that interrupts a dynamic array (whether intentional or otherwise) is likely to result in a #SPILL error, which may prevent the tool from executing necessary operations. It is important that any new user data introduced is inserted outside the bounds of dynamic array functions.
Deleting Rows or Columns
We strongly recommend against deleting rows or columns that contain content as part of this tool. The nature of an allocations tool requires tight references between data sources, and Velixo has thoughtfully constructed the formulas in this tool to handle and gracefully bypass exceptions where a data point might not exist. Instead, we encourage you to simply hide rows or columns (or even entire tabs) that you prefer not to see. It is possible that deleting an existing row or column in the tool may result in errors, and if you encounter such a scenario, you should either restore to a file version pre-deletion or download another copy of the tool from Velixo.
The above does not apply to your own rows or columns you may have created outside the range of the existing tool structure.
If you encounter any issues, we recommend contacting Velixo support.
Version history
Version | Released on | Changes |
1 | August 5, 2025 | N/A. Initial version of the template. |